Odroid N1 as NAS in a 19″ rack
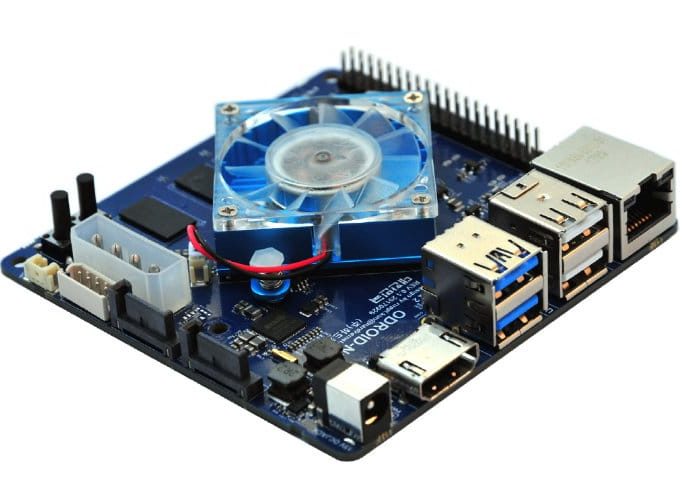
Odroid N1
There is some months ago now, I was offered an ODROID N1 by Hardkernel for a debug party. Being short in time, I could not publish something earlier. But here it is, I used this SBC as a NAS to replace my Banana PI based solution.
The ODROID N1, is a lot more powerfull and I plan to use it for more than NAS activities in the future (I think about a custom docker registry and an ELK server).
For now, let’s focus on what I use it for now : a very good NAS !
Hardware
19″ rack mount case
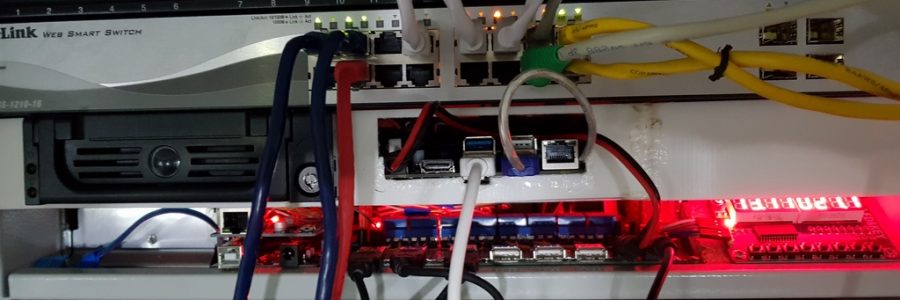
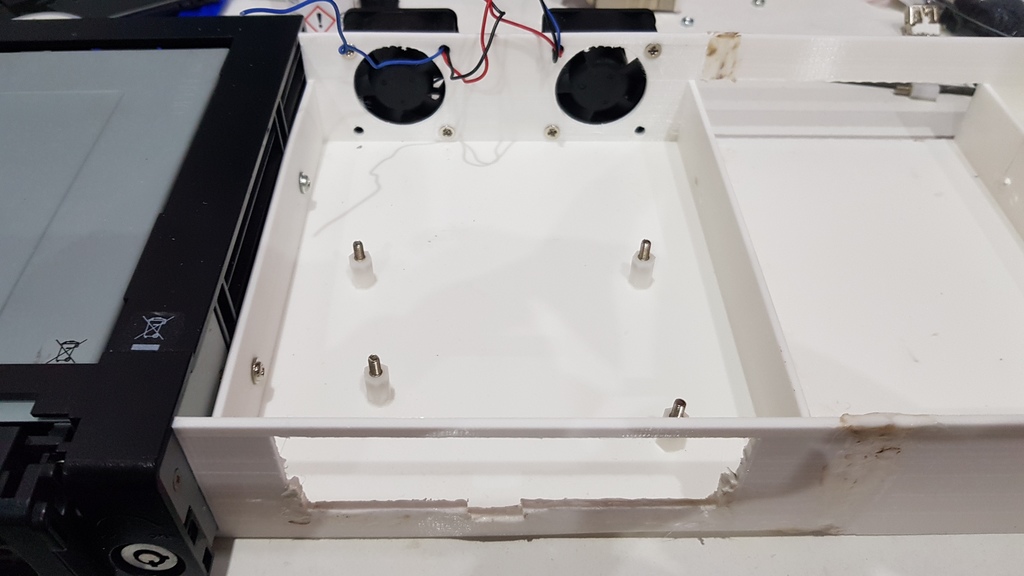
I put all my servers (and my smartpower) in a 19″ cabinet. This NAS makes no exception. To do so, I created a custom enclosure for the Odroid N1.
Files can be found on Thingiverse. I printed it in three parts so it fitted my 20x20x20 printer. However, the original Freecad source file is available.
The enclosure provides the following:
- one 5.25″ bay, for a removable 3.5″ HDD for example
- one 3.5″ bay for an full size HDD
- enough space behind the Odroid N1 to put a 2.5″ device (e.g: a SSD)
- 2 holes for 40 mm fan
- some space for 2 leds (e.g: HDD activity leds)
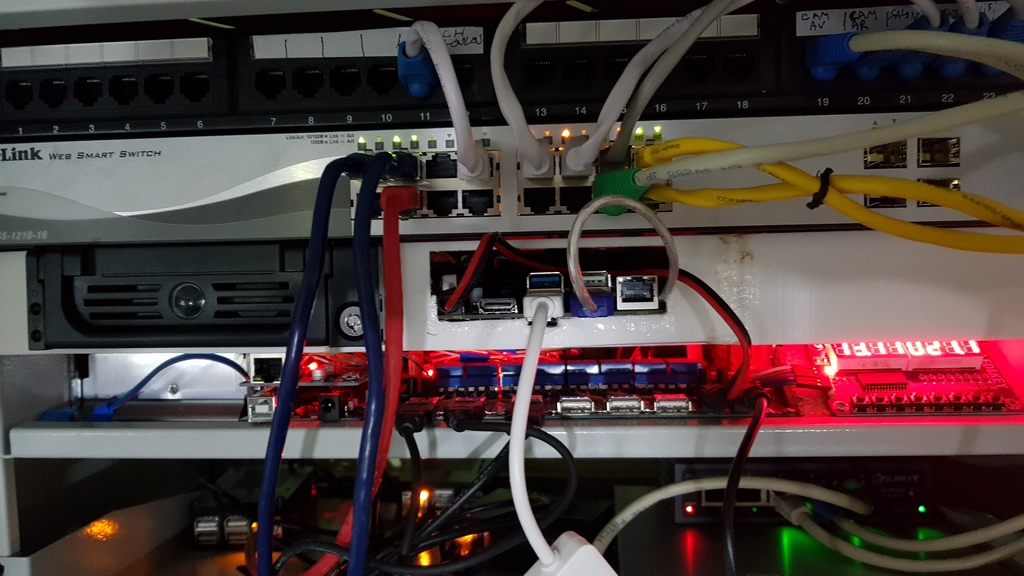
As seen in the photo below, I used the originals skrews and glued them on the printed enclosure to fix the Odroid N1:
Final result in my 19″ cabinet (the white layer on the middle):
Used parts
The whole solution is composed of:
- 2 x 3.5″ Sata HDD of 4TB mirrored on a nightly (I don’t like RAID with 2 disks)
- 1 x 120 GB SSD (kingston A400) used for /var (in prevision for ELK storage)
- 1 x 16 GB EMMC for root filesytem (given with the board)
- 2 leds and 2 resistors for disk activity monitoring
- A USB 3 gigabit ethernet adapter to add a second NIC
- Some wire for the 12V hack bellow
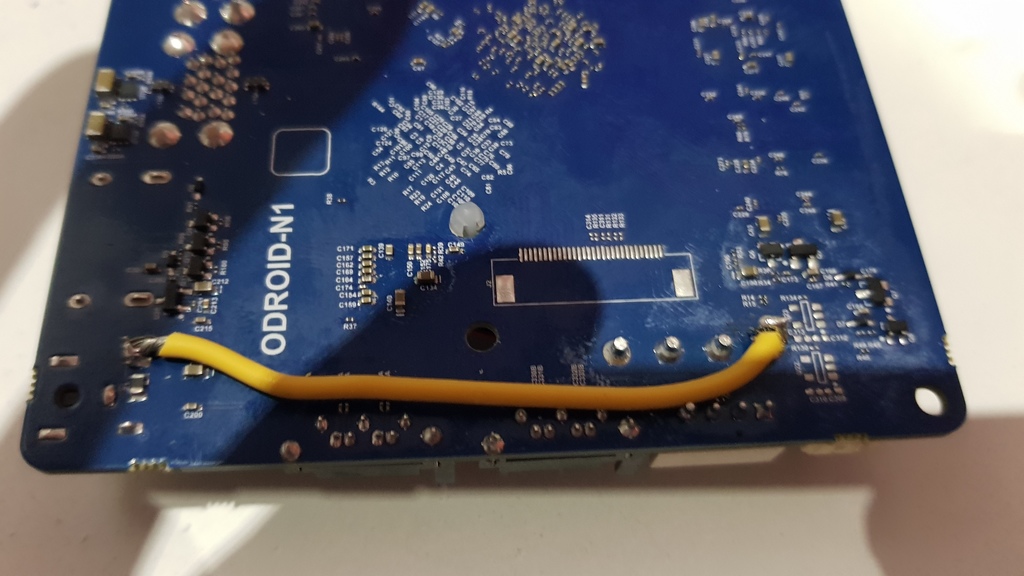
12v hack for molex connector
The board being a “test model” it has some issues. Onw is missing 12V output on the onboard molex connector. As I had two 3.5″ HDD to power, I did a little modification on the board, like someone else documented it on the official forum.
The hack simply consists in wiring the barrel connector input to the 12V pin of the molex connector. Of course, in that case the N1 has to be powered with 12v…
Front leds for mmc activity and heartbeat
I wanted to have some emmc and heartbeat monitoring. I just made a small board with two leds and resistors. I wired them to the Odroid N1 GPIO and modified the kernel device tree mapping.
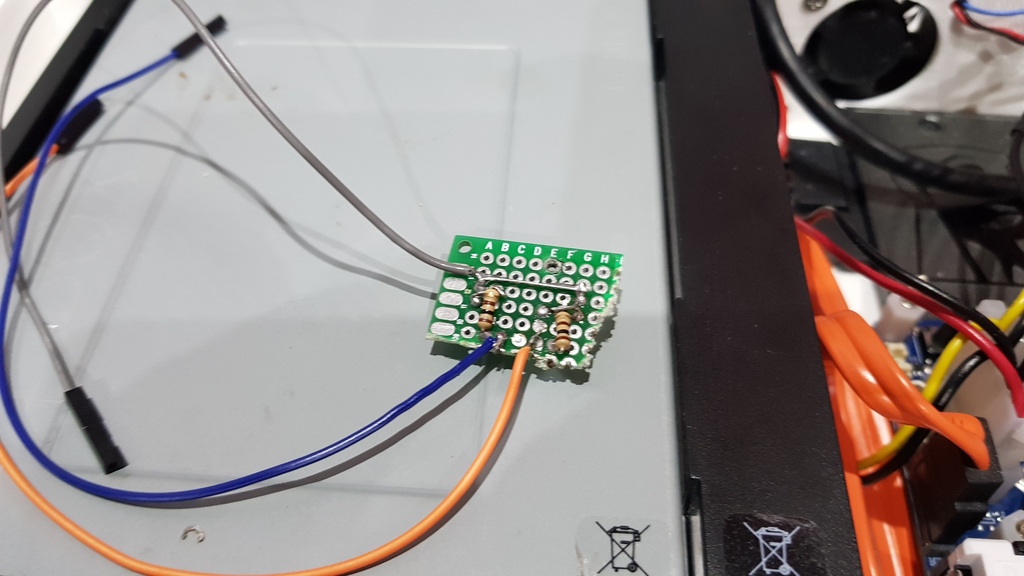
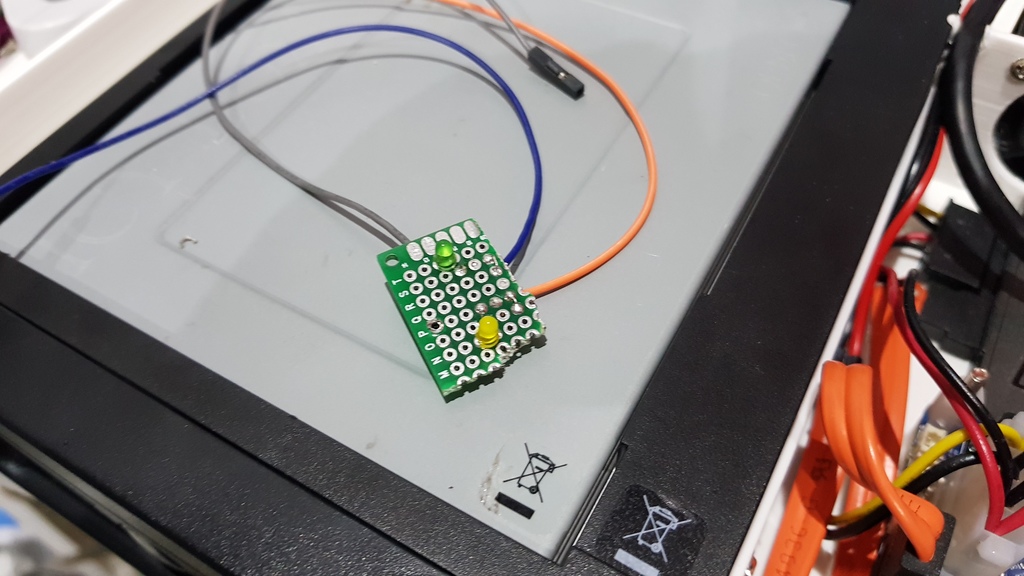
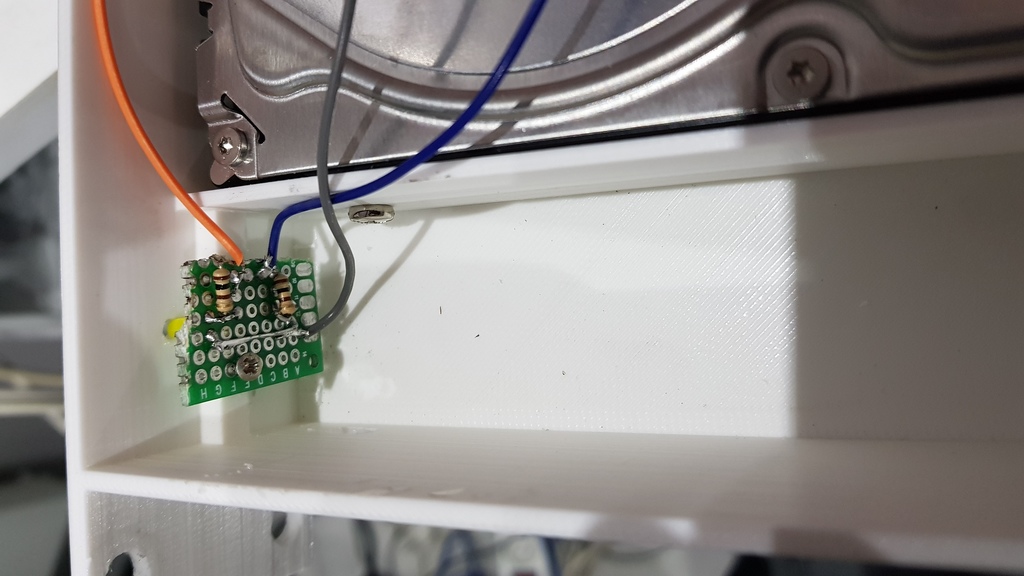
Leds board skrewed to the enclosure
In order to make the leds working, I modified the device tree as following
In arch/arm64/boot/dts/rockchip/rk3399-odroidn1-linux.dts I added the following in the section “leds: gpio_leds” :
|
1 2 3 4 5 6 7 8 9 |
fronthb { gpios = <&gpio1 13 GPIO_ACTIVE_HIGH>; linux,default-trigger = "heartbeat"; }; mmc { gpios = <&gpio1 18 GPIO_ACTIVE_HIGH>; linux,default-trigger = "mmc1"; }; |
Important : gpio number can be found in file include/dt-bindings/pinctrl/rk.h. In my case, GPIO 45 and 50 are named GPIO1_B.5 and GPIO1_C.2, so the corresponding numbers for the devicetree are GPIO1_B5 and GPIO1_C2 in the file rk.h.
Initialization
Install archlinux
I received the Odroid N1 with a 16GB emmc module containing a Debian Linux. Being a fan of Archlinux I replaced the installed OS.
The is no official support form Archlinuxarm, but the Odroid N1 uses the same SOC than the supported ChromeBook (RK3399). So the main steps was to keep the kernel and modules and replace the root file system with archlinuxarm’s 64 bits root file-system archive.
Form another computer, I mounted the emmc module:
|
1 2 3 |
cp -R /lib/modules /some/safe/location rm -Rf / bsdtar archlinuxarm |
As there is no official support from archlinuxarm, the kernel should never be updated though pacman. So I added the following to /etc/pacman.conf:
|
1 |
IgnorePkg = linux-aarch64* linux-firmware* |
updated all:
|
1 |
pacman -Syu |
Changed /etc/fstab to allow /boot (emmc) mount and specific options for / (emmc), /var (ssd) and /home (hdd)
|
1 |
/dev/mmcblk1p1 /boot vfat defaults,noauto 0 0 |
|
1 2 3 4 |
/dev/mmcblk1p2 / ext4 defaults,noatime,nodiratime 0 1 UUID=xxxxxxxxx /var ext4 nodev,noatime,discard,errors=remount-ro 0 1 UUID=xxxxxxxxx /home ext4 nofail,noauto,nodev,nosuid,relatime,noexec,async,x-system.device-timeout010 0 2 |
To make it clear :
- Disable “atime” everywhere for performance and/or to lesser flash drives writes
- Activate “discard” option for the SSD to enable trim
- Enhance security a bit /home partition and make it never block the boot process (the system itself can leave without /home mounted)
Finally, I moved back /home/alarm temporarily, just to be able to login as “alarm”, this user will be deleted later…
Cross compiling the kernel
After reboot was successful, it was time to build a new kernel.
I used Linaro toolchain on m x86 laptop :
|
1 2 |
wget https://releases.linaro.org/components/toolchain/binaries/latest-7/aarch64-linux-gnu/gcc-linaro-7.3.1-2018.05-x86_64_aarch64-linux-gnu.tar.xz tar -xf aarch64-linux-gnu/gcc-linaro-7.3.1-2018.05-x86_64_aarch64-linux-gnu.tar.xz |
Then I cloned the latest Odroid N1 kernel:
|
1 |
git clone https://github.com/hardkernel/linux.git --depth 1 -b odroidn1-4.4.y |
On my x86 Archlinux, I had to change the file in scripts/gcc-wrapper.py to use python2 (first line):
|
1 |
#! /usr/bin/env python2 |
Then I compiled the kernel and installed modules to a dedicated directory to copy them on the Odroid N1 after the build:
|
1 2 3 4 5 6 7 |
export ARCH=arm64 export CROSS_COMPILE=/opt/gcc-linaro-7.3.1-2018.05-x86_64_aarch64-linux-gnu/bin/aarch64-linux-gnu- make odroidn1_defconfig make menuconfig make -j5 mkdir /tmp/modules_N1 make INSTALL_MOD_PATH=/tmp/modules_n1 modules_install |
Regarding the initial kernel configuration, I modified the following options:
- preemption set to “server” : this is the true usage of my Odroid N1…
- removed wireless : no need for me
- ipv4 connection traking support : needed for docker daemon
- all iptables option: needed for docker daemon
- bridge: needed for docker daemon
- Posix Mqueue: needed for docker registry
After the build finished, I copied DTB file and Image to /boot (on Odroid N1) and /tmp/modules/4.4.114 to /lib/modules (on Odroid N1 too)
Then on Odroid N1 :
|
1 2 3 4 |
$ reboot [...] $ uname -a Linux filesrv 4.4.114 #2 SMP Sat Jun 30 16:59:47 CEST 2018 aarch64 GNU/Linux |
Deploy saltstack
As I use saltstack to “templatize” all my servers, I installed saltstack master and minion (the NAS will be the master for all others servers). I already documented this here
I’m not going to copy paste all my states and templates here, as it obviously depends on personnal needs and tastes.
Basicaly, my “NAS” template did the following on the Odroid N1:
- Configures my HDDs (mirroring, etc.)
- Set CPU affinity (see benchmarks below)
- Optimized network parameters for gigabit
- Created / removed users (e.g: remove alarm user)
- Install NFS and Samba
- Install docker and deploy a local registry
Some benchmarks
The purpose of theses benchmarks was to see what the Odroid N1 had to offer. I also used them to tune up and adapt my configuration.
Benchmarking is a quite complex task and I don’t claim that I did it 100% correctly !
HDD / SATA
Test protocol
For every parameters I tested, I launched 3 times the following tests
hdparm -tT /dev/sda
dd write 4k:
|
1 |
sync; dd if=/dev/zero of=/home/datas/benchfile bs=4k count=1048476; sync |
dd write 1m:
|
1 |
sync; dd if=/dev/zero of=/home/datas/benchfile bs=1M count=4096; sync |
dd read 4k:
|
1 2 |
echo 3 > /proc/sys/vm/drop_caches dd if=/home/datas/benchfile of=/dev/null bs=4k count=1048476 |
dd read 1m:
|
1 2 |
echo 3 > /proc/sys/vm/drop_caches dd if=/home/datas/benchfile of=/dev/null bs=1M count=4096 |
Tuned parameters
Set readahead
|
1 |
hdparm -a 1024 /dev/sda |
Set performance for pcie_aspm (for cold boot, add “pcie_aspm.policy=performance” to boot parameters):
|
1 |
echo performance > /sys/module/pcie_aspm/parameters/policy |
set cpu performance
|
1 2 3 4 5 6 |
echo performance > /sys/devices/system/cpu/cpu0/cpufreq/scaling_governor echo performance > /sys/devices/system/cpu/cpu1/cpufreq/scaling_governor echo performance > /sys/devices/system/cpu/cpu2/cpufreq/scaling_governor echo performance > /sys/devices/system/cpu/cpu3/cpufreq/scaling_governor echo performance > /sys/devices/system/cpu/cpu4/cpufreq/scaling_governor echo performance > /sys/devices/system/cpu/cpu5/cpufreq/scaling_governor |
Conclusion

Setting readahead to 1024 provided a small enhancement (read). Setting “pcie_aspm” to “performance” gave also another small enhancement while writing.
CPU governor did not to affect that much hdd performance (default is interactive), but I probably reached my HDD max speed…
SSD on USB3 VS Sata
I initially planned to connect the SSD thought USB3. The following tests changed my mind, and I finally connected the SSD throught the native SATA port and the mirrored HDD to USB3.
I used the same test protocols than previously with the HDD.
Here are the results:

Native Network
I only did very basic tests with FTP, Samba and NFS. The change of “txqueuelen” was the only parameter that had a significant impact on write (18%)
I measured the following performance on my network with a 8 Gb file:
- FTP : read = 112 Mb/s, write = 90 Mb/s
- NFS : read = 106 Mb/s, write = 54 Mb/s
- SMB: read = 100 Mb/s, write = 53 Mb/s
Below are the three kind of tuning I tried:
Changing “txqueuelen” (18% faster on write):
|
1 |
txqueuelen 10000: /sbin/ip link set eth0 txqueuelen 10000 |
Assigning eth0 to big cores (no impact on performance)
|
1 |
echo 4-5 > /proc/irq/24/smp_affinity_list |
changing tcp stack settings (no impact on performance)
|
1 2 3 4 5 6 7 8 9 10 |
sysctl -w net.core.rmem_max=8738000 sysctl -w net.core.wmem_max=6553600 sysctl -w net.ipv4.tcp_rmem="8192 873800 8738000" sysctl -w net.ipv4.tcp_wmem="4096 655360 6553600" sysctl -w net.ipv4.tcp_timestamps=0 sysctl -w net.ipv4.tcp_window_scaling=1 sysctl -w net.ipv4.tcp_sack=1 sysctl -w net.ipv4.tcp_no_metrics_save=1 sysctl -w net.ipv4.conf.all.arp_ignore=1 sysctl -w net.ipv4.conf.all.arp_filter=1 |
Pingback: Home Cloud Setup with PXE, Proxmox, SaltStack & k3s – Minimum Effort Guide