Arduino : HTTP driven power switches and UART to telnet gateway
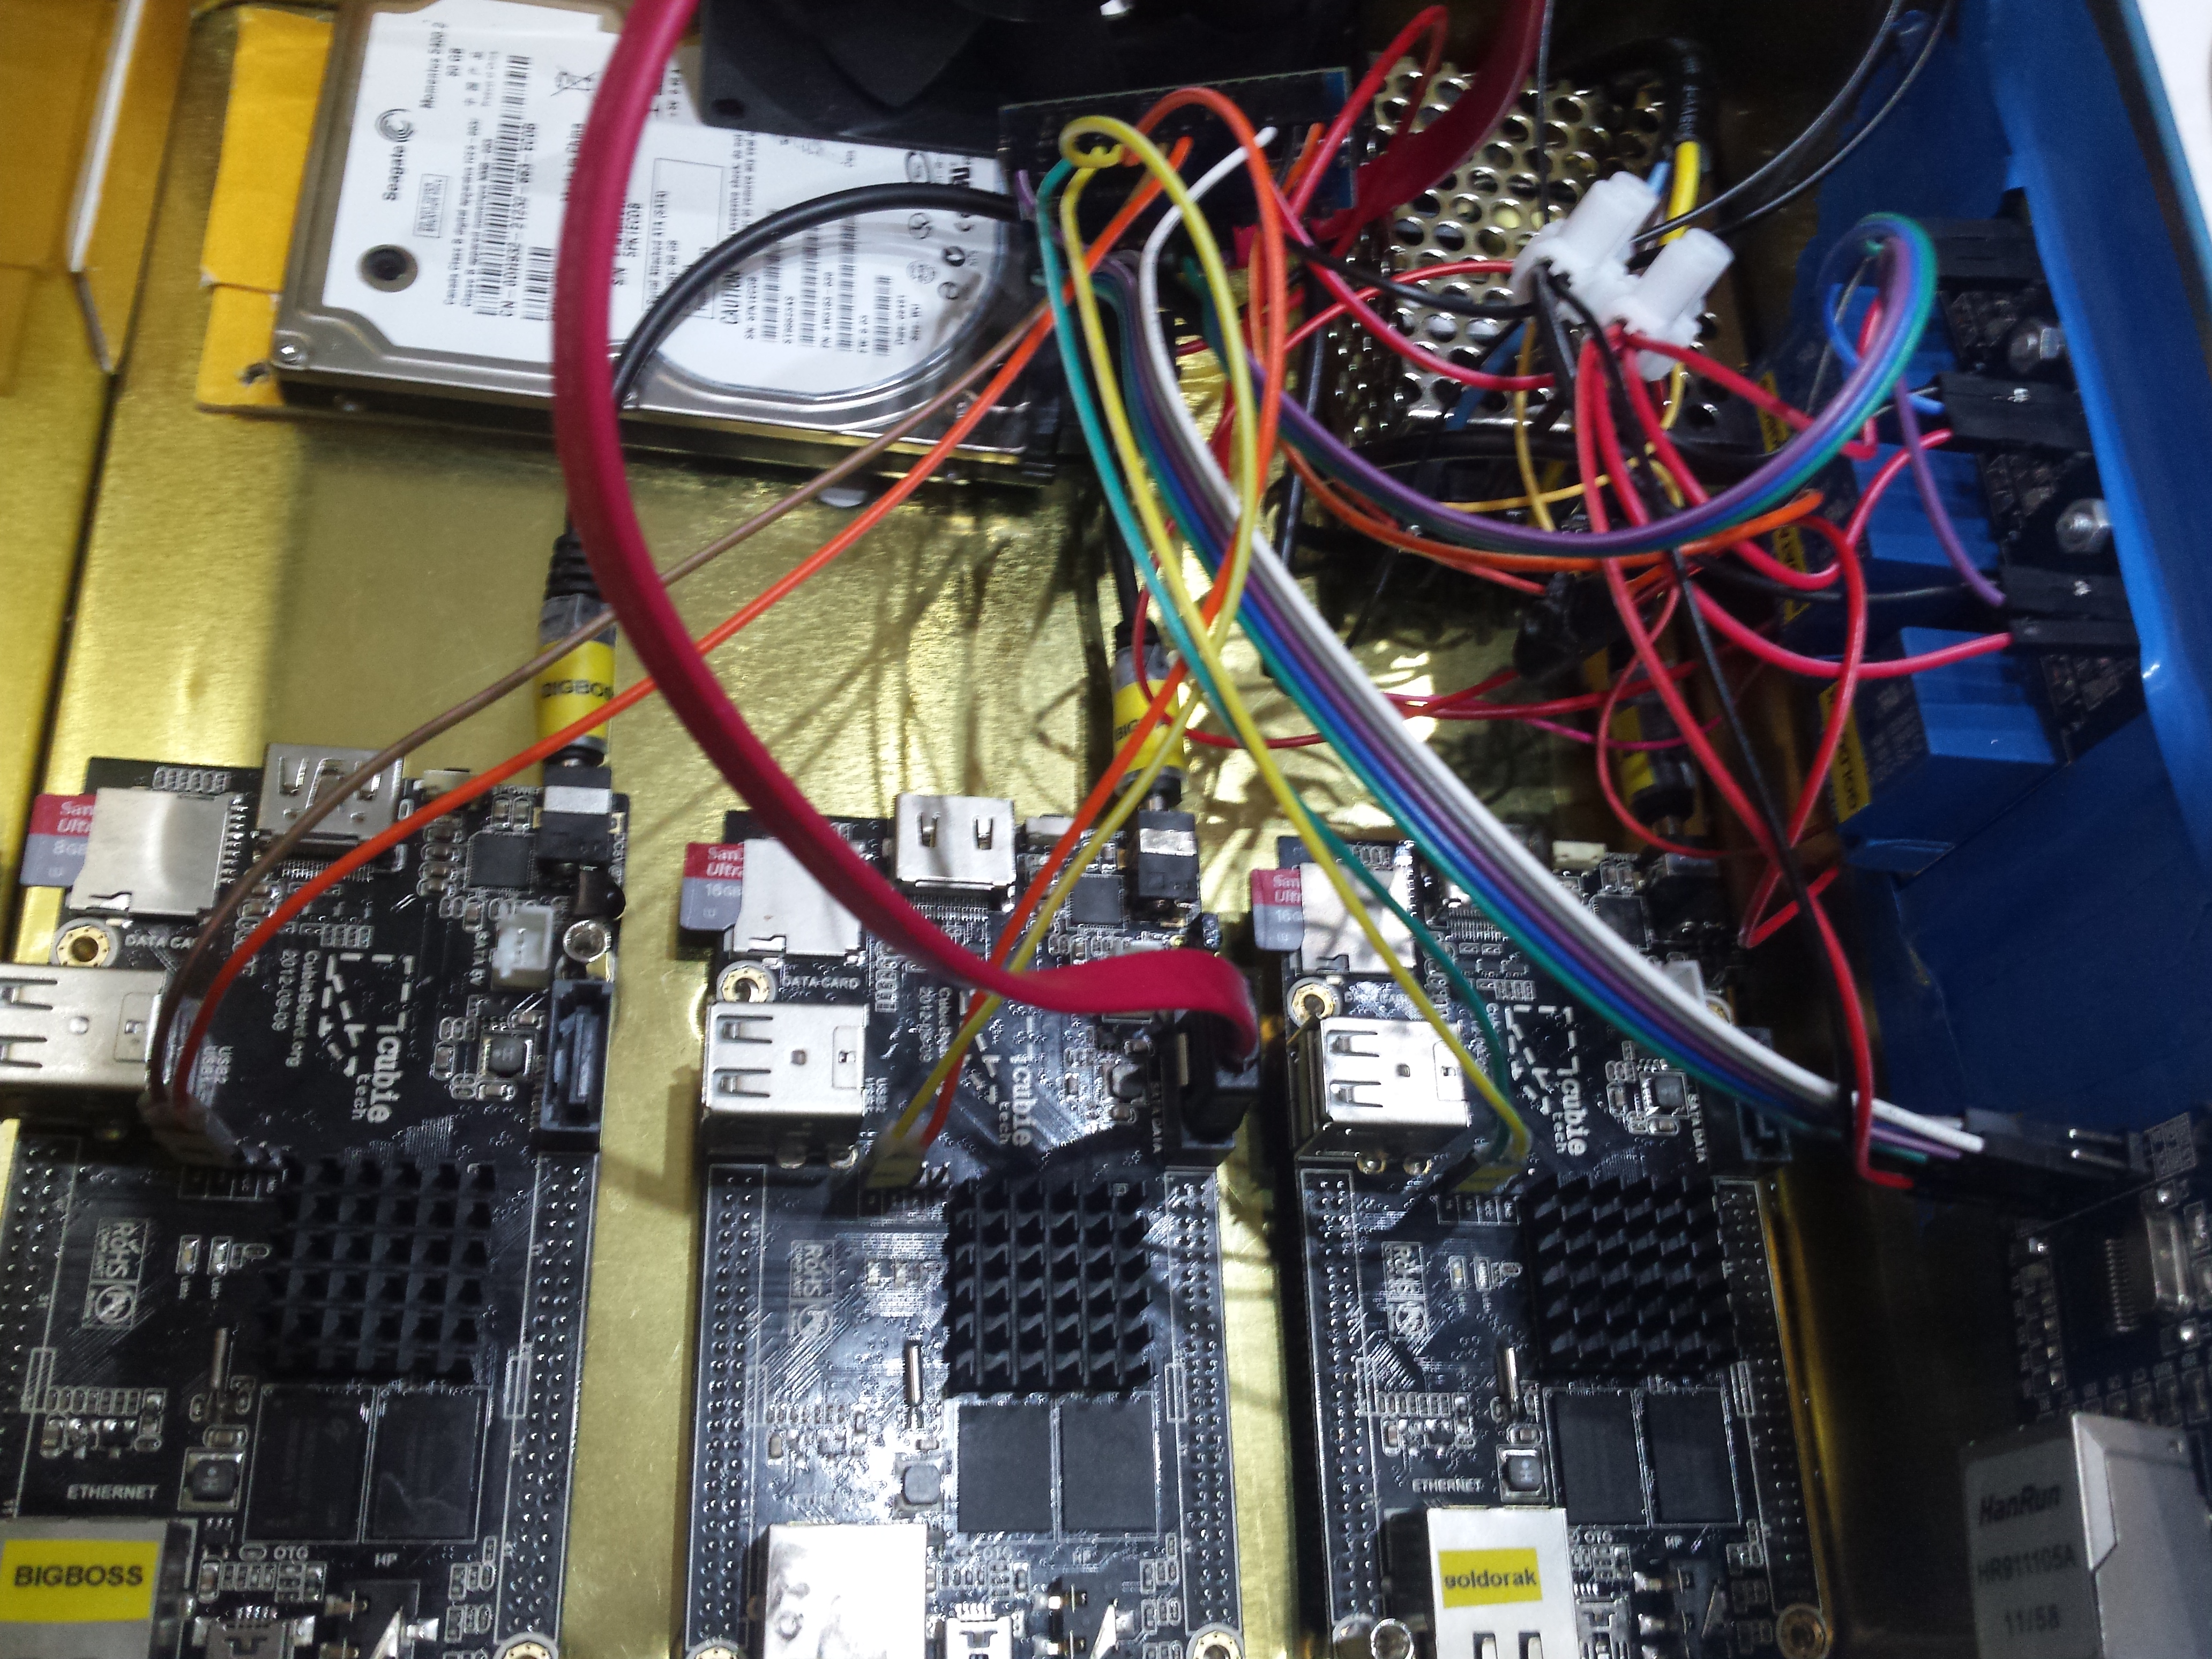
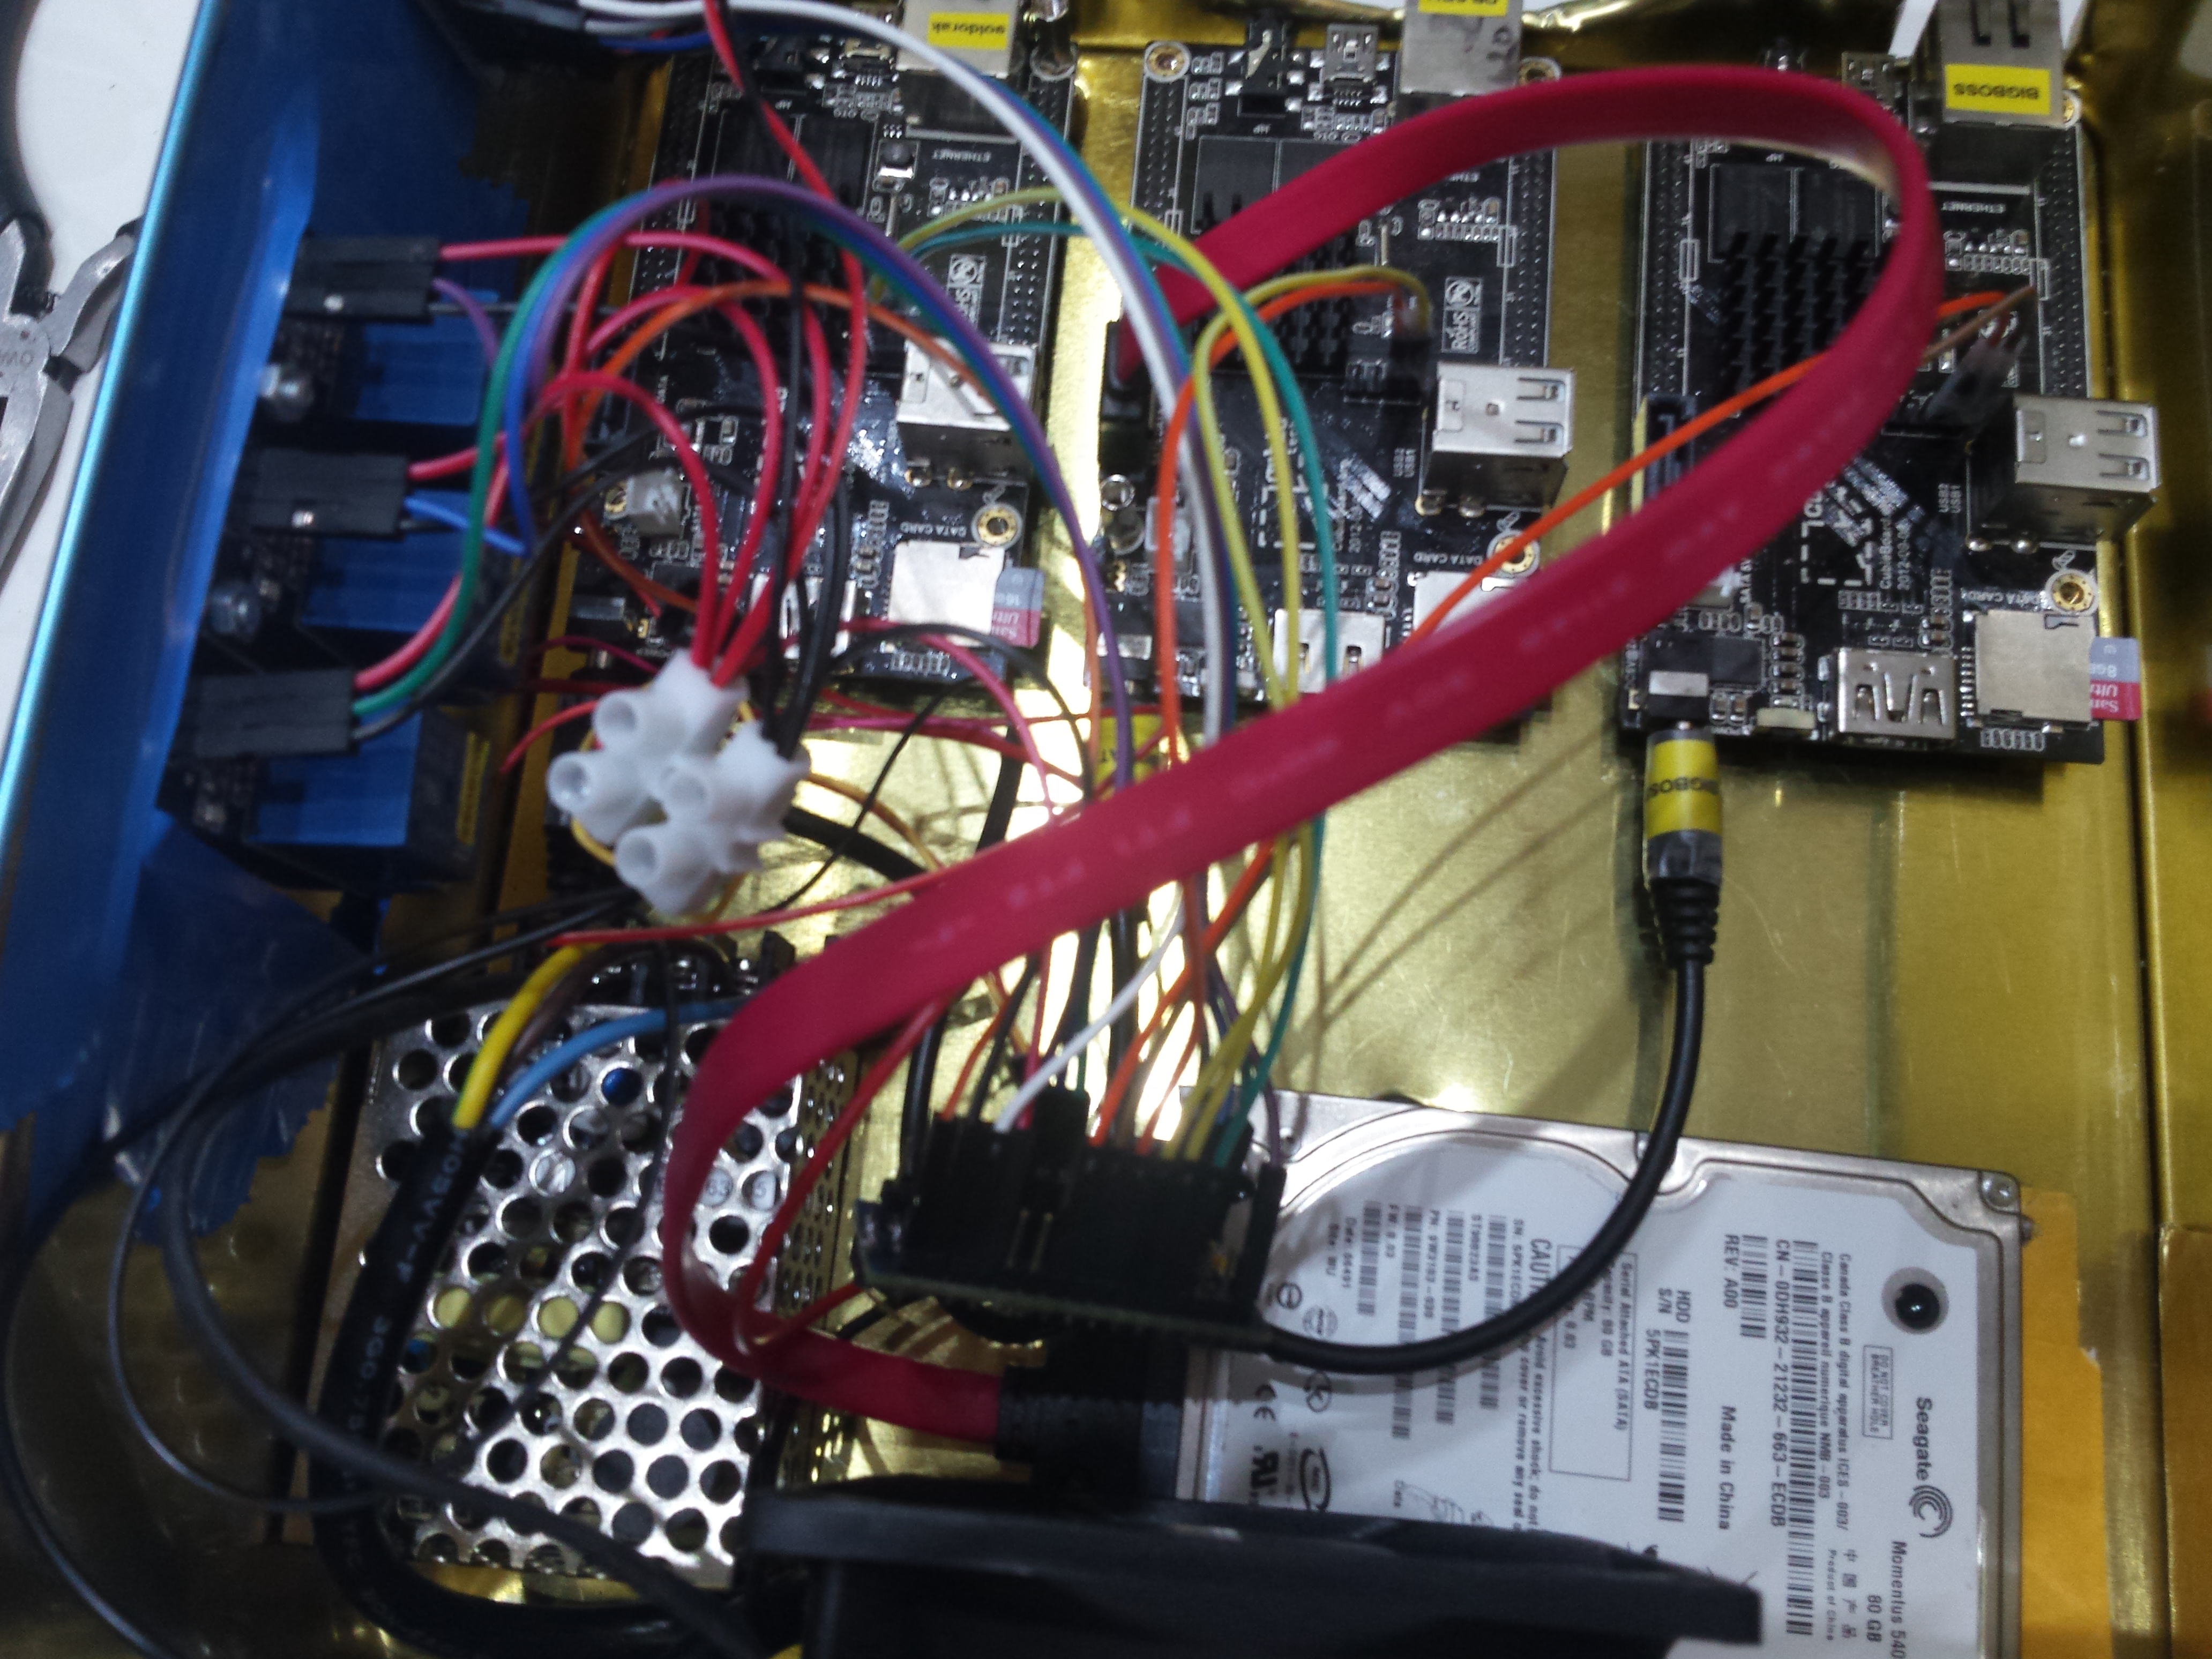
As explained in a previous post, I made a small custom ARM servers bay with 3 cubieboards. Until now, switching power or using UART connection for debugging (headless servers only) required physical accesses. As this server bay is in my garage and not easily accessible, I decided to build an Arduino based solution to switch on/off and debug over my network.
The idea was to use simple HTTP GET urls to turn on or off any server and have UART debug through telnet.
Hardware
Used pieces
- An Arduino Nano clone (as found on ebay for 3 to 5 euros)
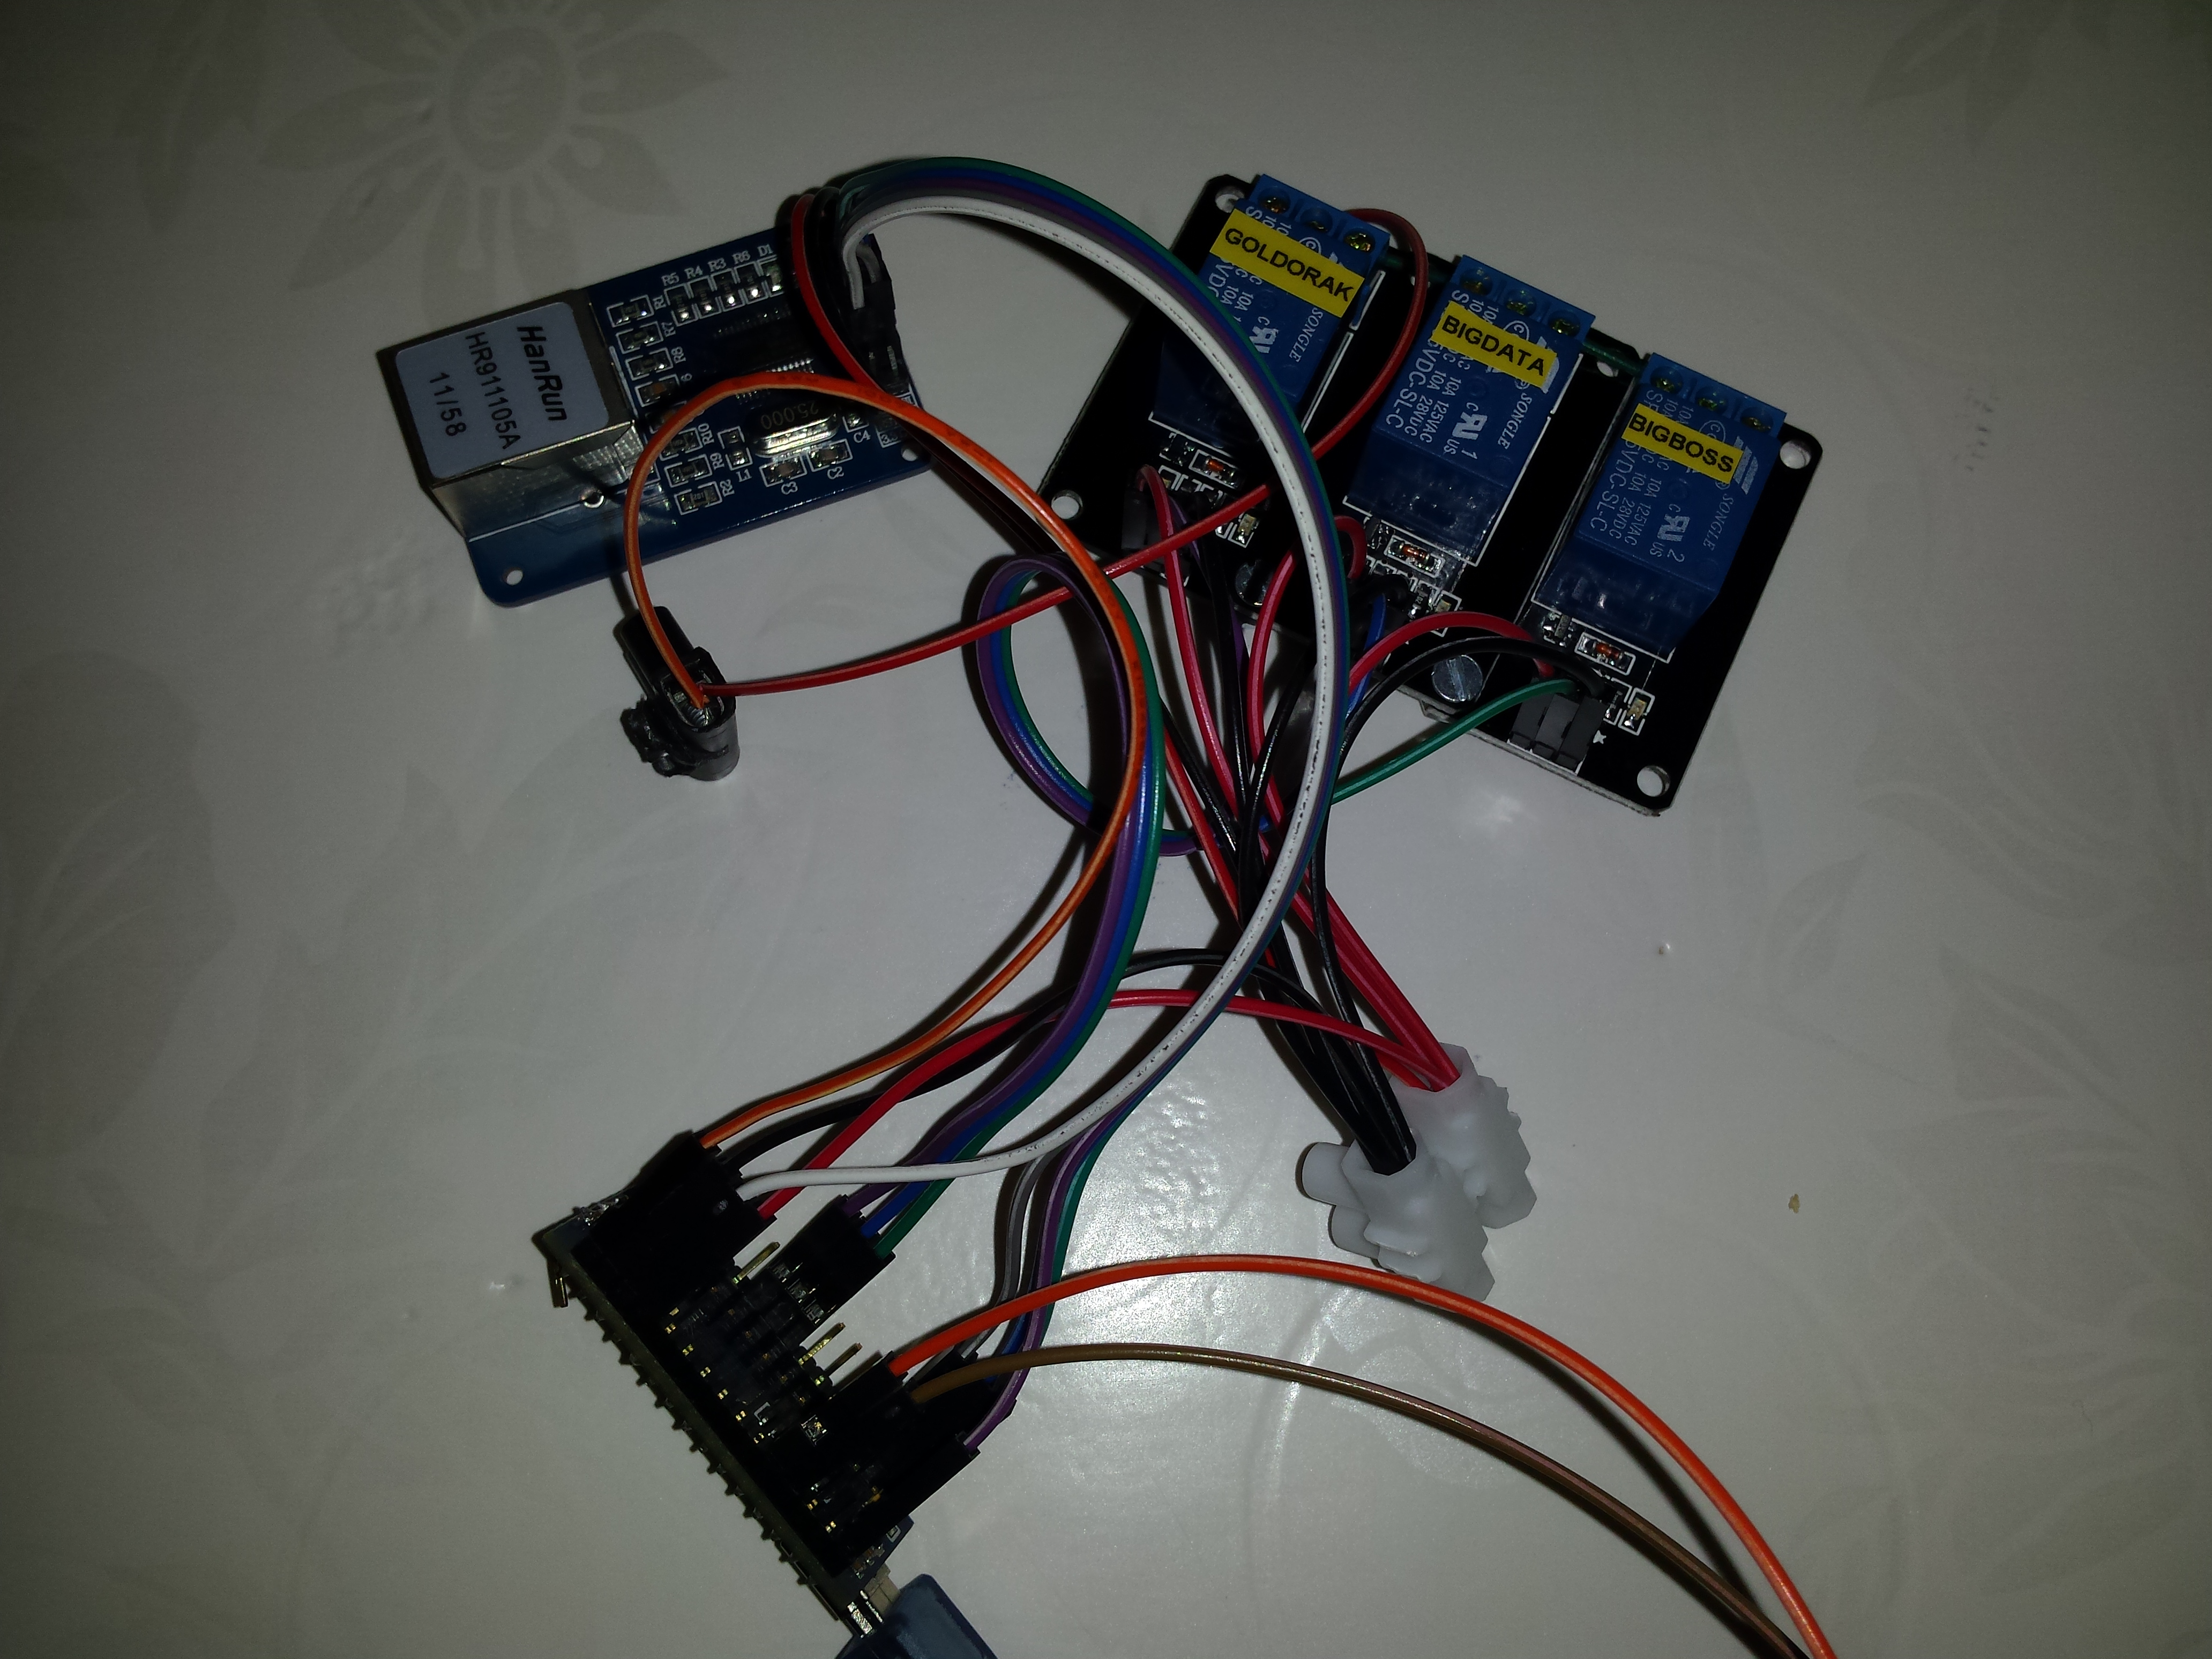
- 3 relay modules
- One Ethernet ENC28j60 shield


Wiring
Wiring ethernet shield is well documented on the web, here for example. I also added a wire from the ENC28J60 “RST” pin to the “Reset” pin of the Arduino, allowing to reset the ethernet shield when the Arduino is reseted. As for the 3 relays, it’s quite straight forward : they require 5v, ground and a wire to any free GPIO of the arduino to drive them (on or off). Each relay must then be connected to the power source that need to be switched on or off. As both Arduino and Cubieboards use 5v, I put all plus and ground together.
All together wired
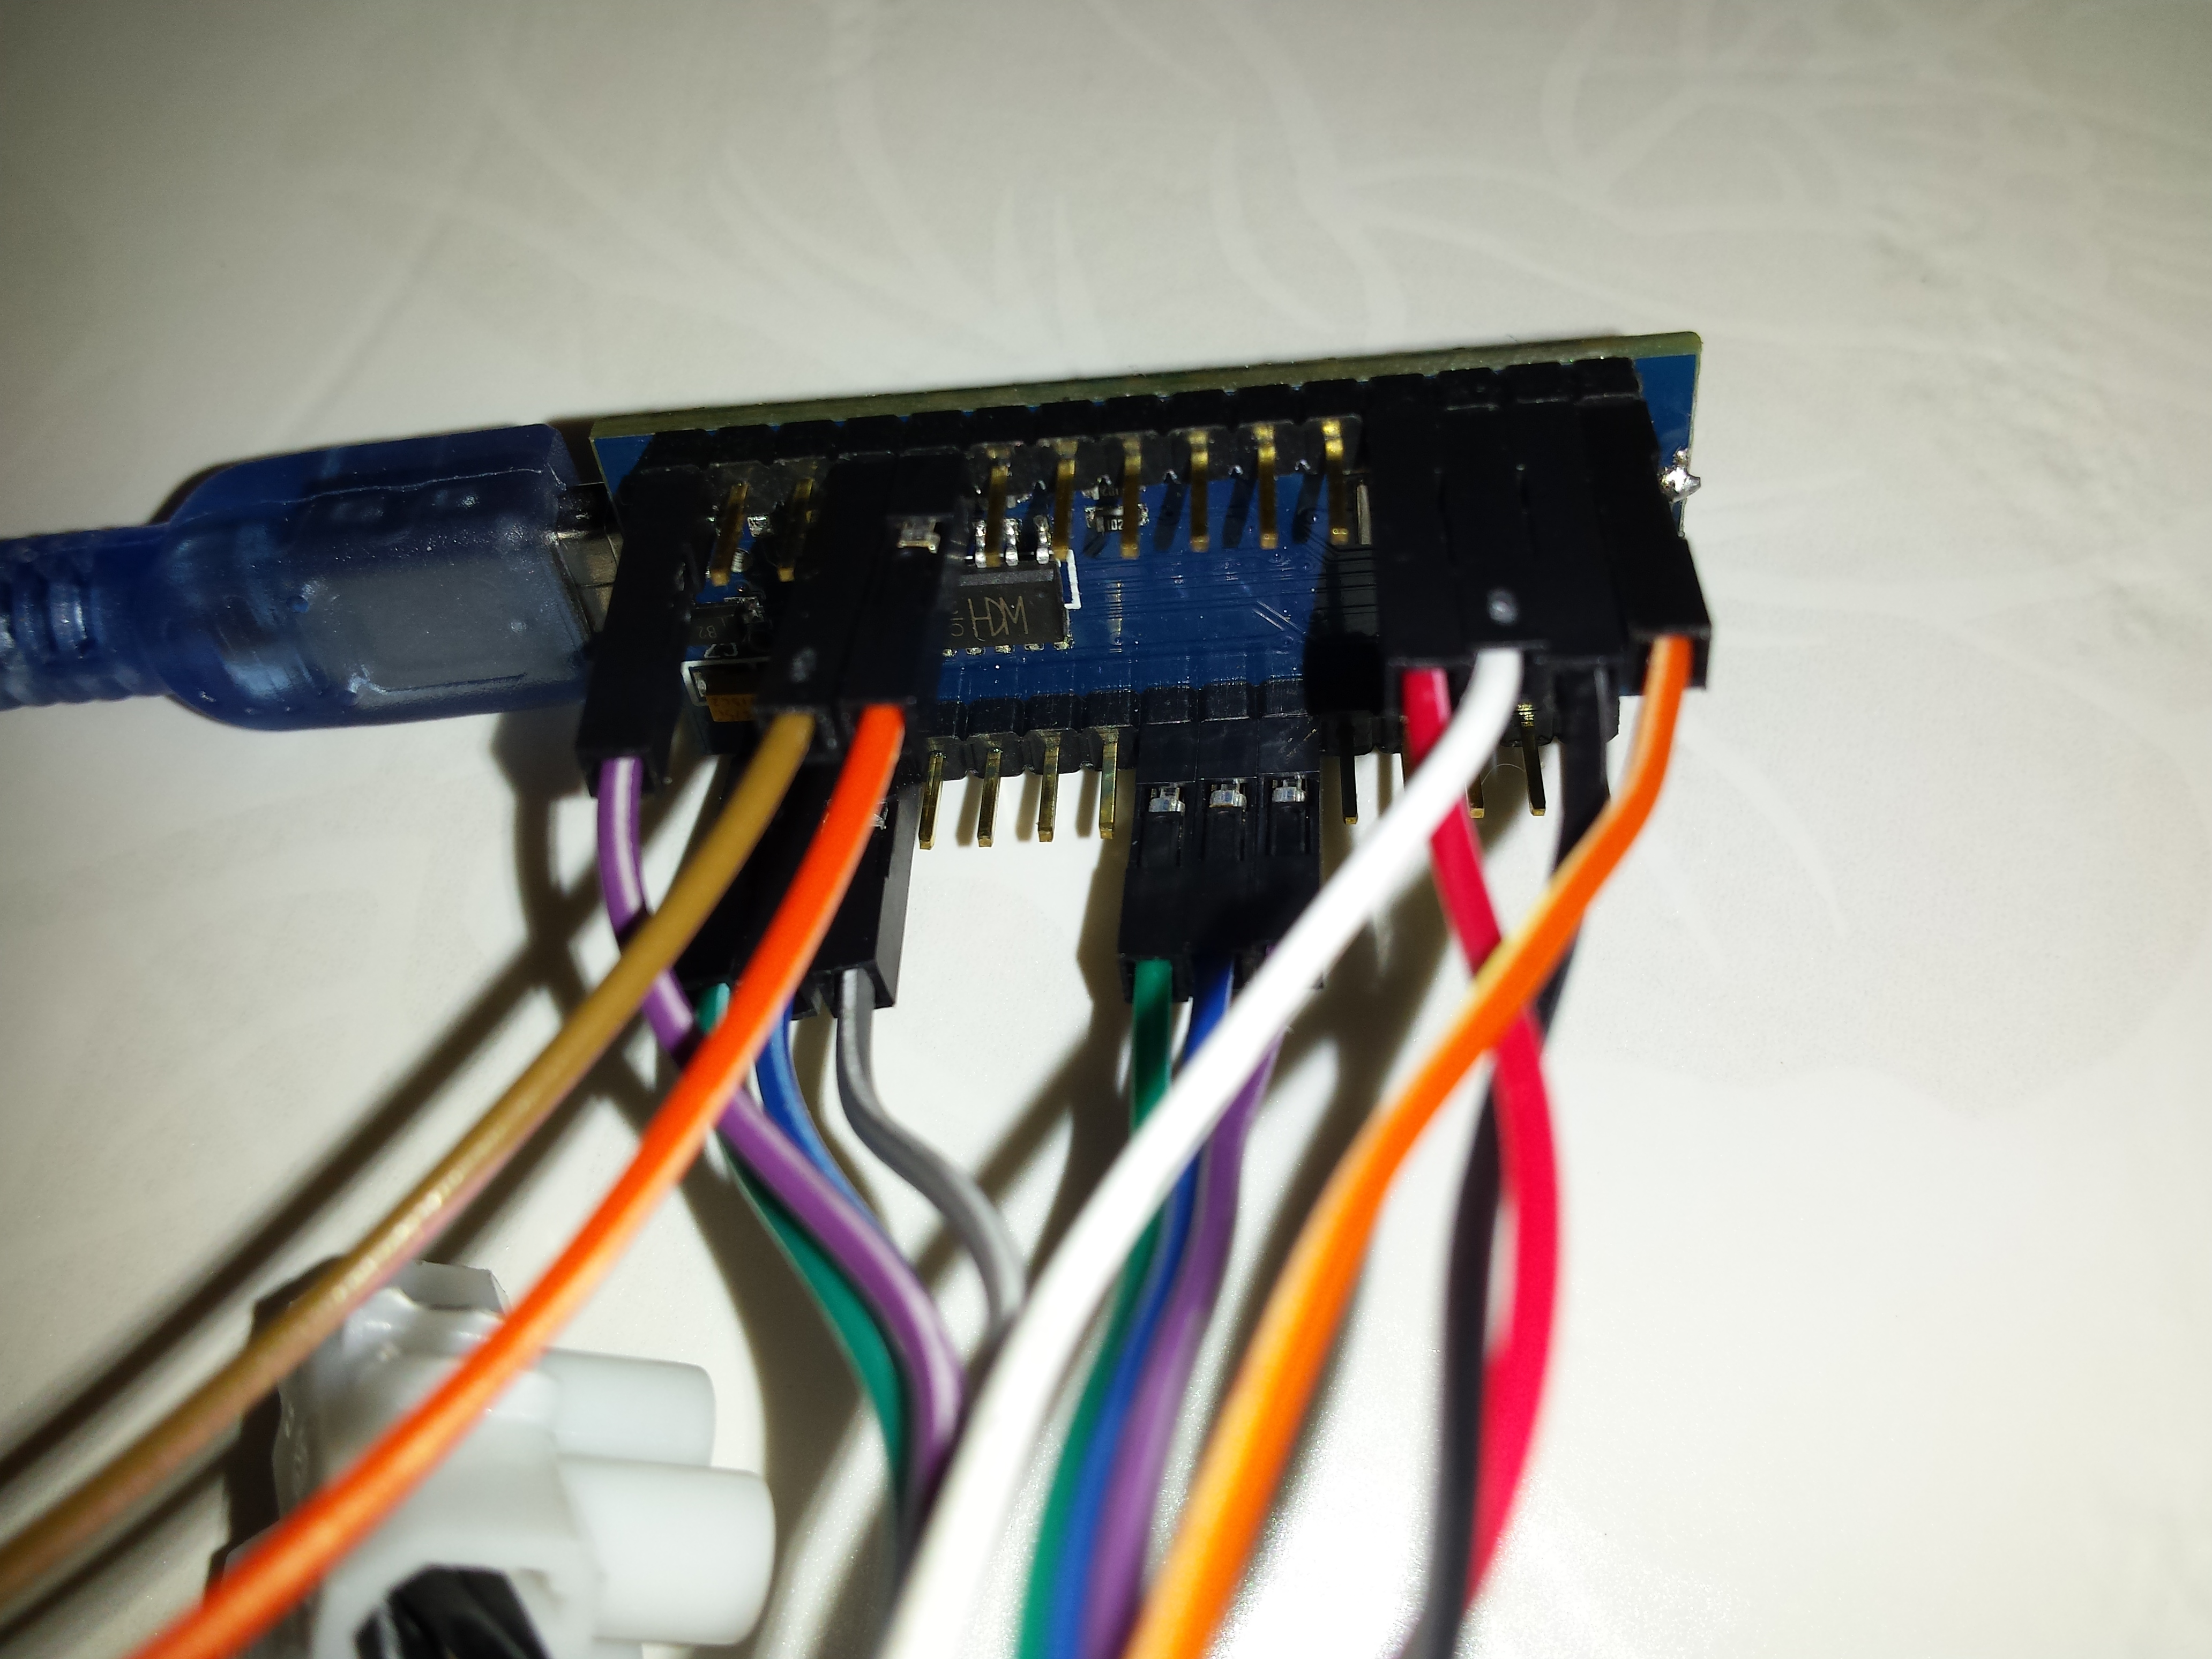
The Arduino nano wired (Only one UART connection on brown and orange wires)
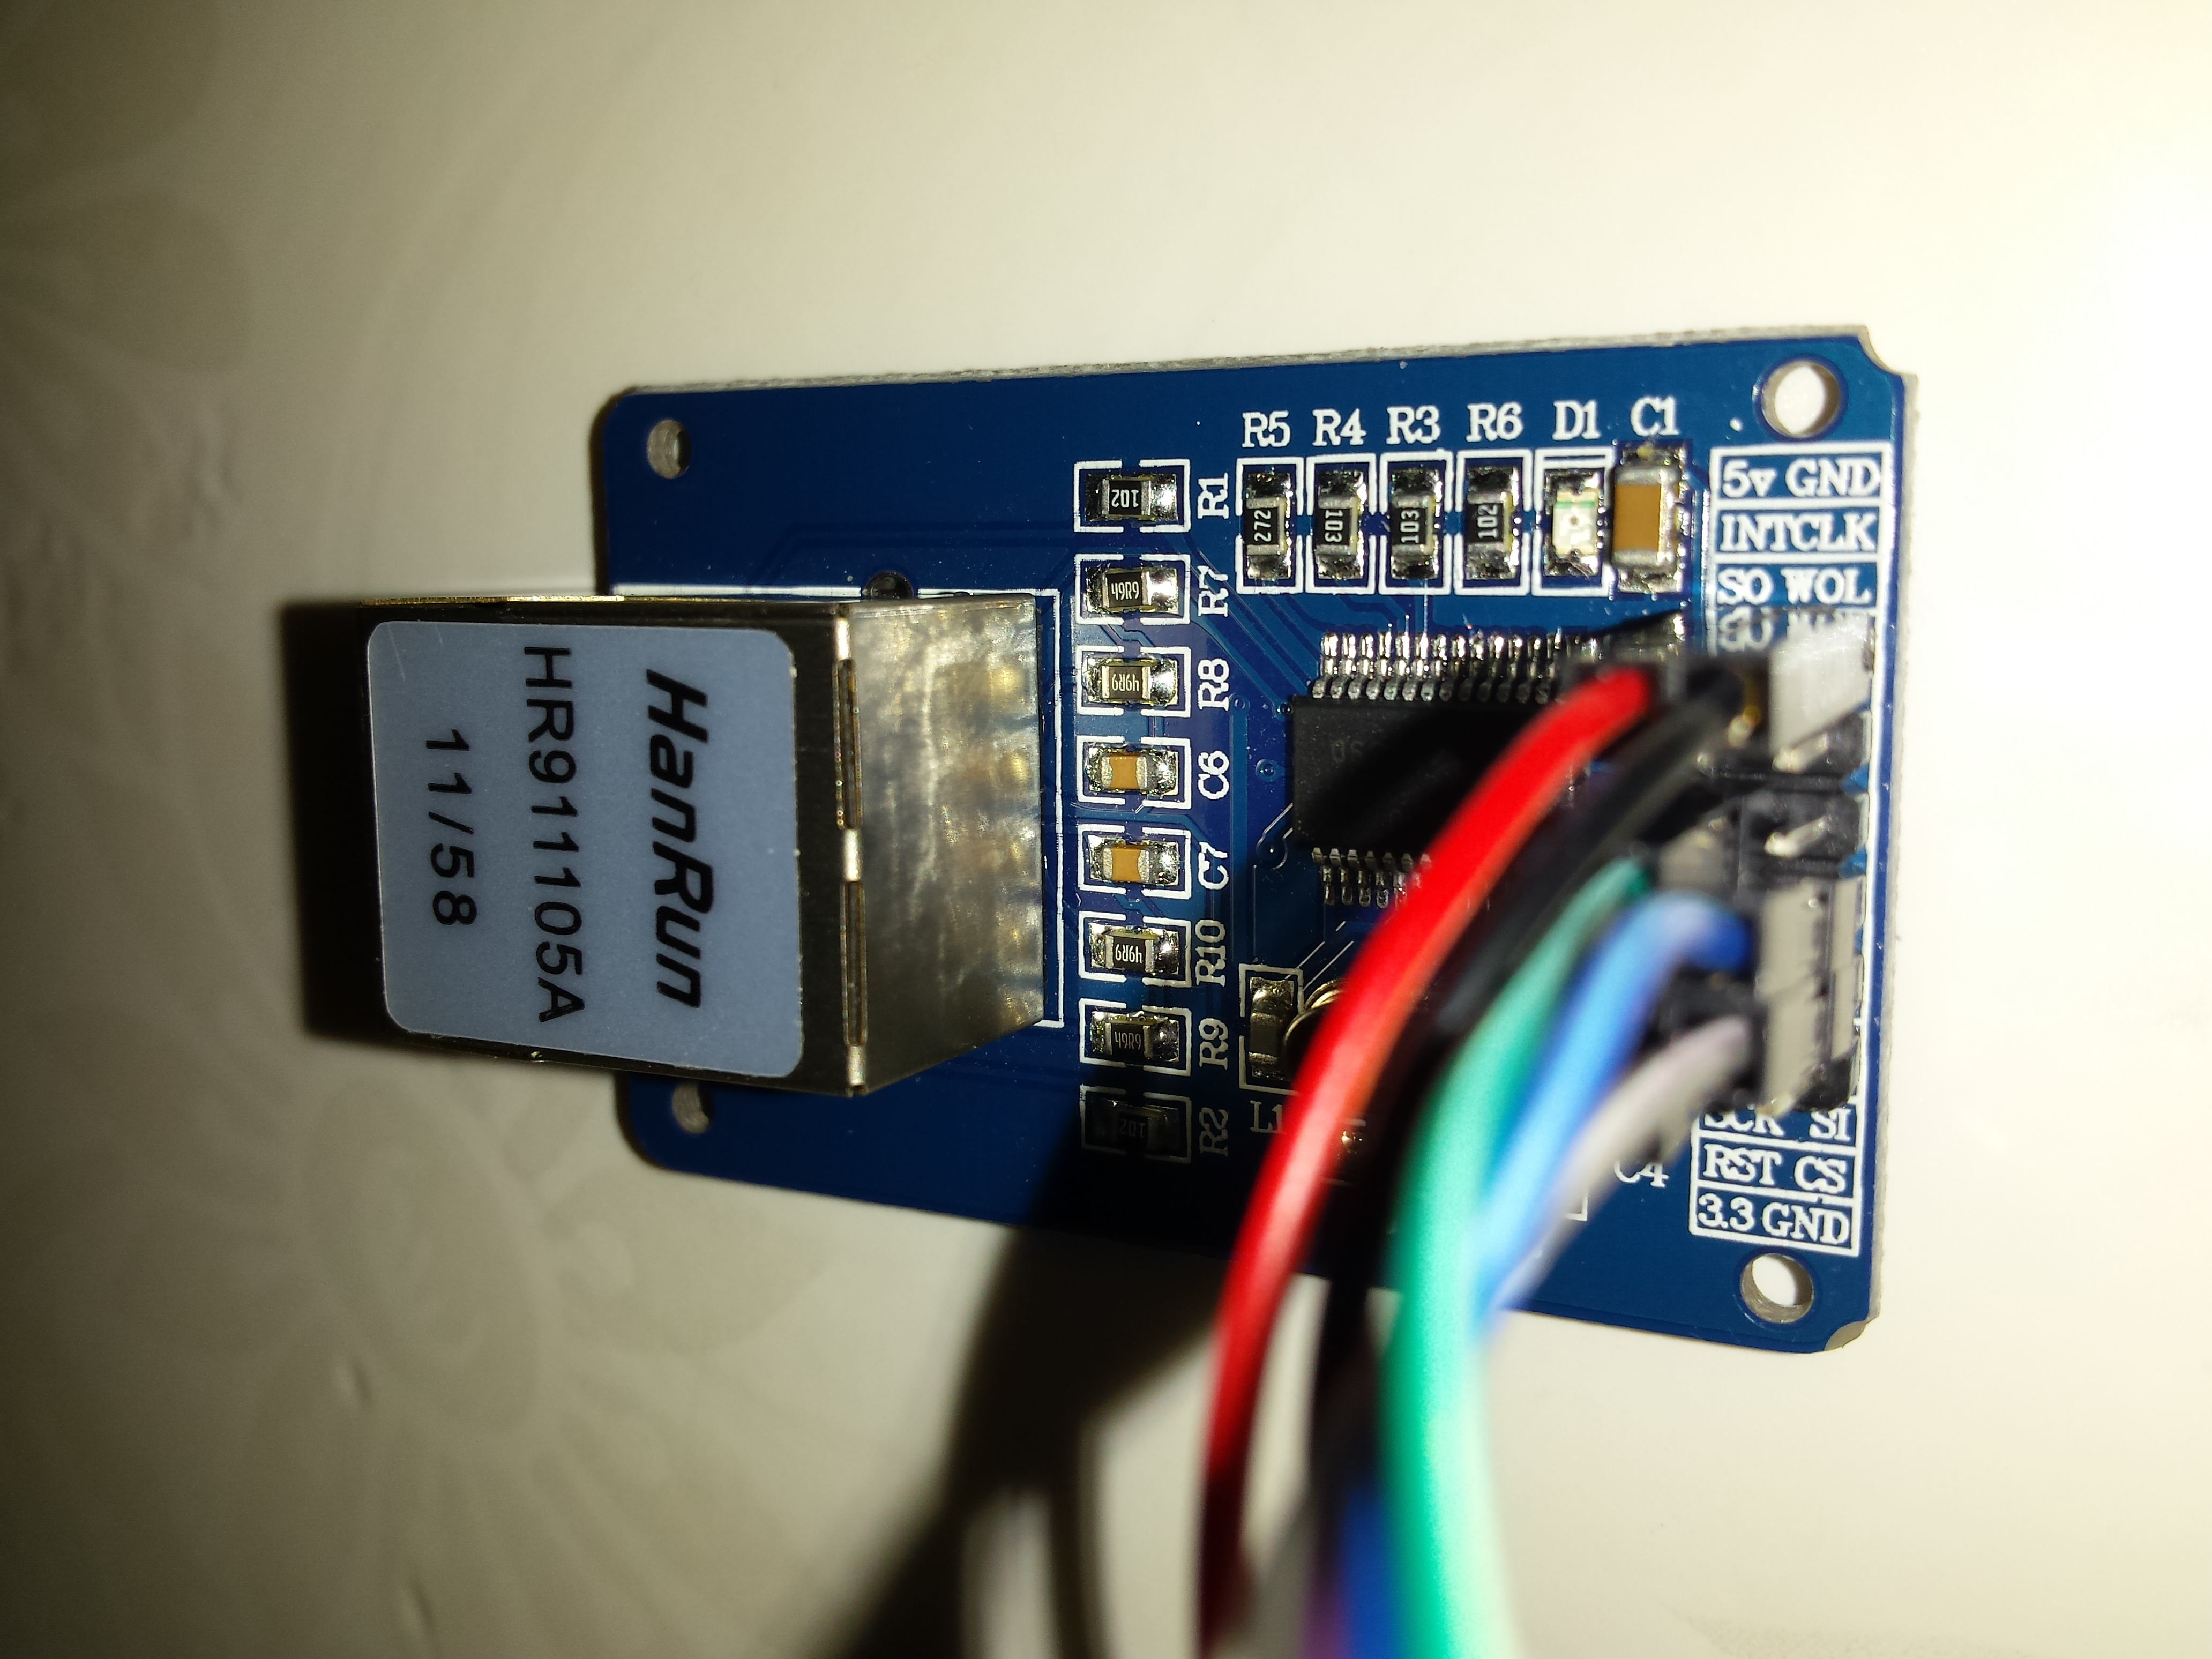
The ENC28J60 ethernet shield wired
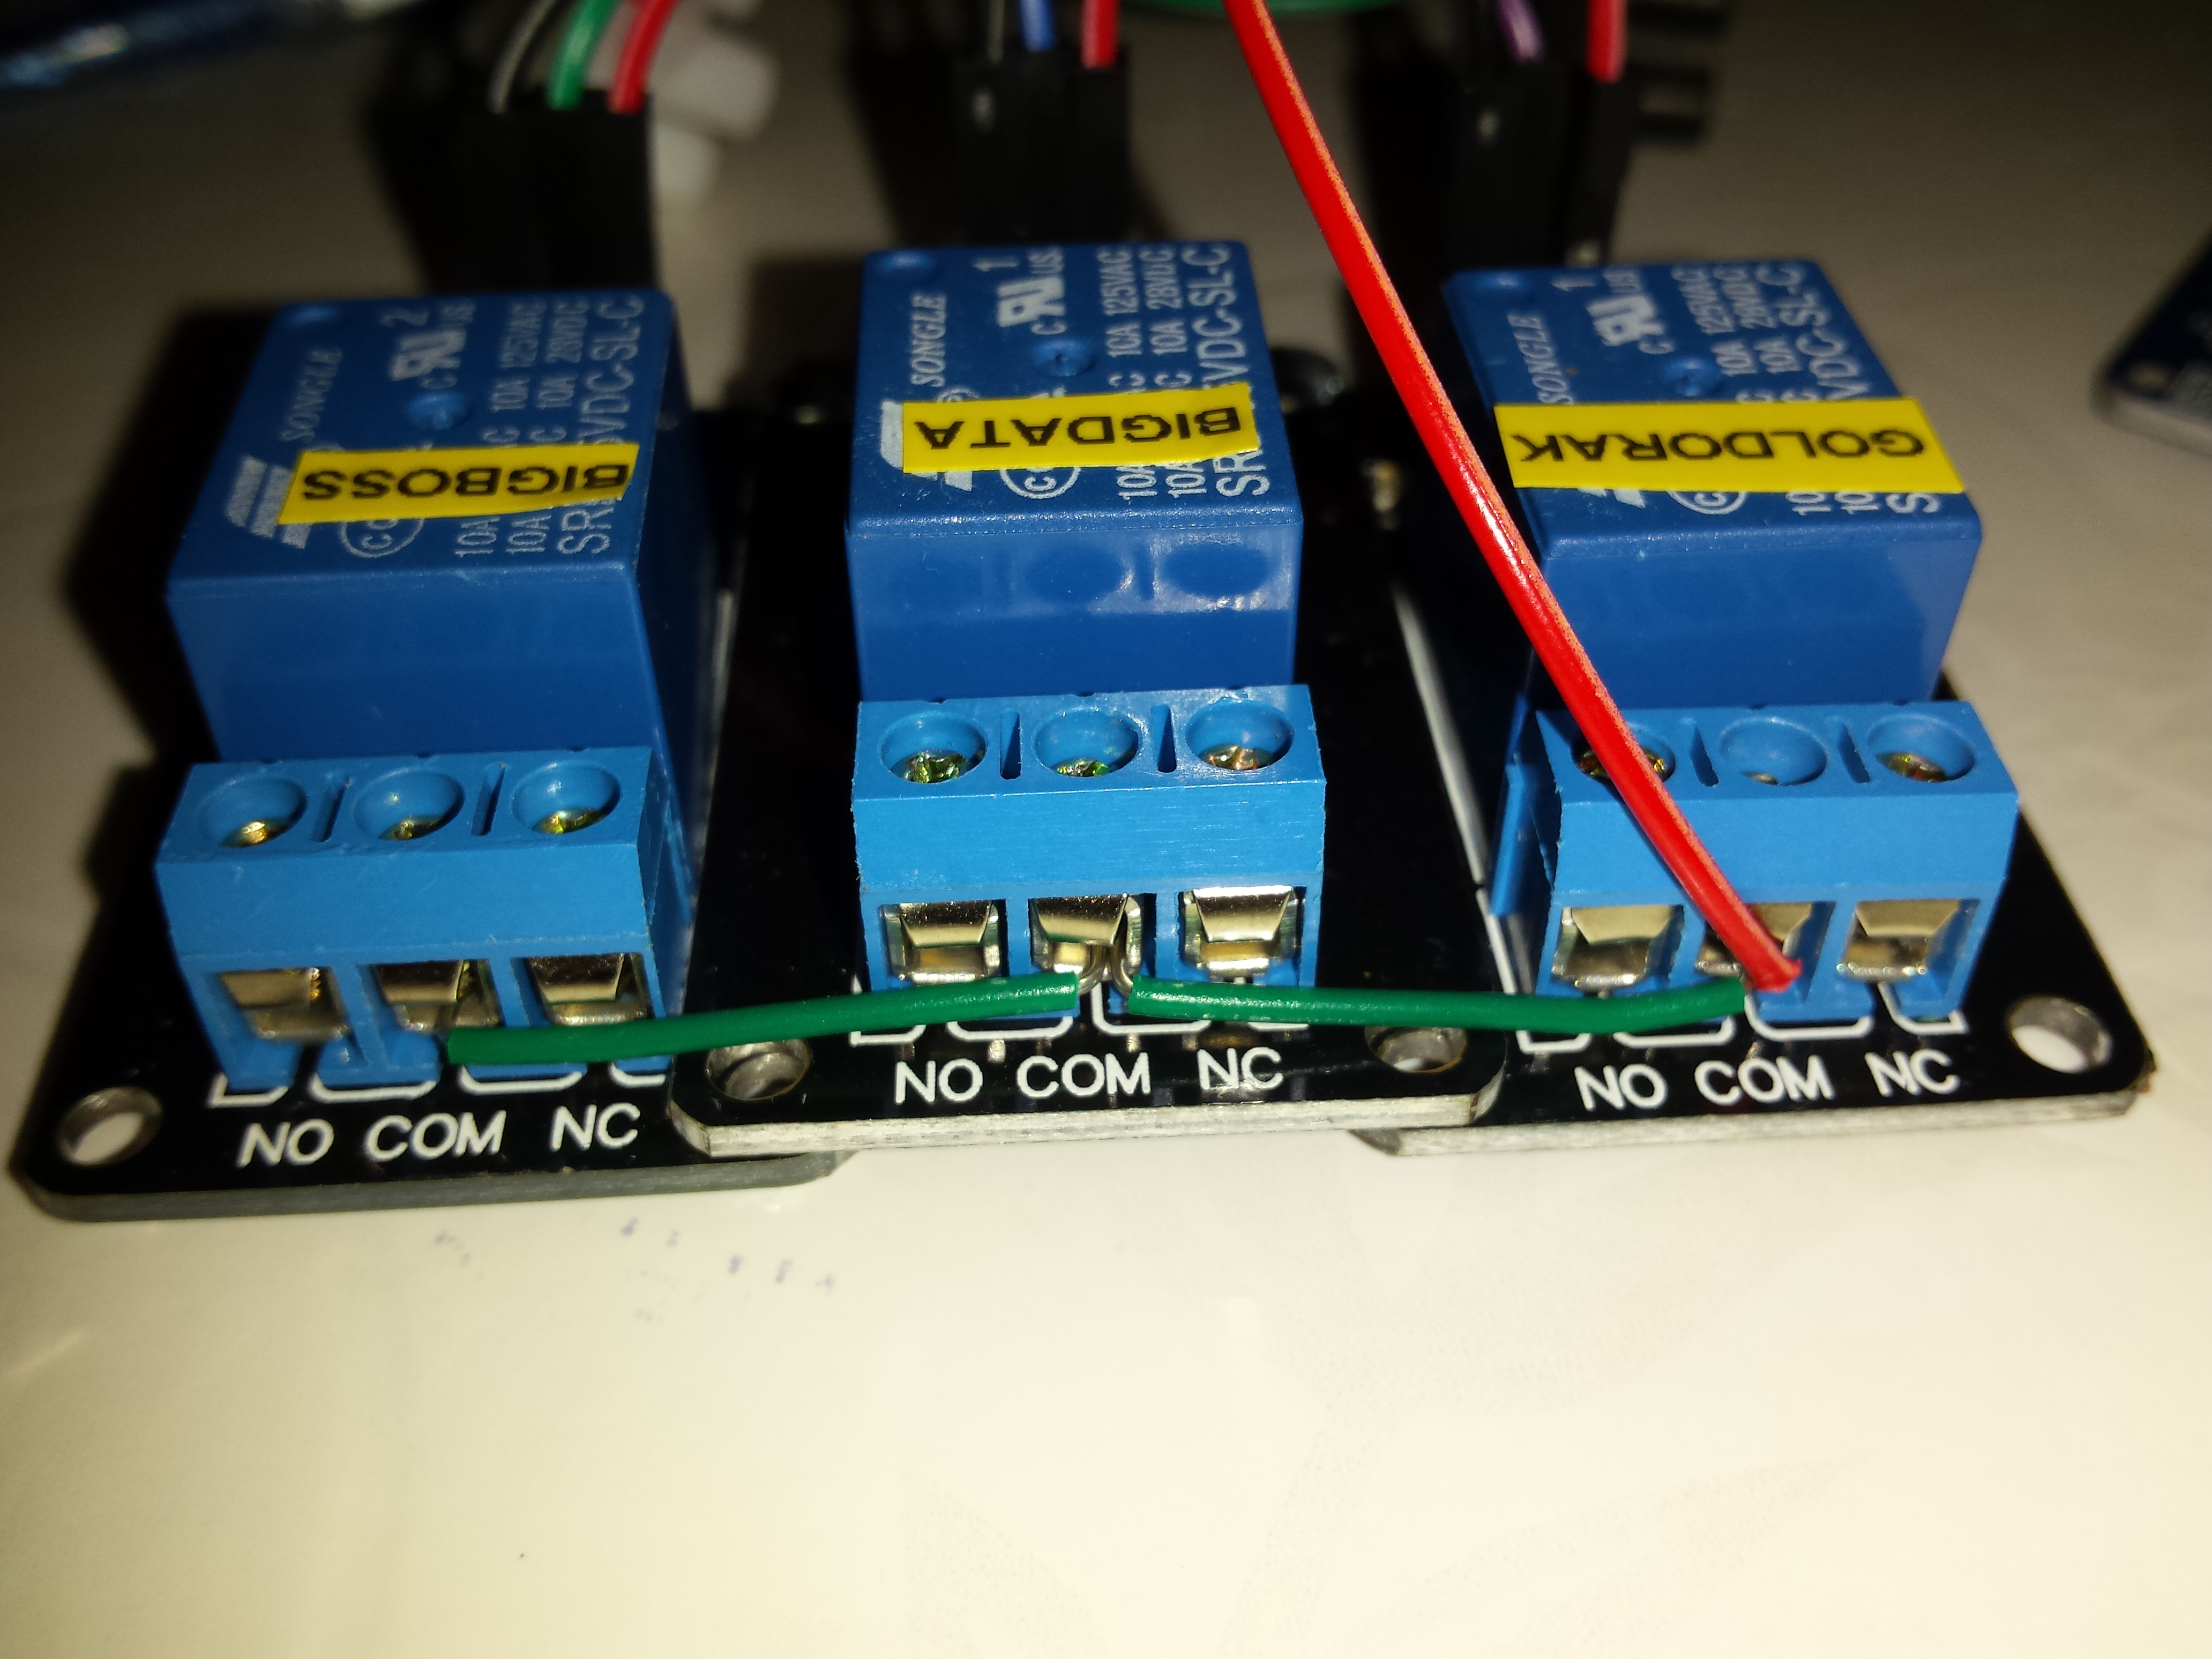
the 3 relays wired
Arduino Sketch
Preamble
I used 2 libraries : SoftwareSerial and UIPEthernet. With debug deactivated and DHCP enabled, the whole sketch take less than 28,000 bytes of the 30,720 bytes availables : it fits perfectly the ATMega 328. The Sketch provides the following functionalities:
- Support for 3 servers / 3 UART connections
- Static or DHCP based IP address
- Basic HTTP server to switch power and set which UART to use over Telnet connection
- Any HTTP order will answer with an XML document that gives actual statuses
- Telnet Server with UART/Serial to Telnet gateway
- Custom DEBUG Macro to make the code easier to use / maintain
To give a simple overview, the usual Setup() and Loop() functions are self explanatory: we initialize the hardware and network, start HTTP and Telnet server listener. Then the main loop just wait / handle HTTP and telnet connections.
|
1 2 3 4 5 6 7 8 9 10 11 12 13 14 15 16 17 |
void setup() { #if DEBUG == 1 Serial.begin(9600); #endif _MSGLN("starting system..."); initSwitches(); initNetwork(); initServers(); setCurrentSoftSerial(SERVER1_RX, SERVER1_TX); _MSGLN("Waiting for connections"); } void loop() { handleTelnet(); handleHttp(); } |
In the following lines, I won’t explain :
- ethernet initialization : the official documentation tells enough,
- switches relay initialization : it’s Arduino very basic things ( pinMod() and digitalWrite() )
HTTP server part
what it does
The HTTP part is responsible for the user interface. It takes orders through HTTP queries and convert them into Arduino instructions :
- Switch on or off one or all the 3 servers (eg : http://<ip>/SERVER1/ON, http://<ip>/ALL/OFF)
- Set which UART connection to use through the telnet listener (eg : http://<ip>/SERVER2/TELNET)
The Query parser
The Query Parser is very minimalist in order to let the micro-controller able to quikly handle UART, Telnet, XML rendering and orders at the “same time”. Basicaly, the HTTP parser functionnalities and limitations are:
- Max 128 characters
- No HTTP order type check (put, delete, post, get or whatever will produce the same result)
- No HTTP header support : it only read the query on the very first line (see HTTP Rfc)
- HTTP protocol version is ignored
- As soon as a query is detected, it searches for action to do ( handleHttpAction() ) and then renders the XML status report ( handleHttpHome() )
|
1 2 3 4 5 6 7 8 9 10 11 12 13 14 15 16 17 18 19 20 21 22 23 24 25 26 27 28 29 |
void handleHttp() { EthernetClient client = HttpServer.available(); if (client) { _MSGLN("HTTP connection detected !"); char c; int i; // first loop : ignore request type for(i=0, c = client.read(); client.available() && c != ' ' && i < HTTP_BUFFER_SIZE ; i++, c = client.read()) { _MSG("1 read : ") ; _VARLN(c); } // second loop : get the URI for(i=0, c = client.read(); client.available() && c != ' ' && c != '\n' && i < HTTP_BUFFER_SIZE ; i++, c = client.read()) { _MSG("2 read ") ; _VAR(i) ; _MSG(" : ") ; _VARLN(c); HttpReqBuff[i] = c; } HttpReqBuff[i] = '\0'; _MSG("Final string : "); _VARLN(HttpReqBuff); handleHttpAction(); handleHttpHome(&client); delay(1); client.stop(); _MSGLN("HTTP connection closed"); } } |
http action handler
The Action handler tries to detect an instruction from the “just received” query. It uses strcmp_P() so query can be compared against char arrays that are stored in program space (using PSTR macro). This allows to preserve RAM by not storing all non dynamic strings in it.
|
1 2 3 4 5 6 7 8 9 10 11 12 13 14 15 16 17 18 |
// turn switches ON or OFF or set current serial connection depending on HTTP query static void handleHttpAction() { _MSGLN("handle http action"); if(!strcmp_P(HttpReqBuff, PSTR("/SERVER1/ON")) || !strcmp_P(HttpReqBuff, PSTR("/ALL/ON"))) digitalWrite(SERVER1, LOW); if(!strcmp_P(HttpReqBuff, PSTR("/SERVER1/OFF")) || !strcmp_P(HttpReqBuff, PSTR("/ALL/OFF"))) digitalWrite(SERVER1, HIGH); if(!strcmp_P(HttpReqBuff, PSTR("/SERVER2/ON")) || !strcmp_P(HttpReqBuff, PSTR("/ALL/ON"))) digitalWrite(SERVER2, LOW); if(!strcmp_P(HttpReqBuff, PSTR("/SERVER2/OFF")) || !strcmp_P(HttpReqBuff, PSTR("/ALL/OFF"))) digitalWrite(SERVER2, HIGH); if(!strcmp_P(HttpReqBuff, PSTR("/SERVER3/ON")) || !strcmp_P(HttpReqBuff, PSTR("/ALL/ON"))) digitalWrite(SERVER3, LOW); if(!strcmp_P(HttpReqBuff, PSTR("/SERVER3/OFF")) || !strcmp_P(HttpReqBuff, PSTR("/ALL/OFF"))) digitalWrite(SERVER3, HIGH); if(!strcmp_P(HttpReqBuff, PSTR("/SERVER1/TELNET"))) { setCurrentSoftSerial(SERVER1_RX, SERVER1_TX); return; } if(!strcmp_P(HttpReqBuff, PSTR("/SERVER2/TELNET"))) { setCurrentSoftSerial(SERVER2_RX, SERVER2_TX); return; } if(!strcmp_P(HttpReqBuff, PSTR("/SERVER3/TELNET"))) { setCurrentSoftSerial(SERVER3_RX, SERVER3_TX); return; } } |
result handler
Any HTTP request (valid or not) will result in the same status reporting content. This content simply consists in an XML result that shows relay statuses as well as which server’s UART port is actually used for the telnet gateway. The check of the currently used UART is based on one of the 2 UART pins, for instance I arbitrarily used the RX pin.
|
1 2 3 4 5 6 7 8 9 10 11 12 13 14 15 16 17 18 19 20 21 22 23 24 25 26 27 28 29 |
void handleHttp() { EthernetClient client = HttpServer.available(); if (client) { _MSGLN("HTTP connection detected !"); char c; int i; // first loop : ignore request type for(i=0, c = client.read(); client.available() && c != ' ' && i < HTTP_BUFFER_SIZE ; i++, c = client.read()) { _MSG("1 read : ") ; _VARLN(c); } // second loop : get the URI for(i=0, c = client.read(); client.available() && c != ' ' && c != '\n' && i < HTTP_BUFFER_SIZE ; i++, c = client.read()) { _MSG("2 read ") ; _VAR(i) ; _MSG(" : ") ; _VARLN(c); HttpReqBuff[i] = c; } HttpReqBuff[i] = '\0'; _MSG("Final string : "); _VARLN(HttpReqBuff); handleHttpAction(); handleHttpHome(&client); delay(1); client.stop(); _MSGLN("HTTP connection closed"); } } |
Note: for relay statuses, I wanted 0 for off and 1 for on. Relay statuses being the contrary, this explains the “!” in front of digitalRead().
Example of XML output :
|
1 2 3 4 5 6 |
<ROOT> <SERVER1>1</SERVER1> <SERVER2>0</SERVER2> <SERVER3>1</SERVER3> <SERIAL>SERVER1</SERIAL> </ROOT> |
Serial / UART and Telnet part
Multiple UART connections
Each cubieboard (1 and 2) has an UART port which is the default output. I first tried to instantiate a softwareSerial for each… but it was eating too much memory and things was way to slow even for a 9600 bauds rate. So the solution was simply to use one softwareSerial at a time and delete / instanciate required one regarding an HTTP query. The “current” softwareSerial instance is accessed with a global pointer. Changing instance is done via the following function :
|
1 2 3 4 5 6 7 8 9 10 |
void setCurrentSoftSerial(int RX, int TX) { CurrentRXPin = RX; if(CurrentSoftSerial) delete(CurrentSoftSerial); CurrentSoftSerial = new SoftwareSerial(RX, TX); CurrentSoftSerial->begin(TELNET_SPEED); _MSG("Software serial changed : RX = "); _VARLN(CurrentRXPin); } |
UART to Serial geteway
Even at a 9600 bauds rate, reading from serial connection and writing directly to ethernet driver generated trashed and/or missing characters. It may be due to the Ethernet driver and/or hardware that need some in-compressible delay to send data… So I had to use a custom buffer of 64 bytes. The buffer is a global char array. Below are the gateway and the buffer writer functions.
|
1 2 3 4 5 6 7 8 9 10 11 12 13 14 15 16 17 18 19 20 21 22 23 24 25 26 27 28 29 30 31 32 33 34 35 |
void handleTelnet() { EthernetClient client = TelnetServer.available(); char c; // if something was typed through telnet, send it to serial connection if(client) { _MSGLN("send serial char"); CurrentSoftSerial->write(client.read()); } // handle incomming byte from serial connection and write it to telnet connection // buffering is mandatory to not loose any byte. while(CurrentSoftSerial->available()) { c = CurrentSoftSerial->read(); if(c < 0) continue; SerialBuffer[SerialBufferPos] = c; //_MSG("Getting char "); _VAR(SerialBufferPos); _MSG(" :") ; _VARLN(SerialBuffer[SerialBufferPos-1]); // send data as soon as buffer is full if(SerialBufferPos==SERIAL_BUFFER_SIZE-1) WriteSerialBufferToTelnet(SERIAL_BUFFER_SIZE); SerialBufferPos++; } // handle case where no more data available, but still some chars left in buffer WriteSerialBufferToTelnet(SerialBufferPos); } void WriteSerialBufferToTelnet(int sizeToWrite) { if(sizeToWrite > 0 && sizeToWrite <= SERIAL_BUFFER_SIZE) { TelnetServer.write(SerialBuffer, sizeToWrite); _VARLN(SerialBuffer); SerialBufferPos=0; } } |
Cubieboards side
SoftwareSerial allows to do serial connection through arduino GPIO pins… in software, as its name suggests. If using a 57600 bauds rate connection might be achievable with an fully dedicated Arduino for this task, the best I could get overall is 9600 bauds. As default cubieboard’s uboot and environment’s variables are set to communicate with a bauds rate of 57600, it was necessary to compile my own u-boot. I did that on the cubieboard itself, but this can be of course be cross-compiled :
|
1 2 3 4 5 |
git clone git://git.denx.de/u-boot.git cd u-boot echo "CONFIG_BAUDRATE=9600" >> configs/Cubieboard_defconfig make Cubieboard_defconfig make -j3 |
I then flashed it from my laptop on the Cubieboard SdCard :
|
1 |
dd if=u-boot-sunxi-with-spl.bin of=/dev/sdb bs=1024 seek=8 |
env var settings
Now U-Boot allows the cubieboard to boot with the correct bauds rate…. BUT, as soon as the environment variables are read from the SDCard, it switches to 57600 again. Using “setenv baudrate 9600” require to disconnect the current connection and reconnect with 9600, then press “enter” (send CR/LF) to validate the change. I also, changed some other parameters to be sure that any recent kernel will boot in 9600 bauds rates (“machid” being needed for cubieboard 1 only)
|
1 2 3 4 |
setenv machid 1008 setenv console ttyS0,9600 saveenv reset |
Change getty
Finaly, change /etc/inittab so getty also run at 9600 bauds :
|
1 |
T0:2345:respawn:/sbin/getty -L ttyS0 9600 linux |
Upgraded cookie box
I now have a nice solution to switch on or off any of my 3 cubieboards with no physical access… with debugging support through telnet ! Well, from time to time, the Arduino (or at least the ethernet interface) seems to crash while connected to telnet after a random (but large) amount of data.
Regarding the security of this system, it must be done at lan / switch / firewall level, as this solution does not offer any protection nor encryption (it may be possible to do some encryption). It is also not recommended to login using telnet: the purpose is more to be able to debug the boot sequence, not to use as a daily console…
Full Source code : ServerSwitches2
Note that UIPEthernet library must be modified, see Problems with ENC28J60