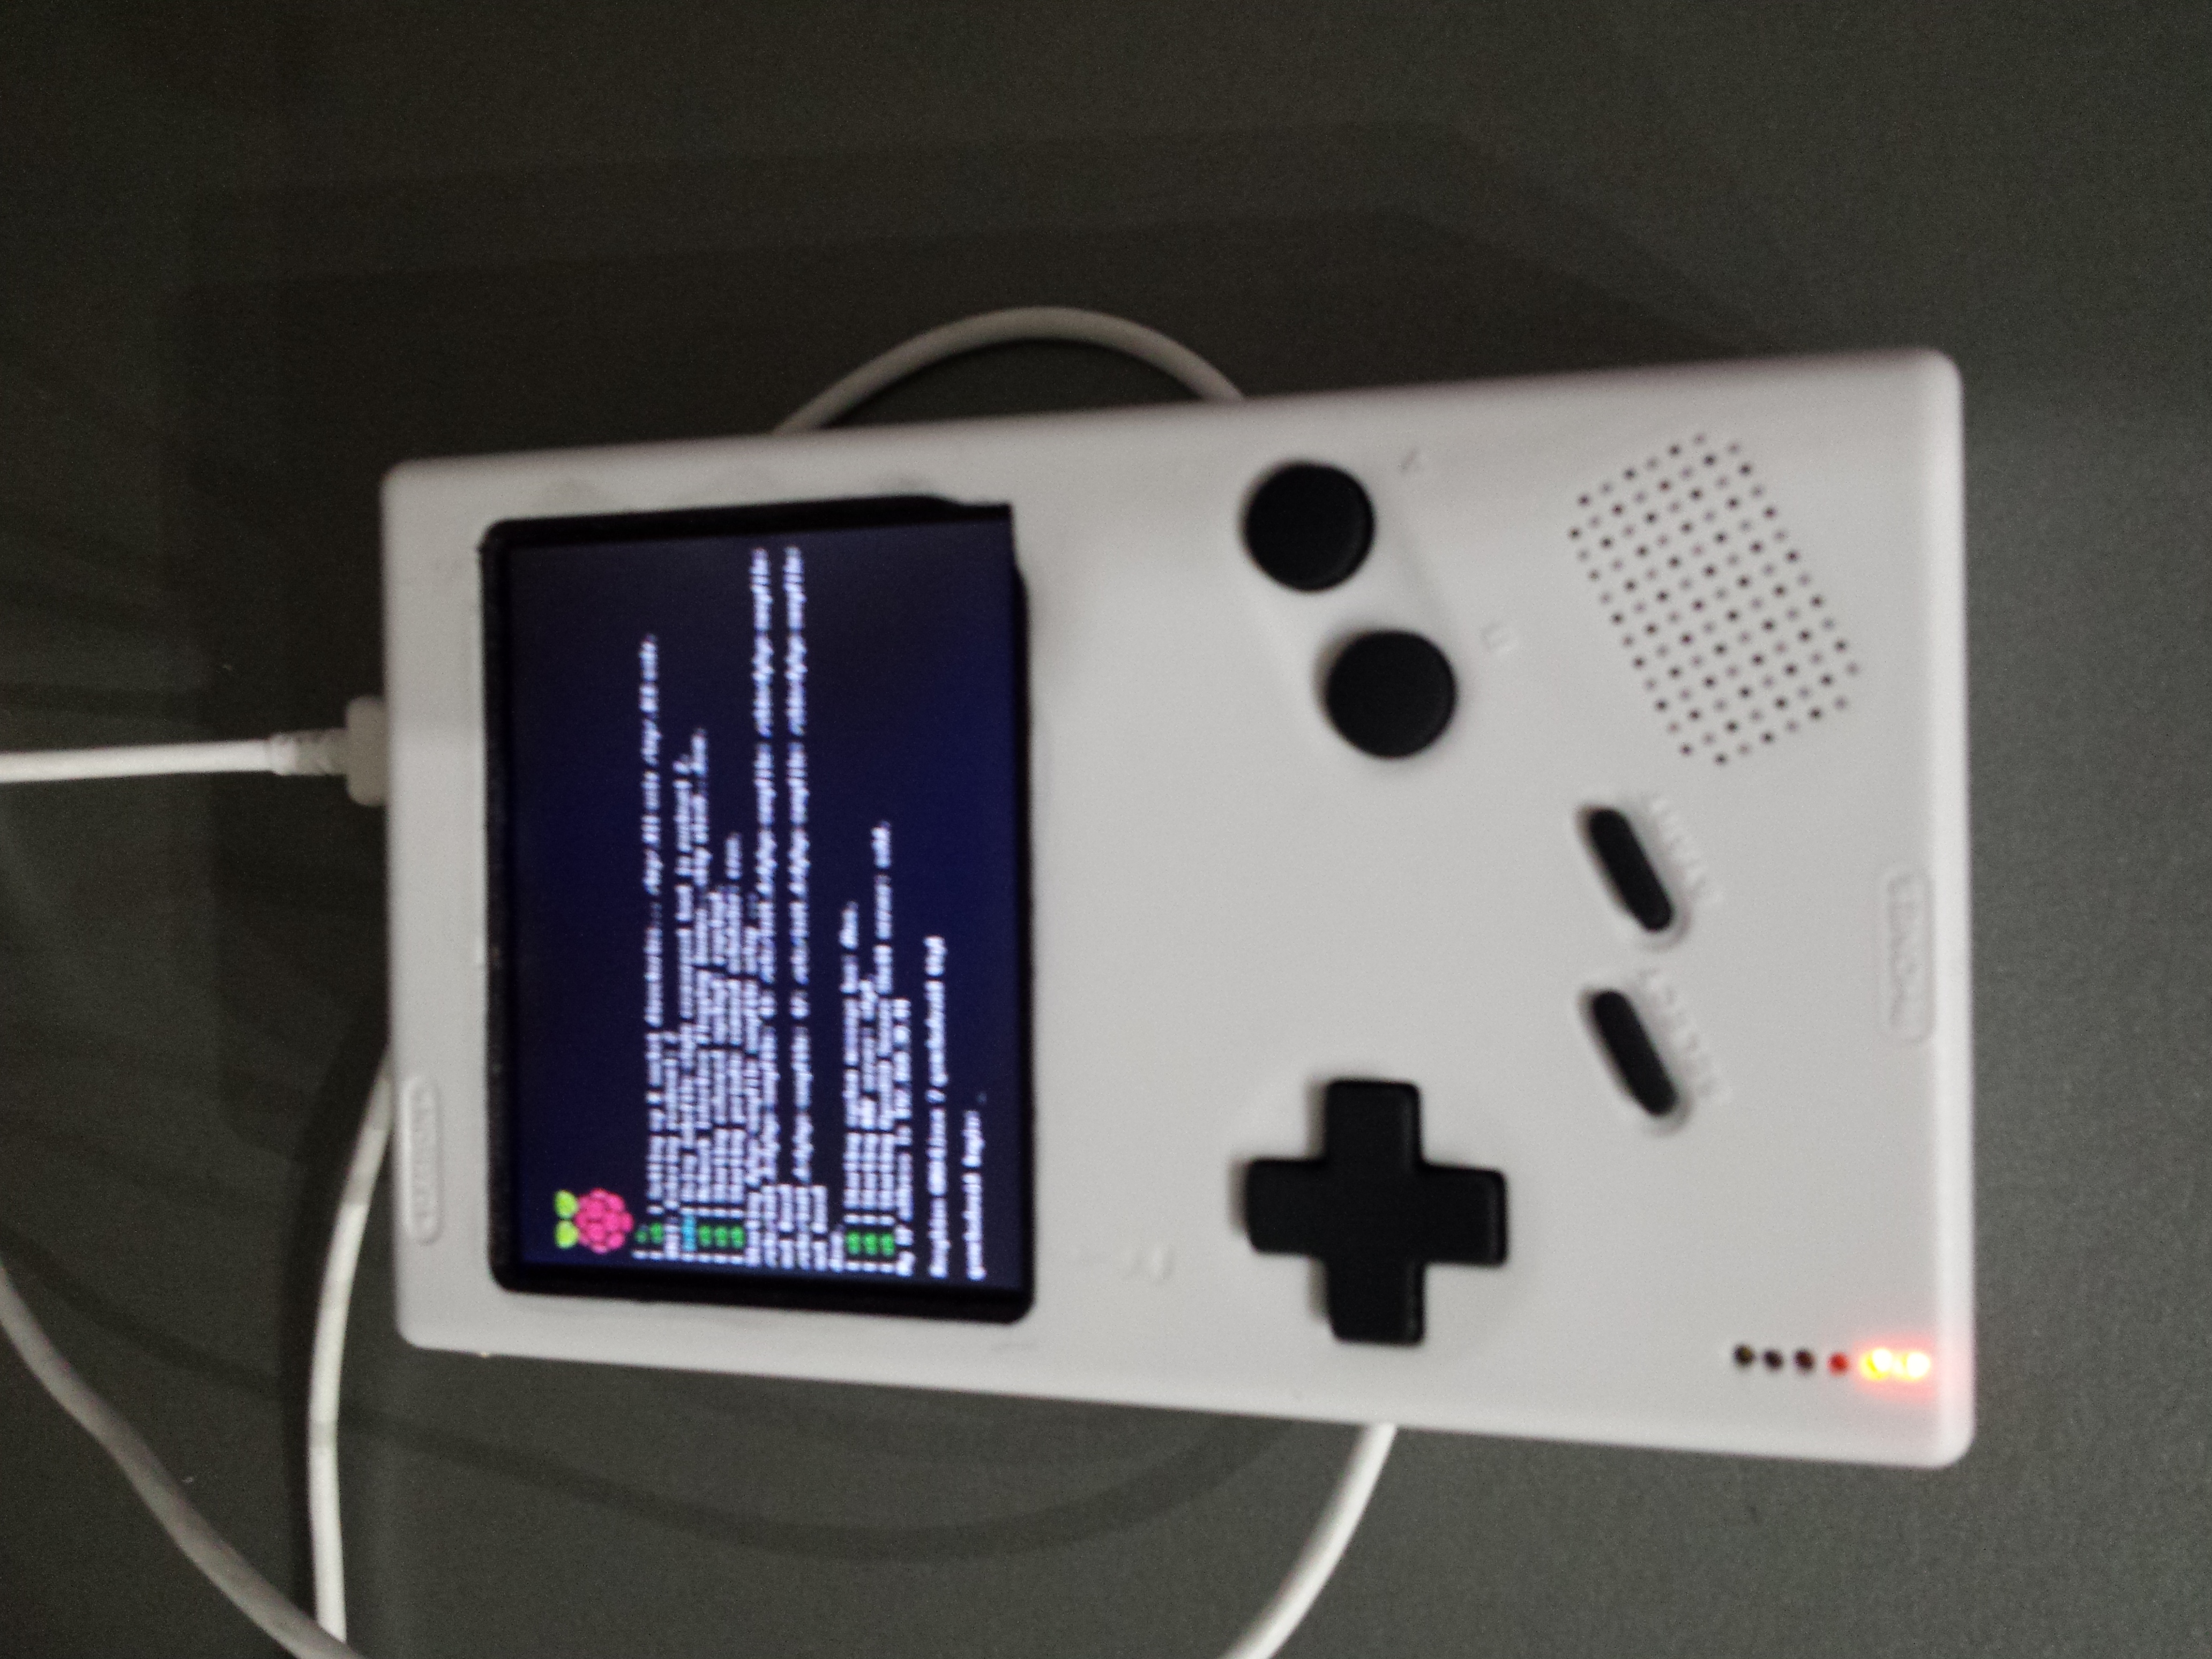
Hardware / Linux : Retro Boy – portable gaming console with an Odroid-w and a GameBoy case
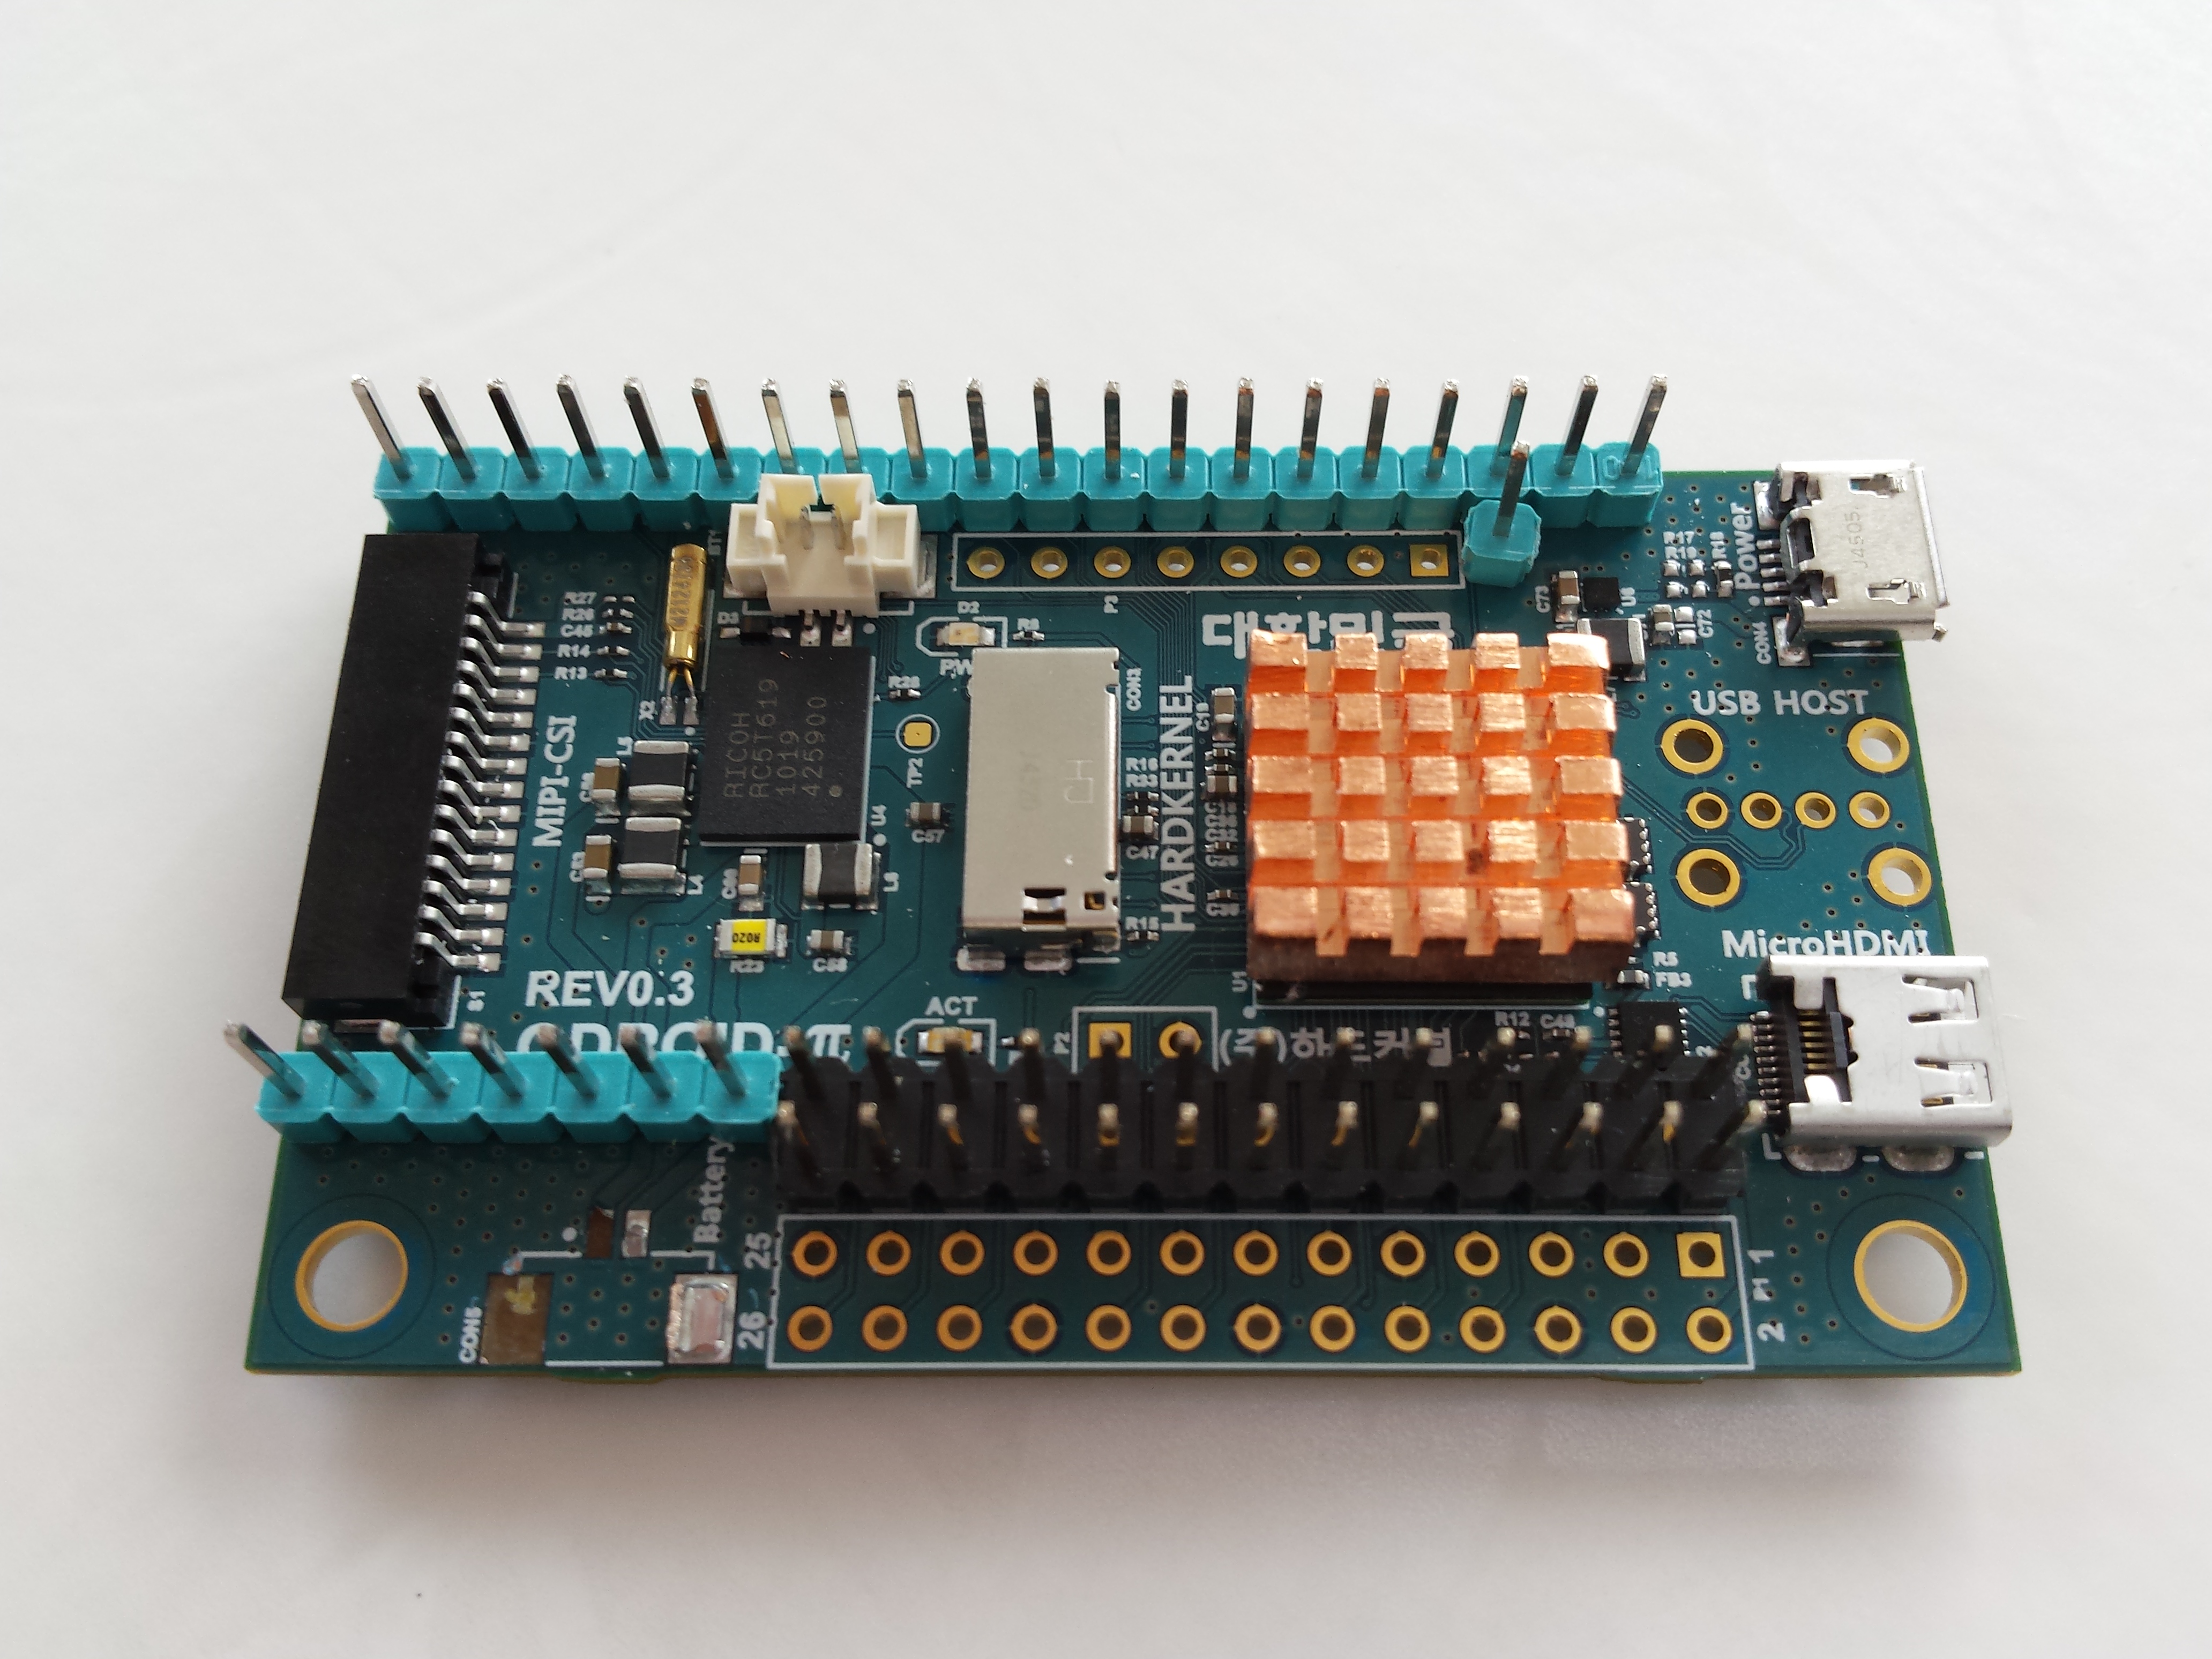
I have seen some guys who put a raspberry pi in a Game Boy case (eg. here or here). Being a fan of retro-gaming, I wanted to do the same for me and my children. But I wanted something a little bit more polished than what I saw, I mean better looking, better battery life, etc. I discovered at the same time the Odroid-W (which is, unfortunately, no more produced).
The following lines are about the build story…
Features
The Final result is a Game Boy lookalike device that runs various 8 and 16 bits systems:
- Nintendo NES
- Nintendo Super NES
- Nintendo Game Boy / Game Boy Color
- Nintendo Game Boy Advance
- Sega Master System
- Sega Genesis
- Sega CD
- Nec Pc Engine / SuperGraphX
- Nec Pc Engine CD-Rom
- SNK NeoGeo
- Atari Link
- PC Doom 1 & Doom 2 (with original background music !)
Main features of my “Retro Boy” are:
- 3.5″ TFT Color screen (NTSC, 60 Hz)
- 3 Usb 2.0 Ports
- Integrated Wifi
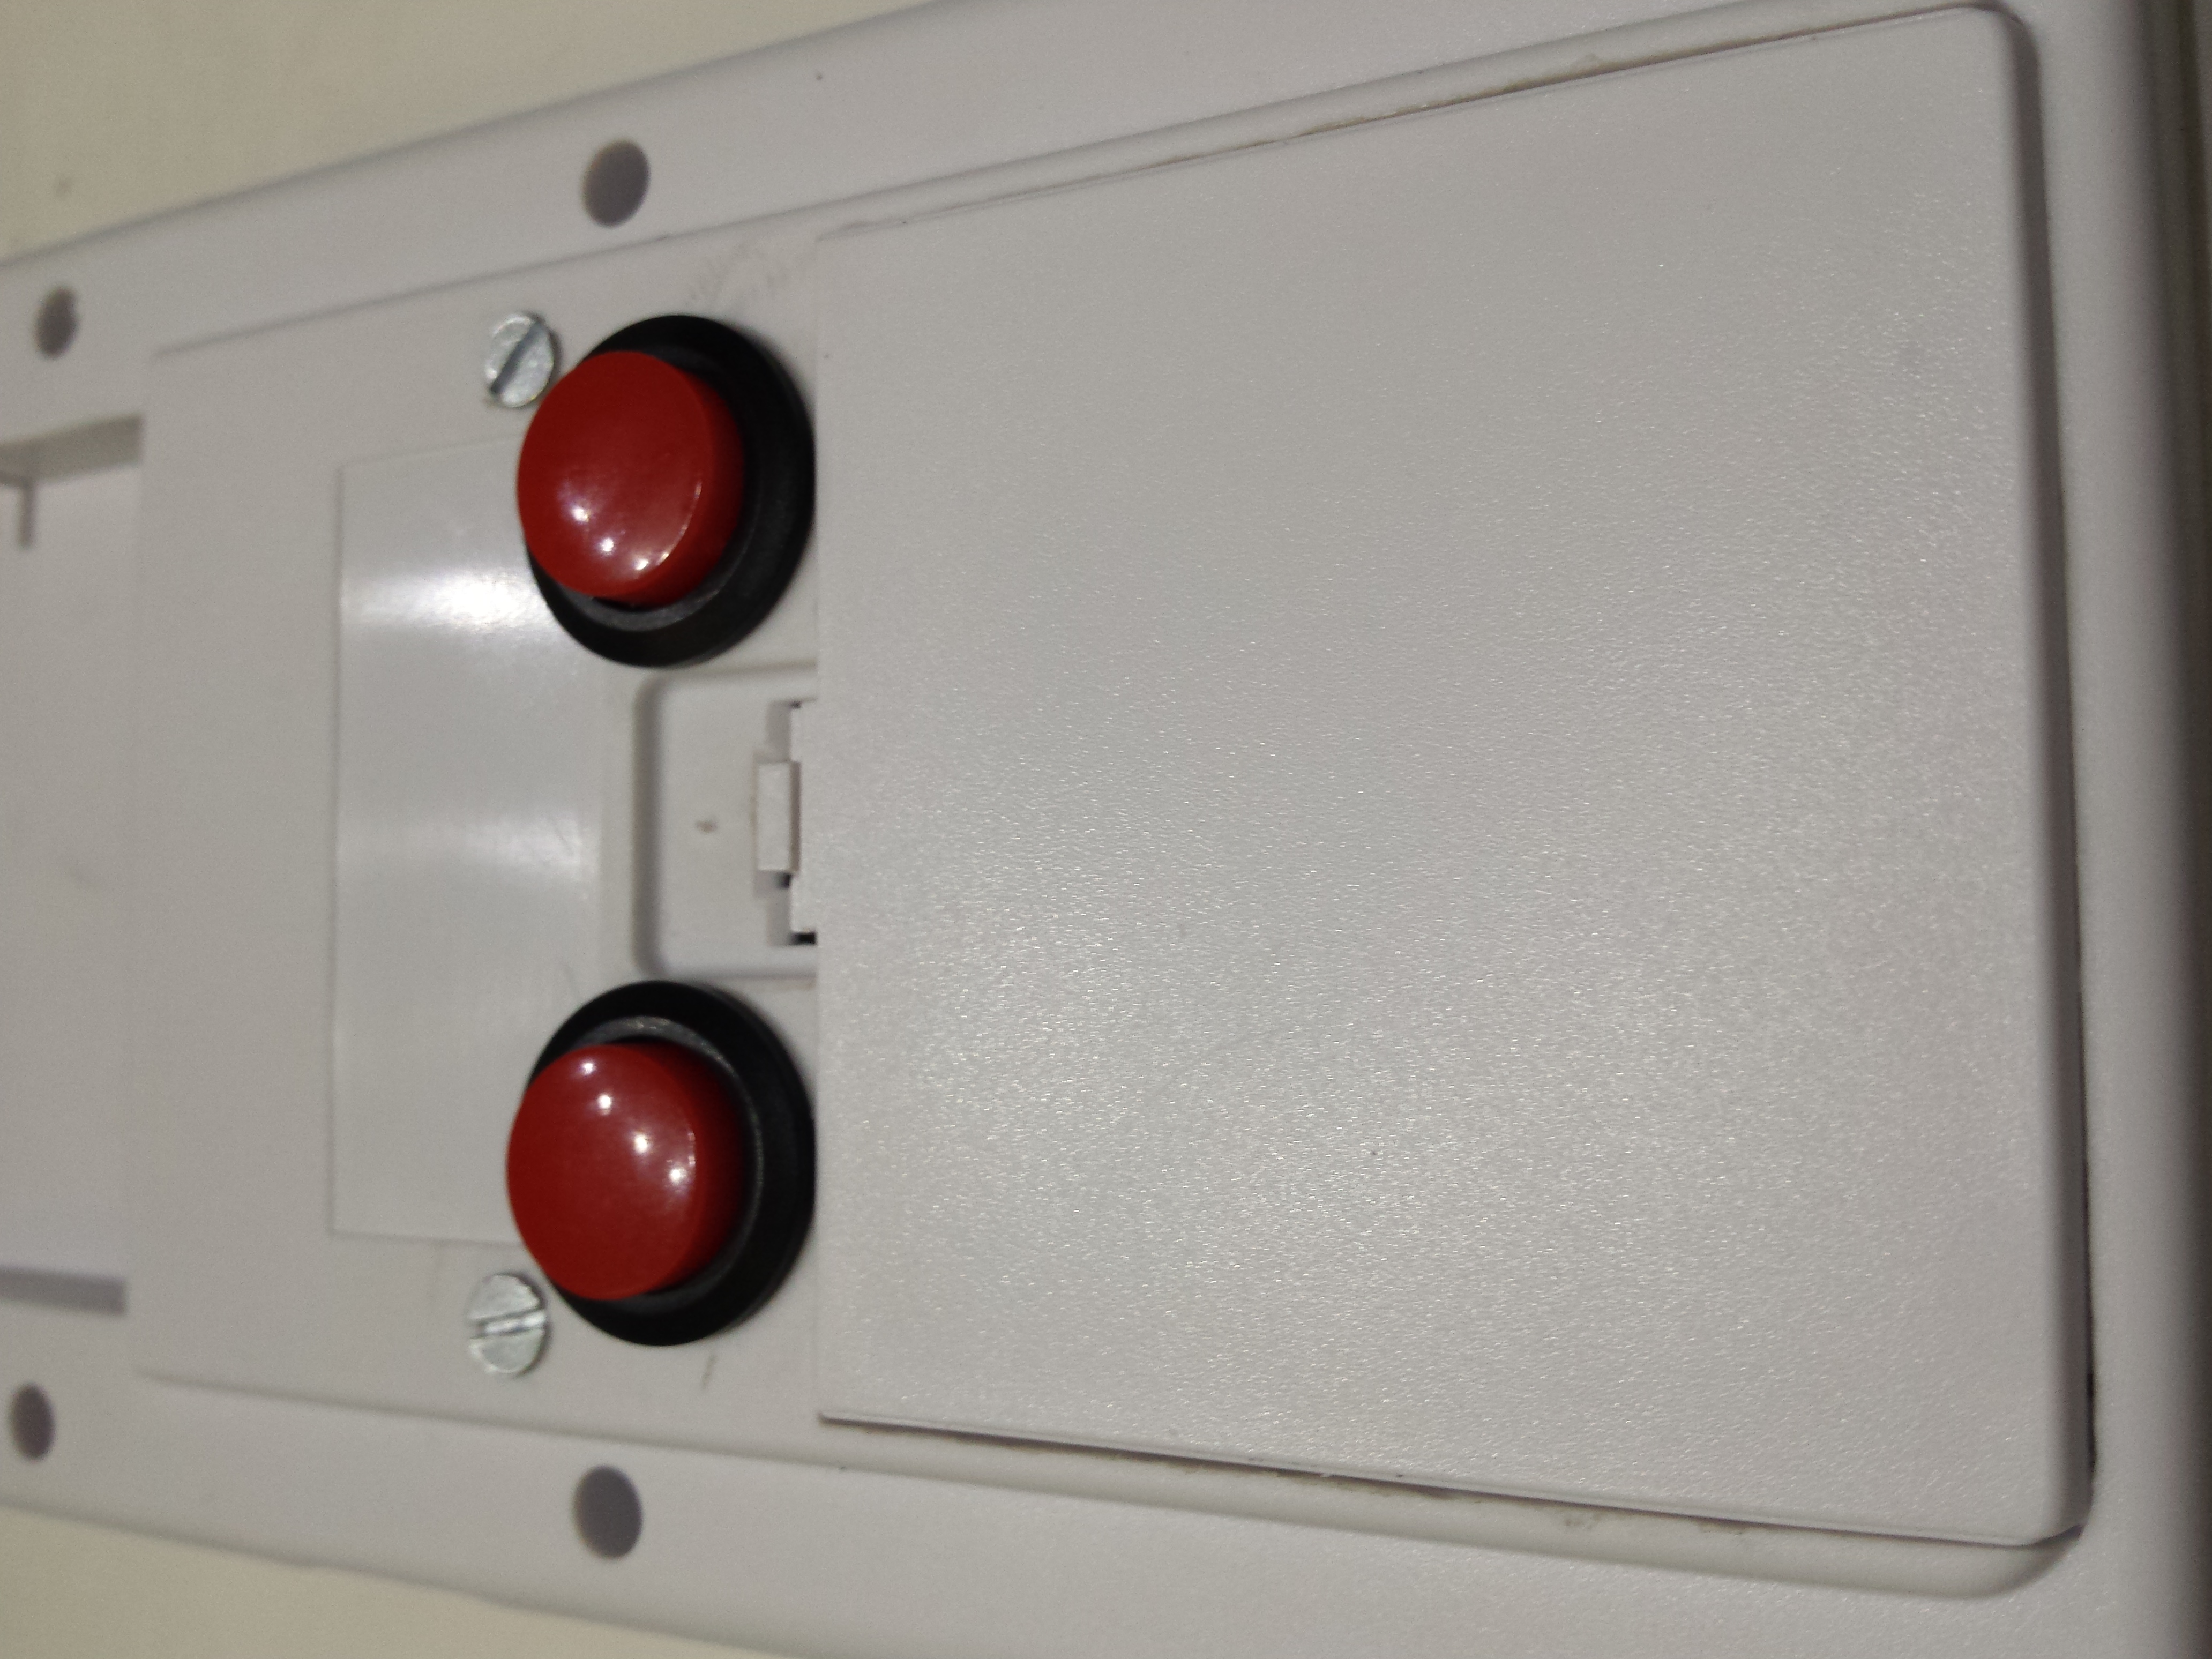
- 4 joypad buttons (a, b, L, R) + start / select
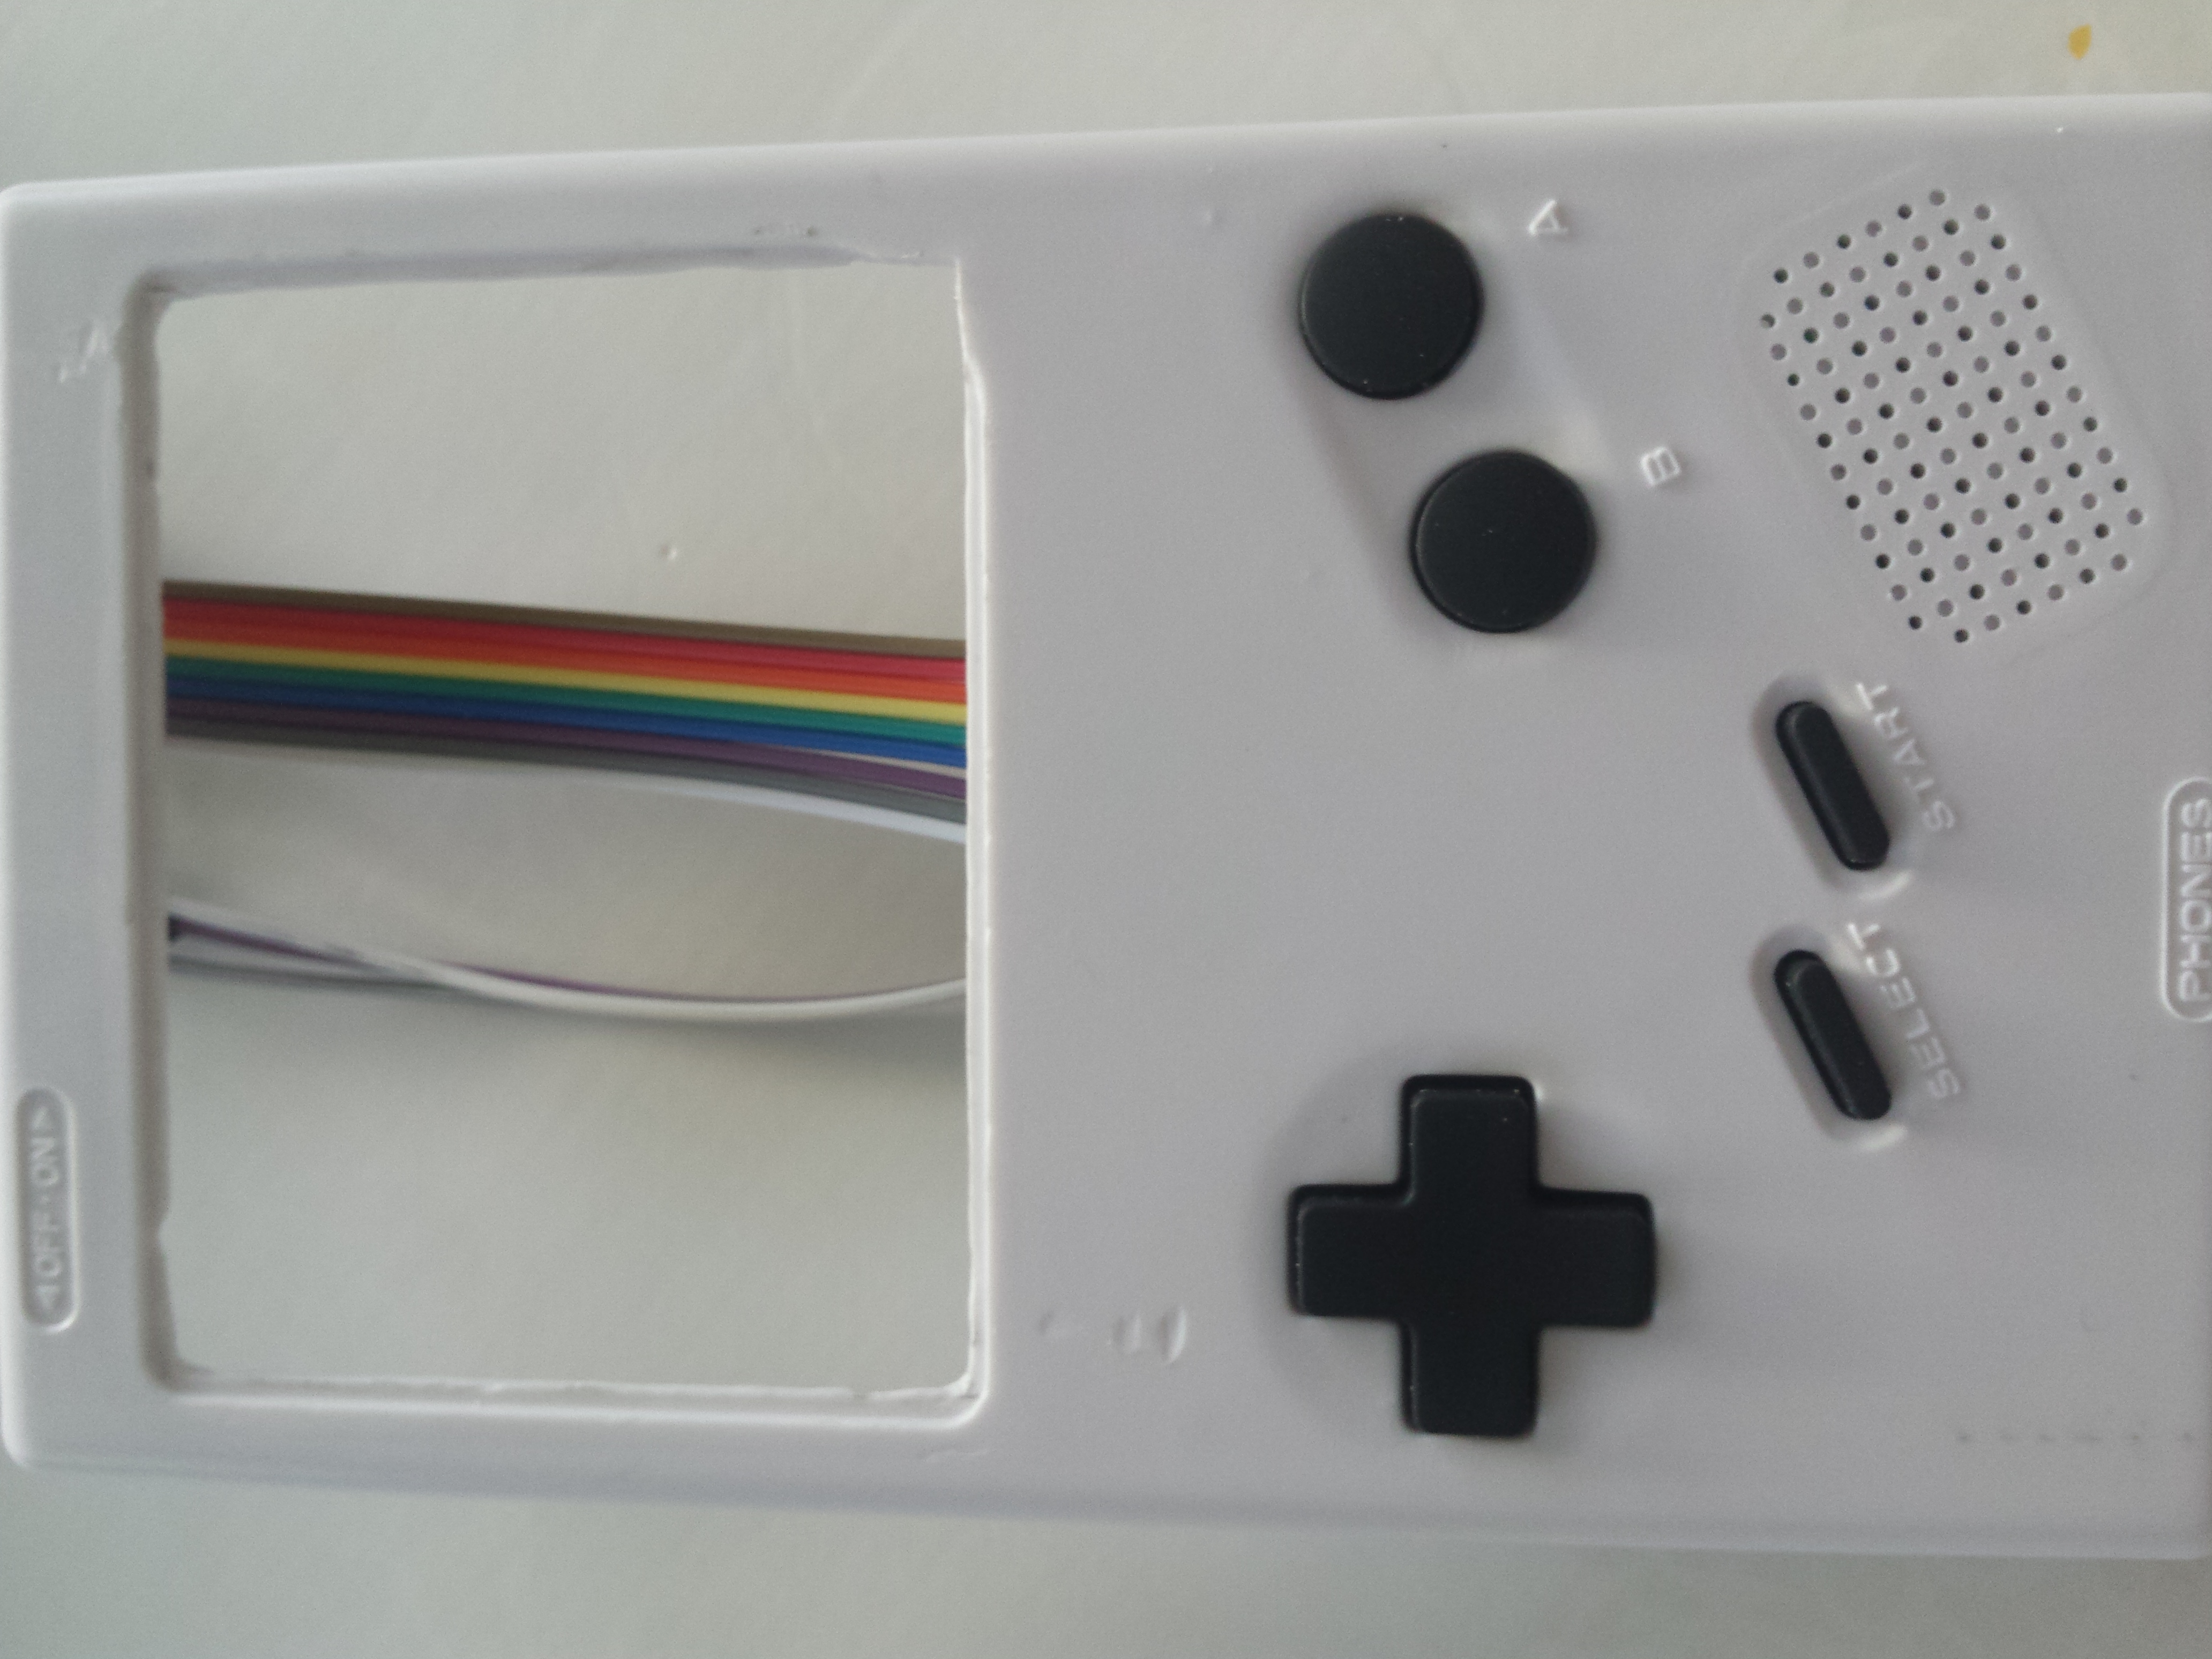
- Mono Speaker + Jack audio out (pluging headset cut the speaker output)
- Tv-Out (Composite)
- 4 – 5 hours of battery life

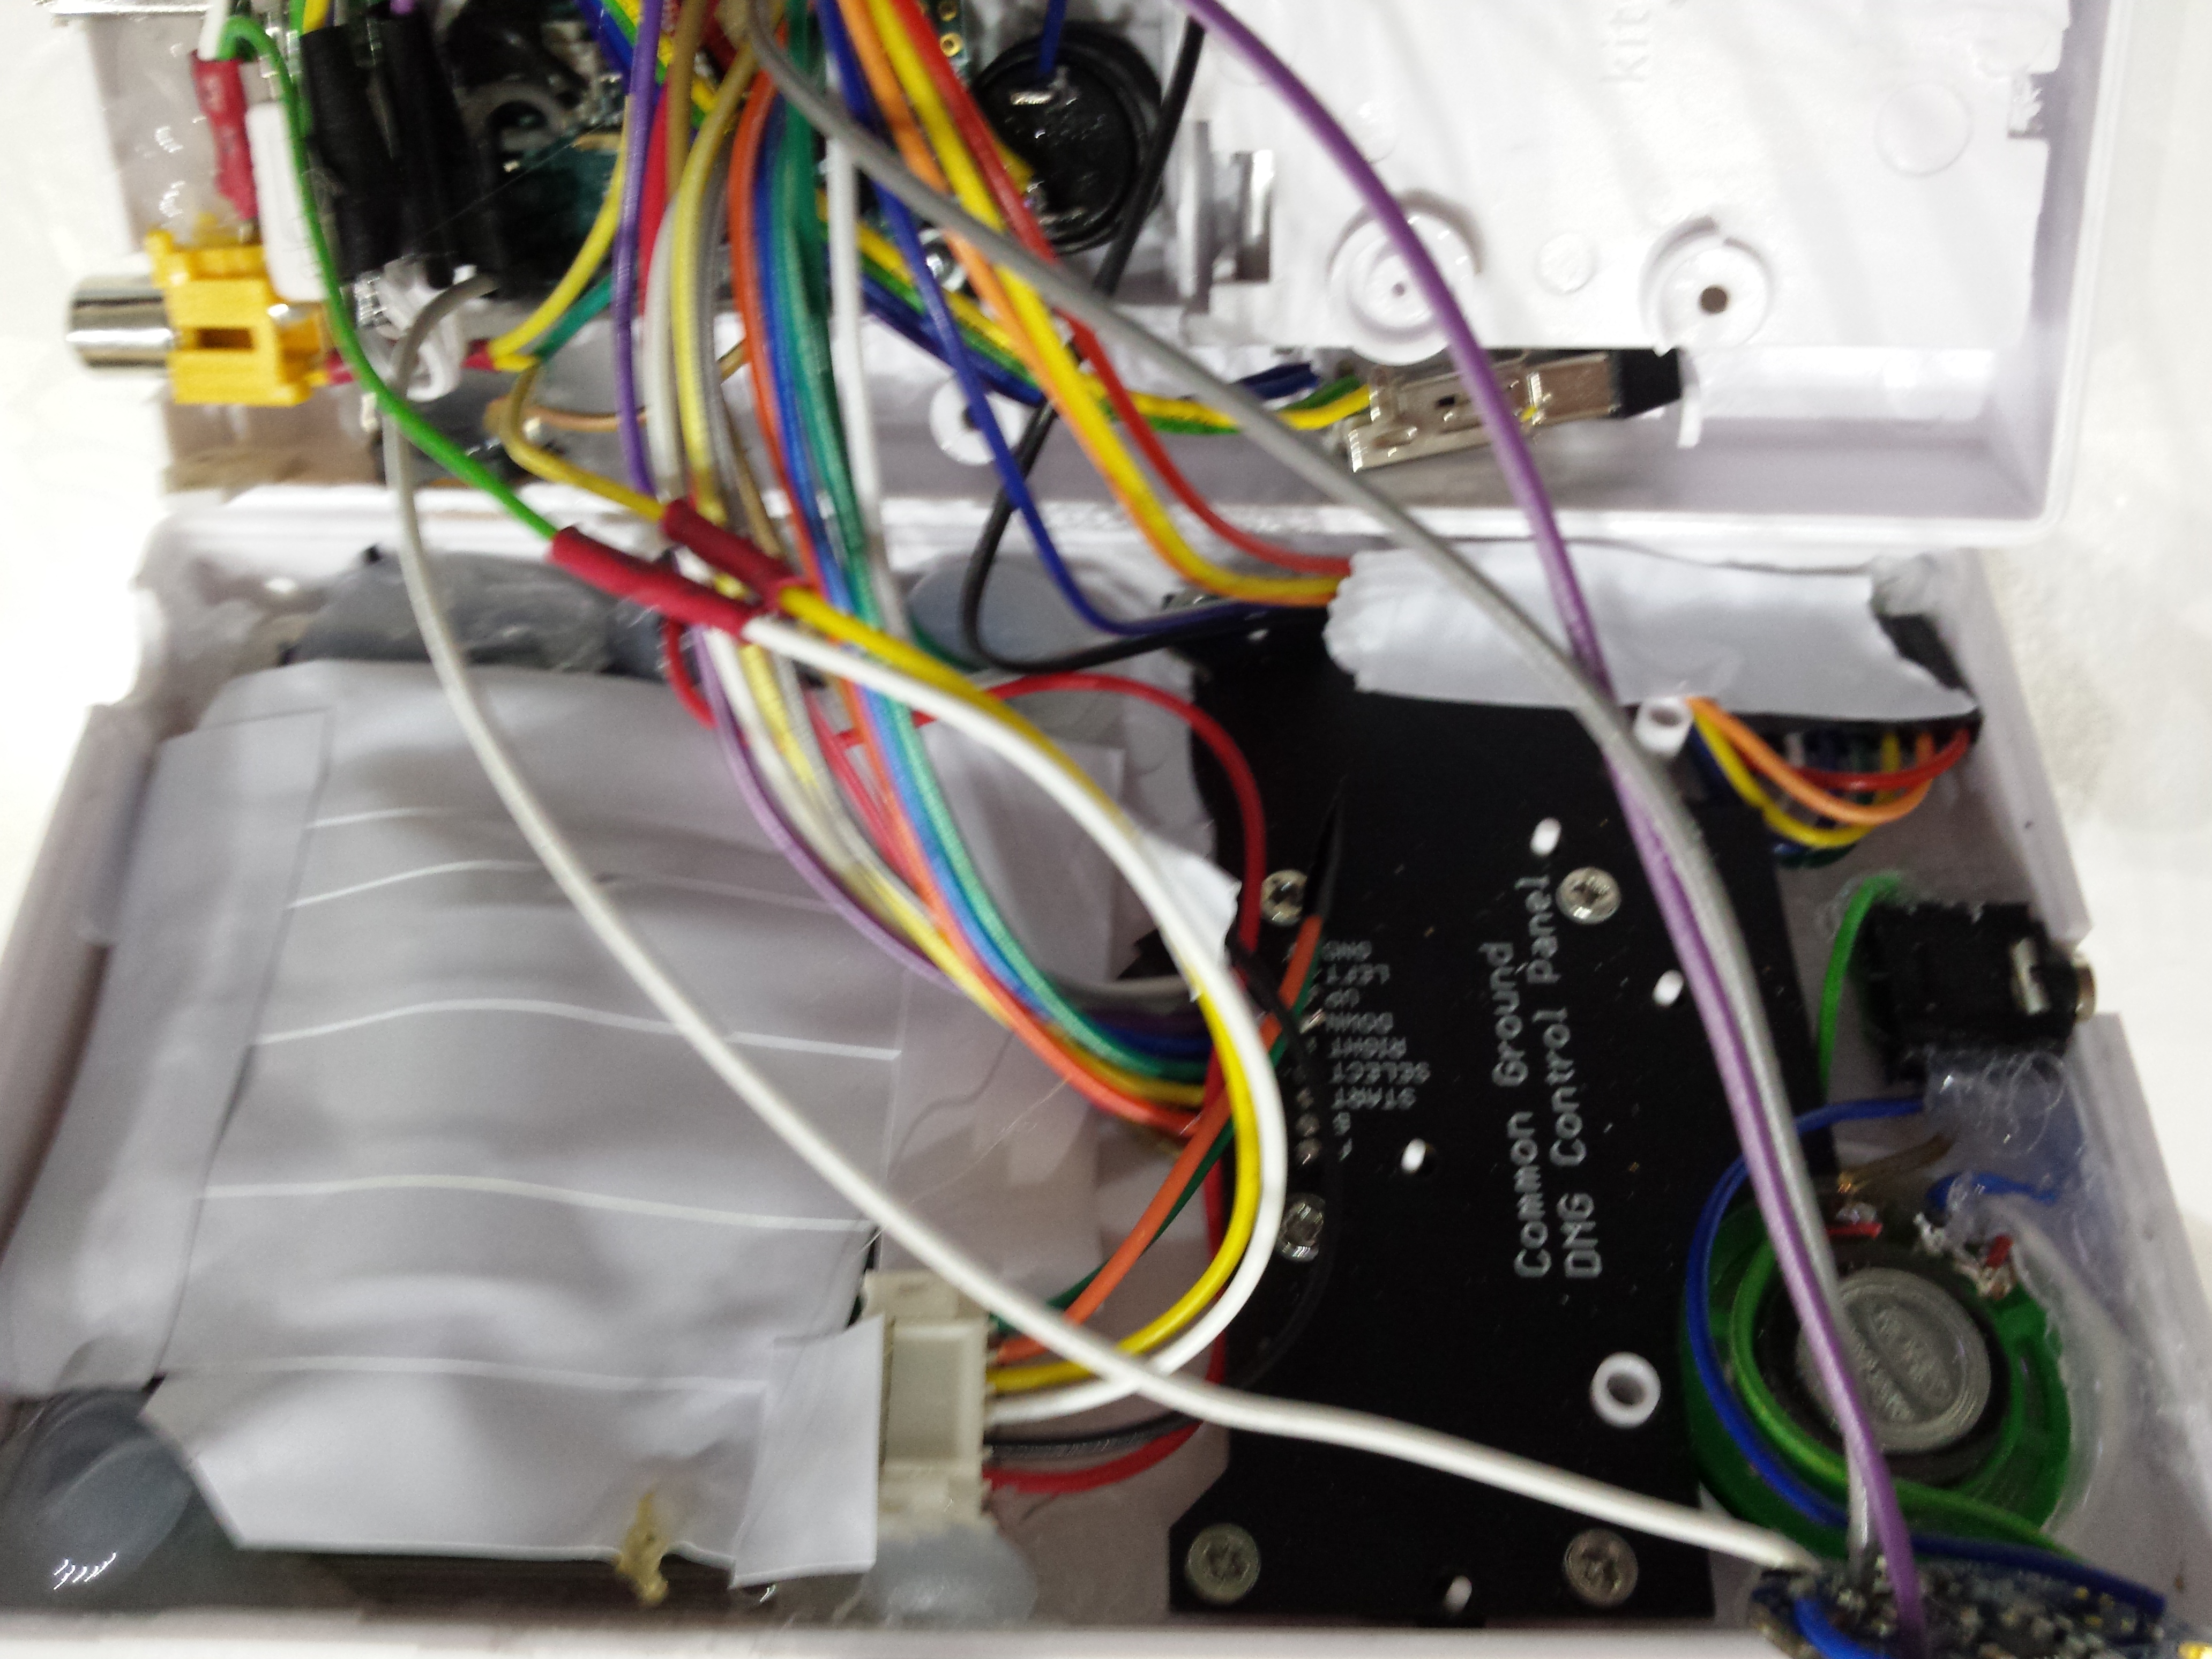
Hardware
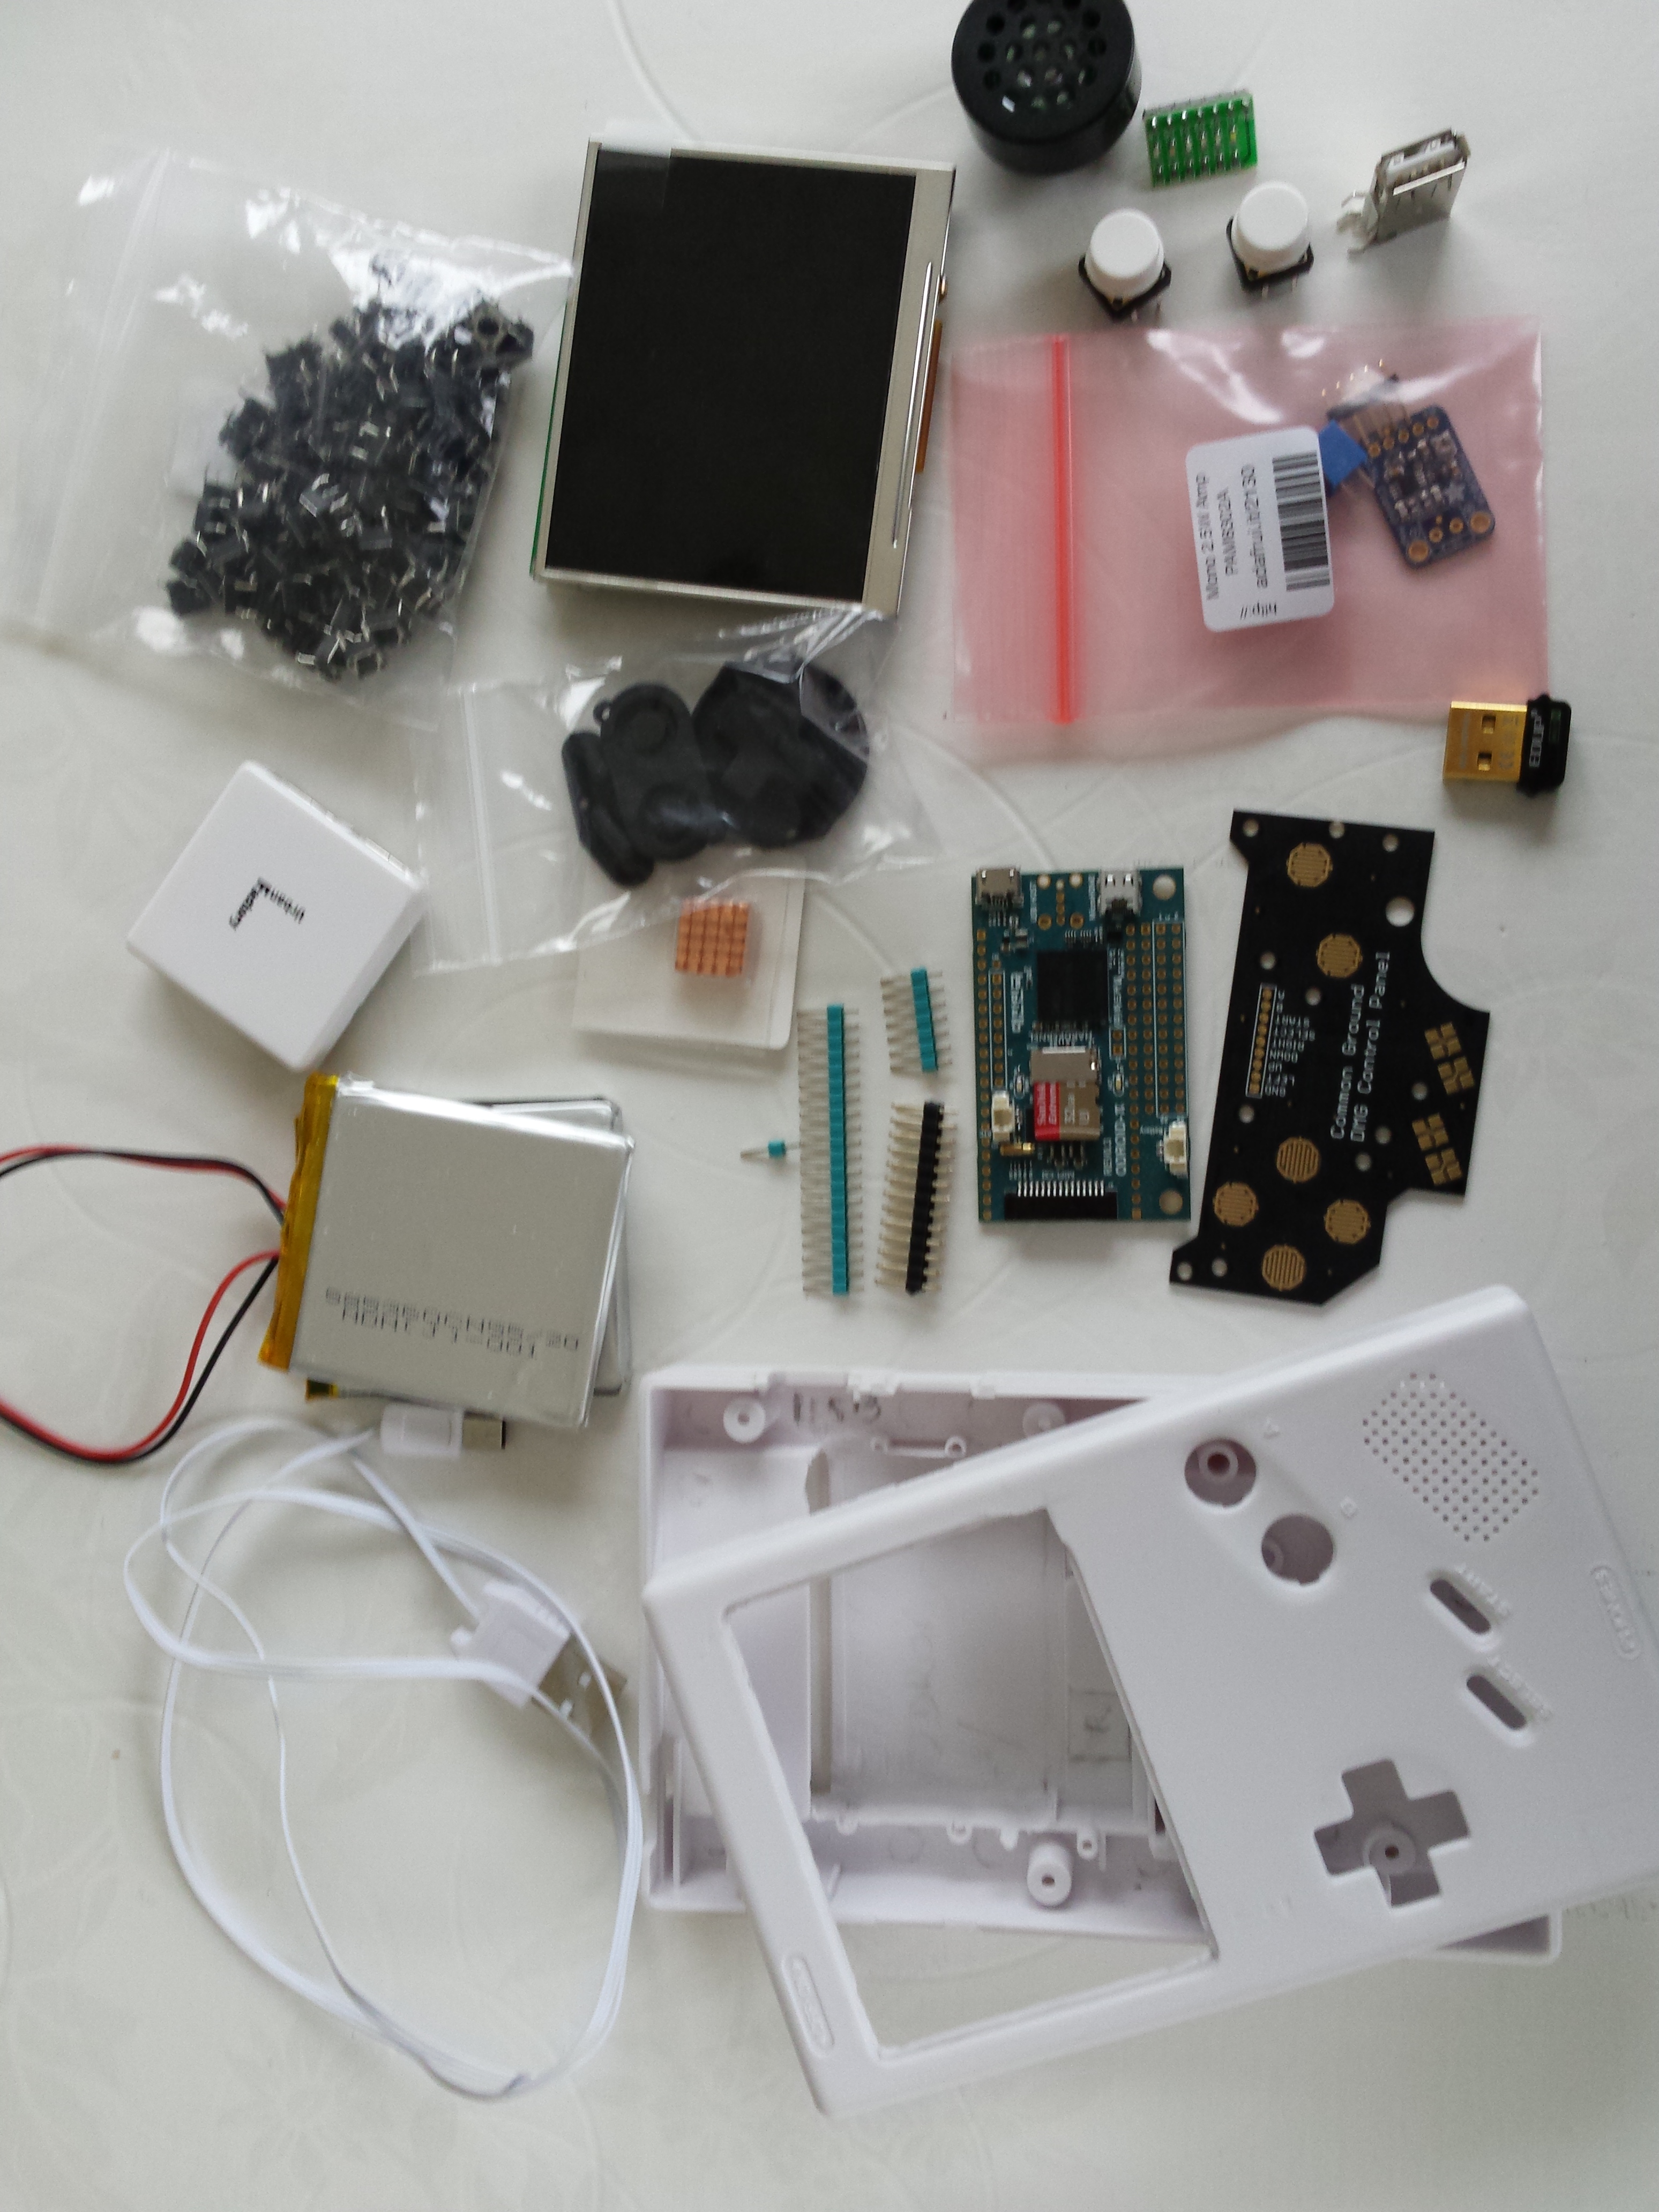
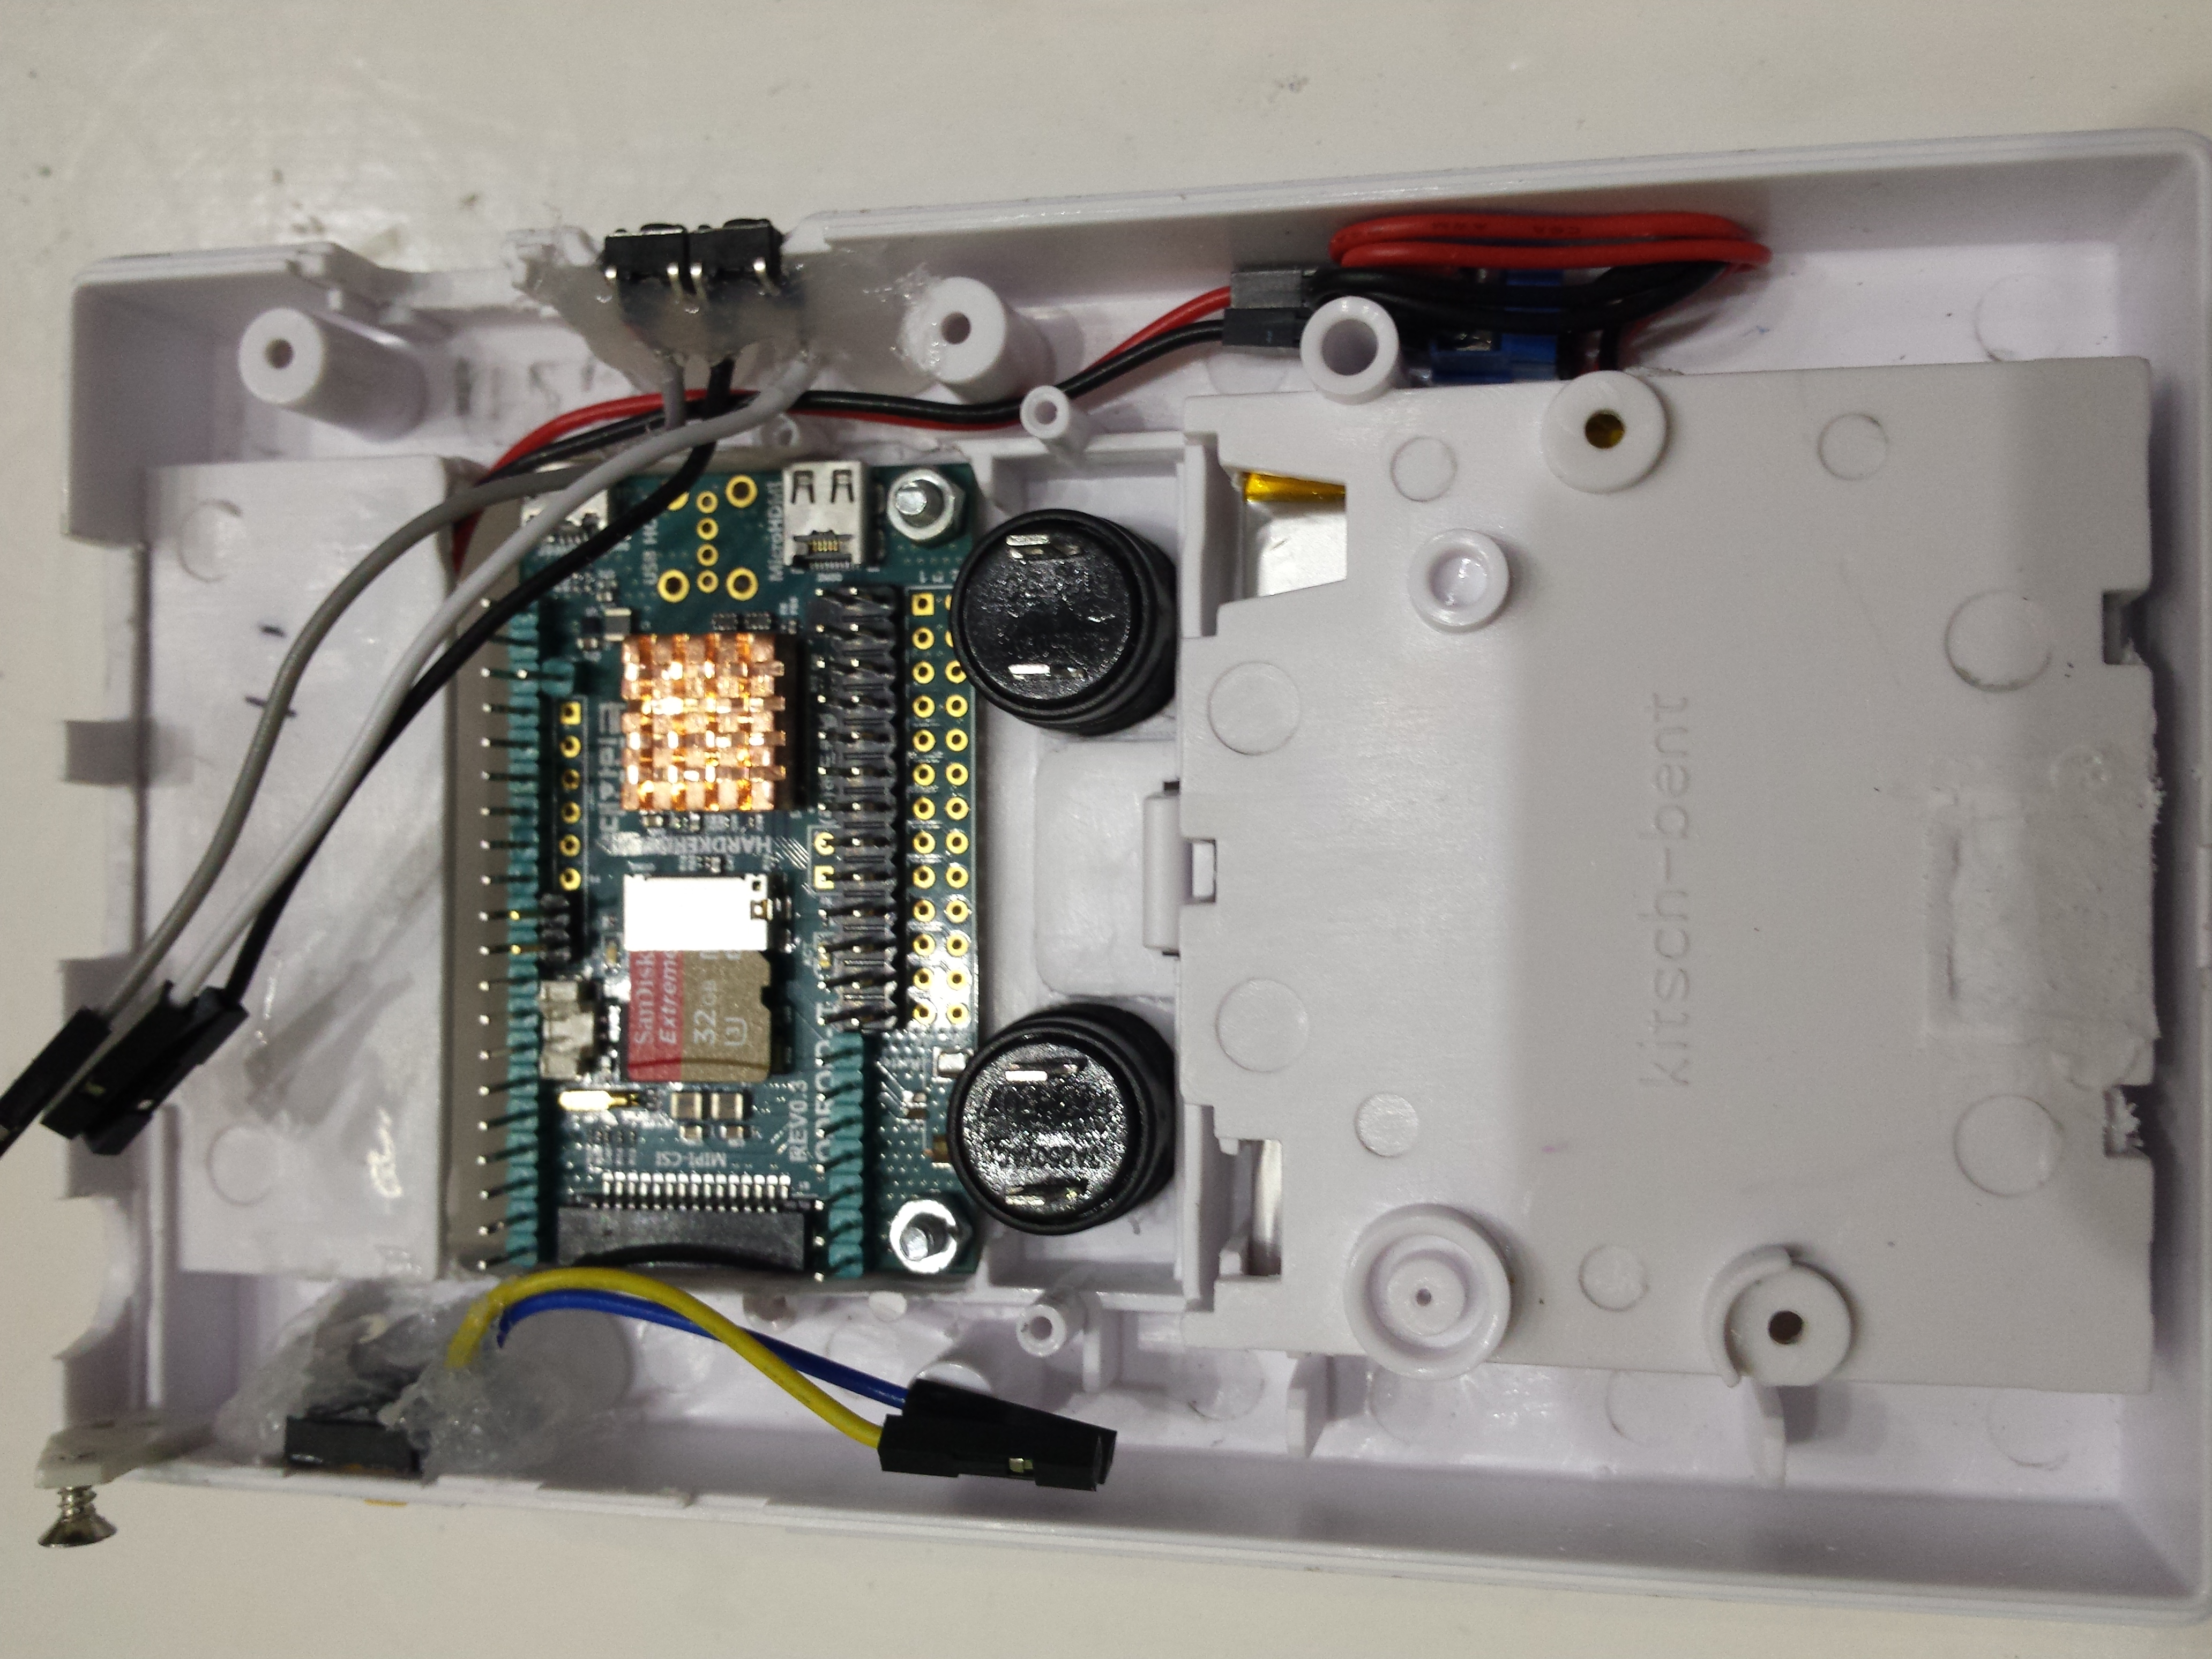
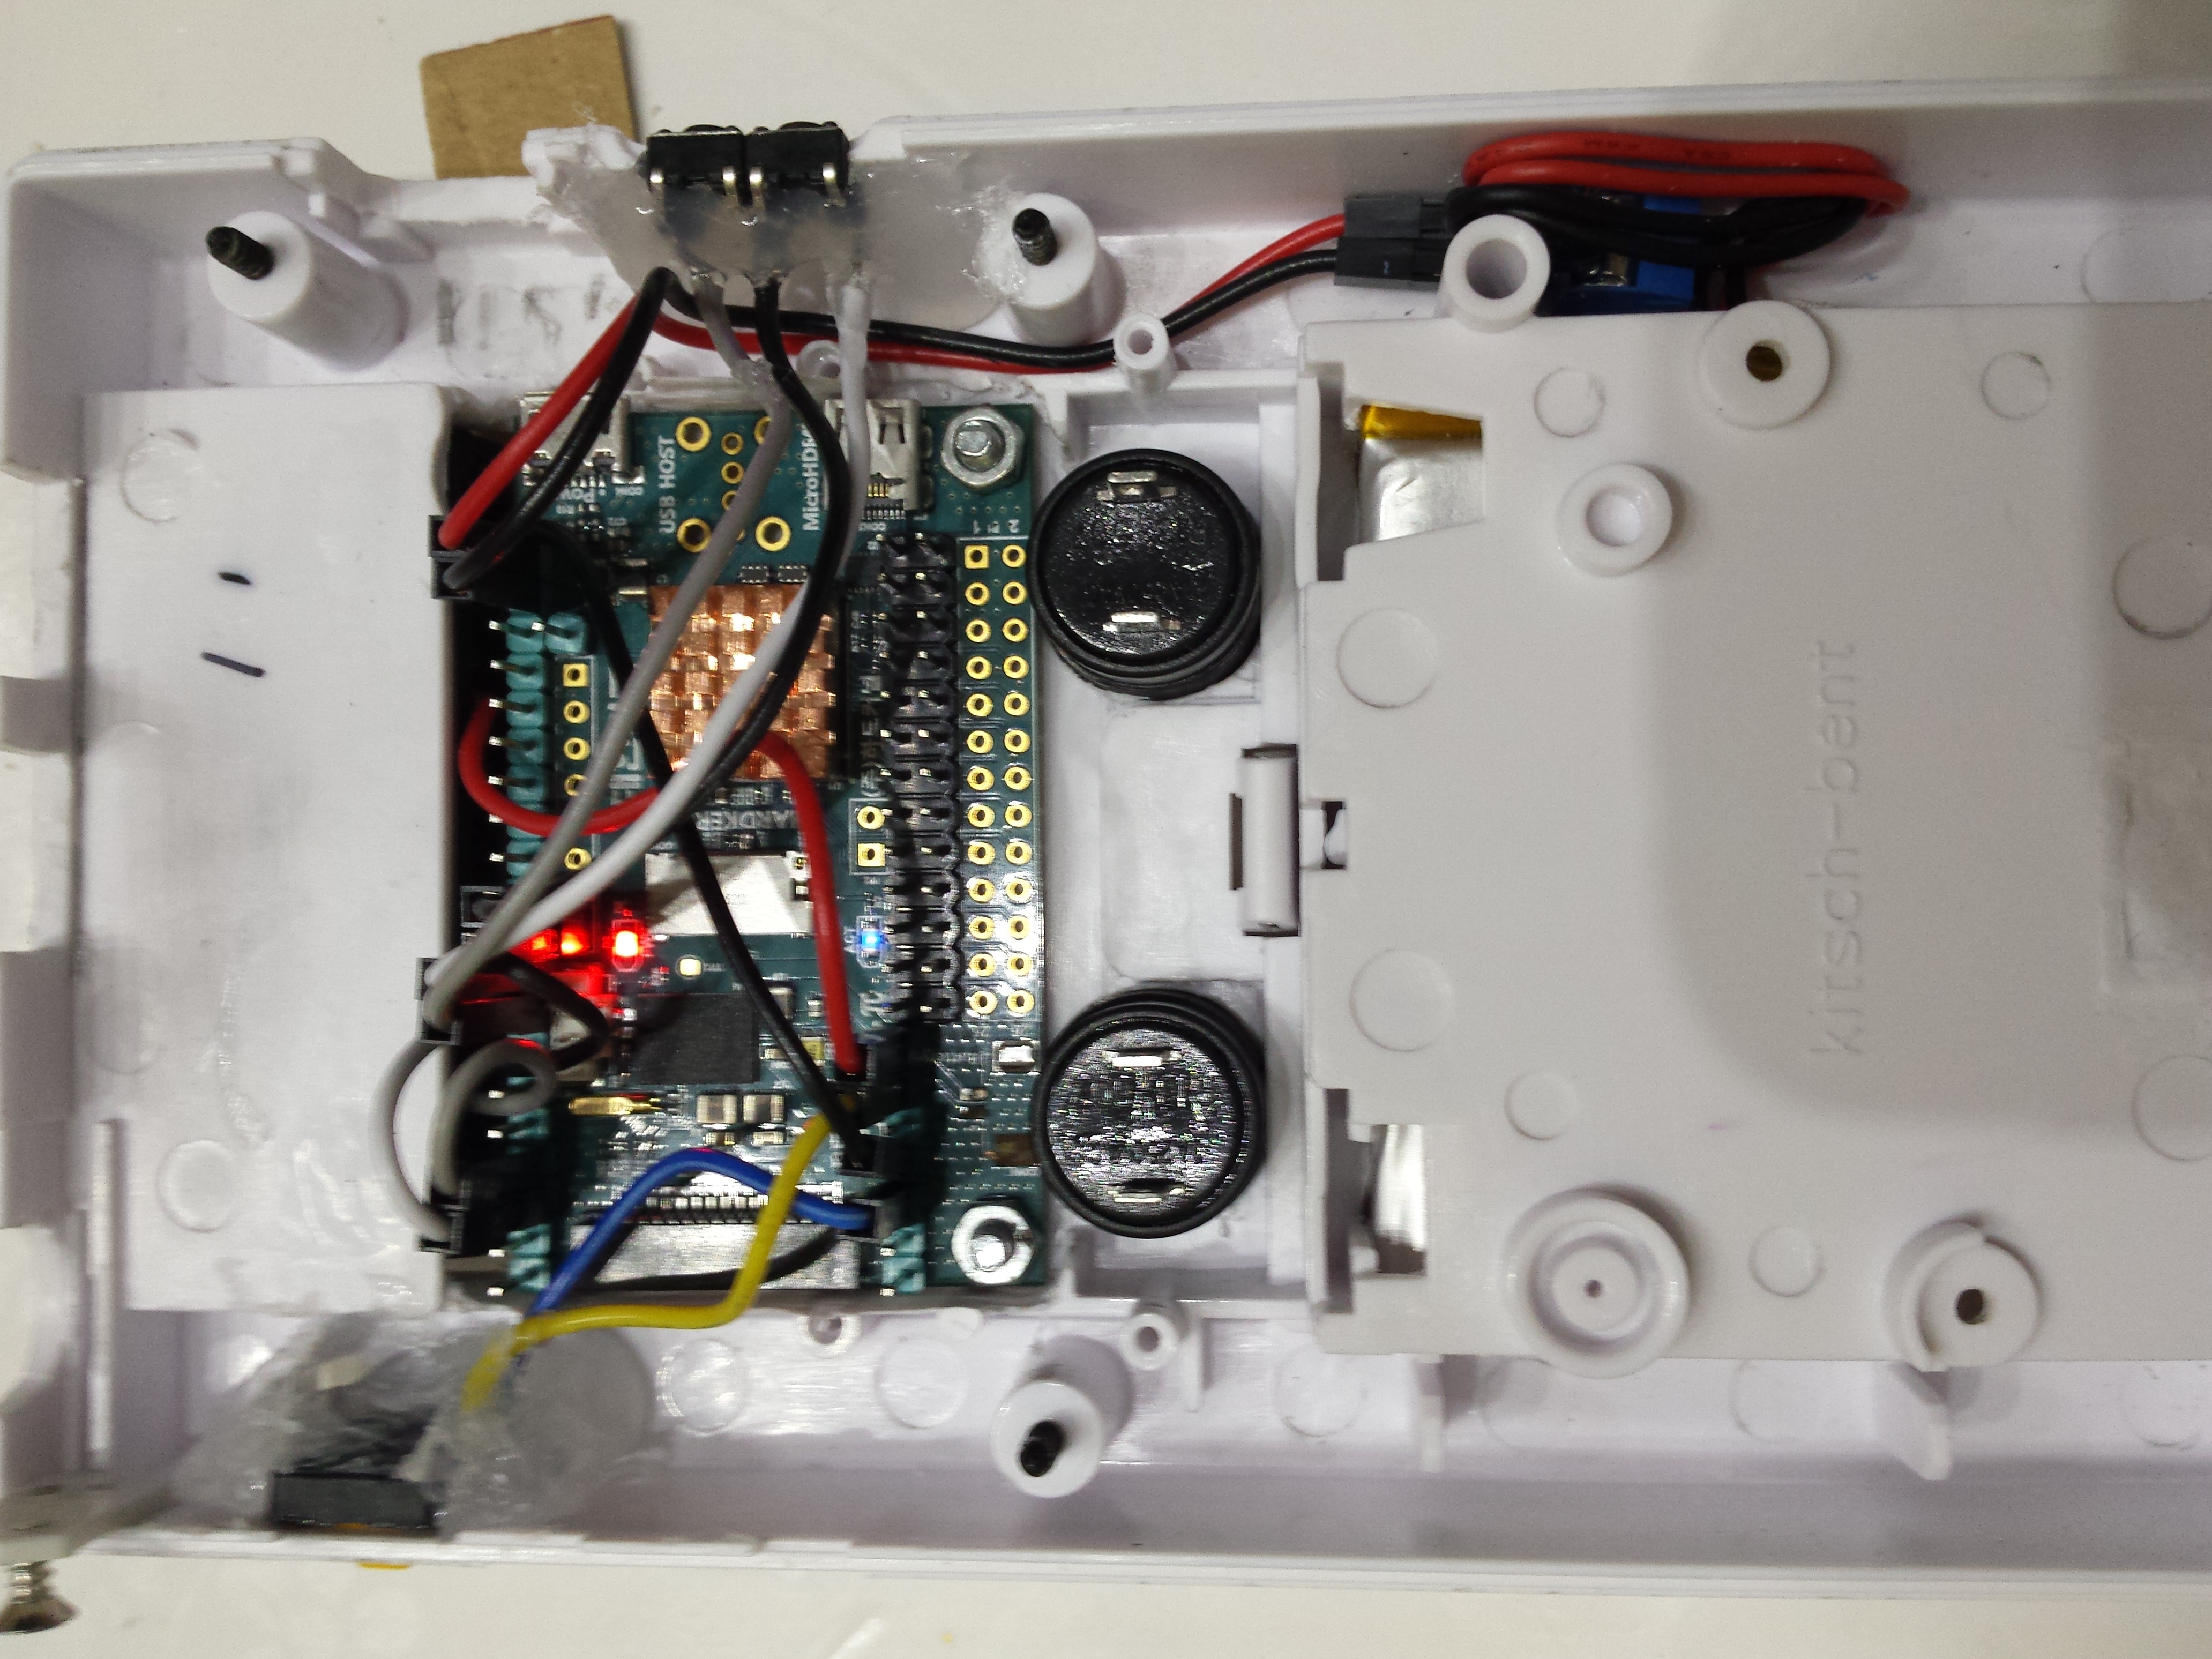
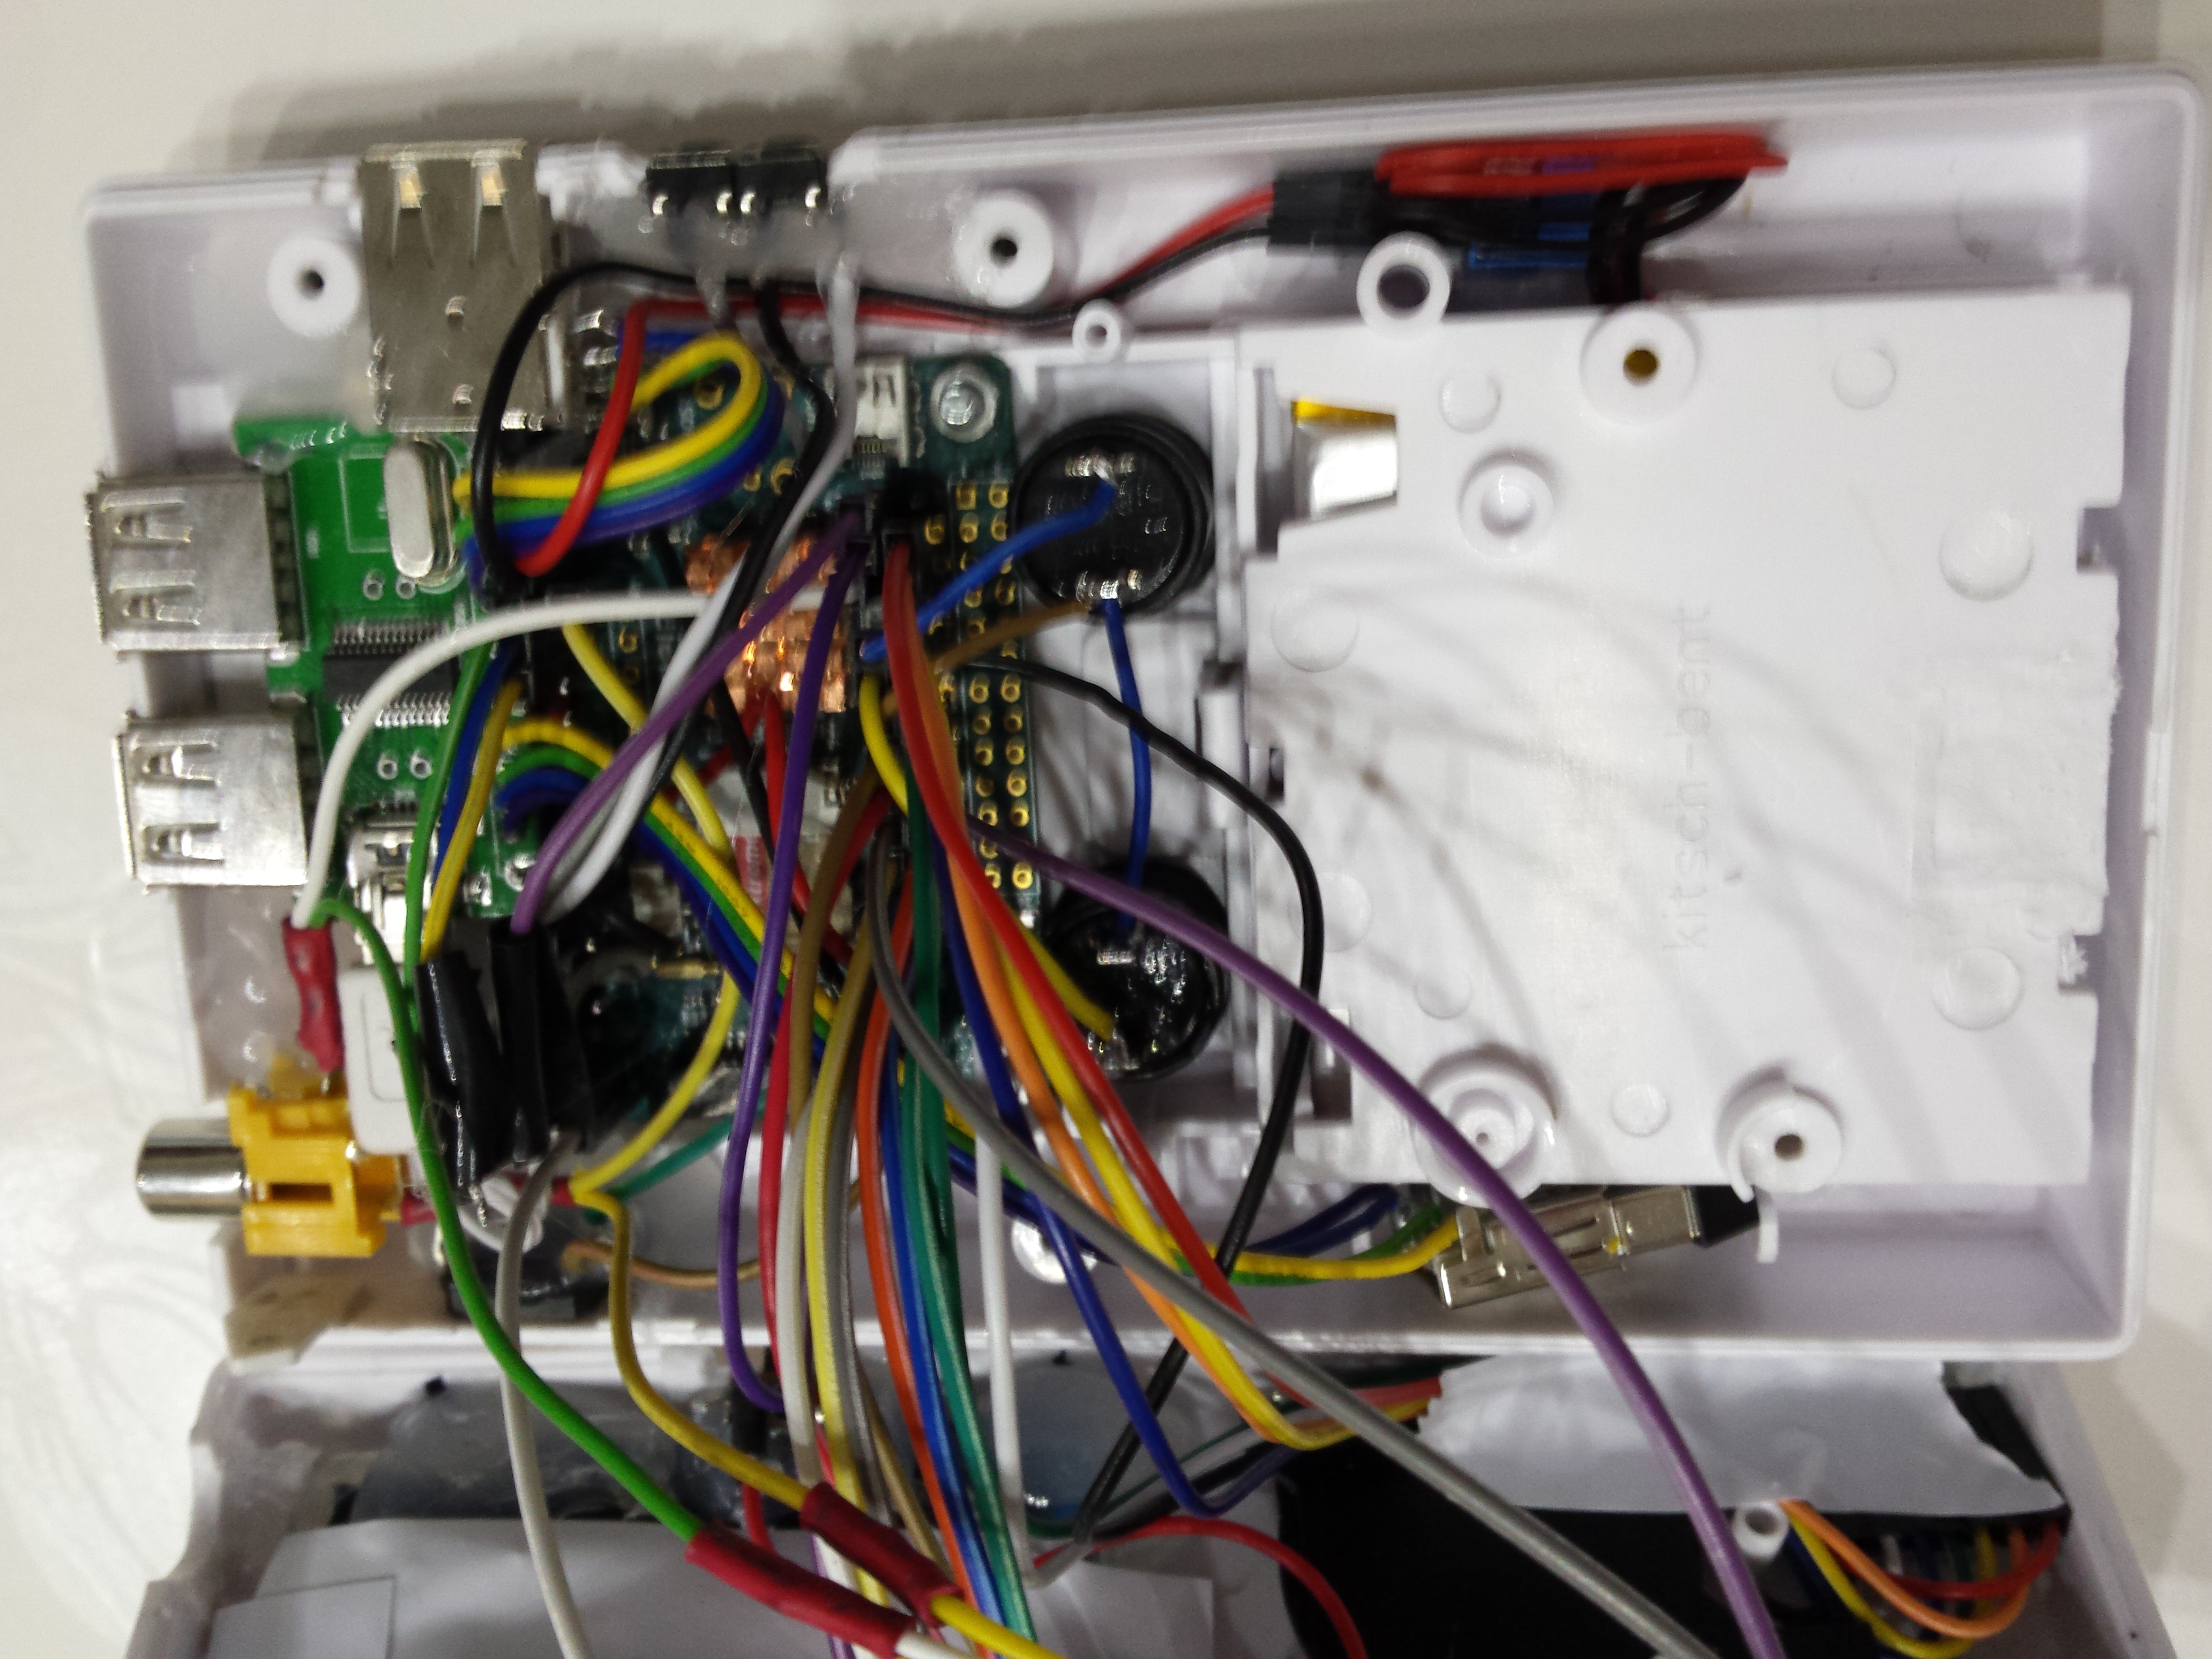
Used components
- Odroid W (which was sold with a USB Connector (F) and pin headers
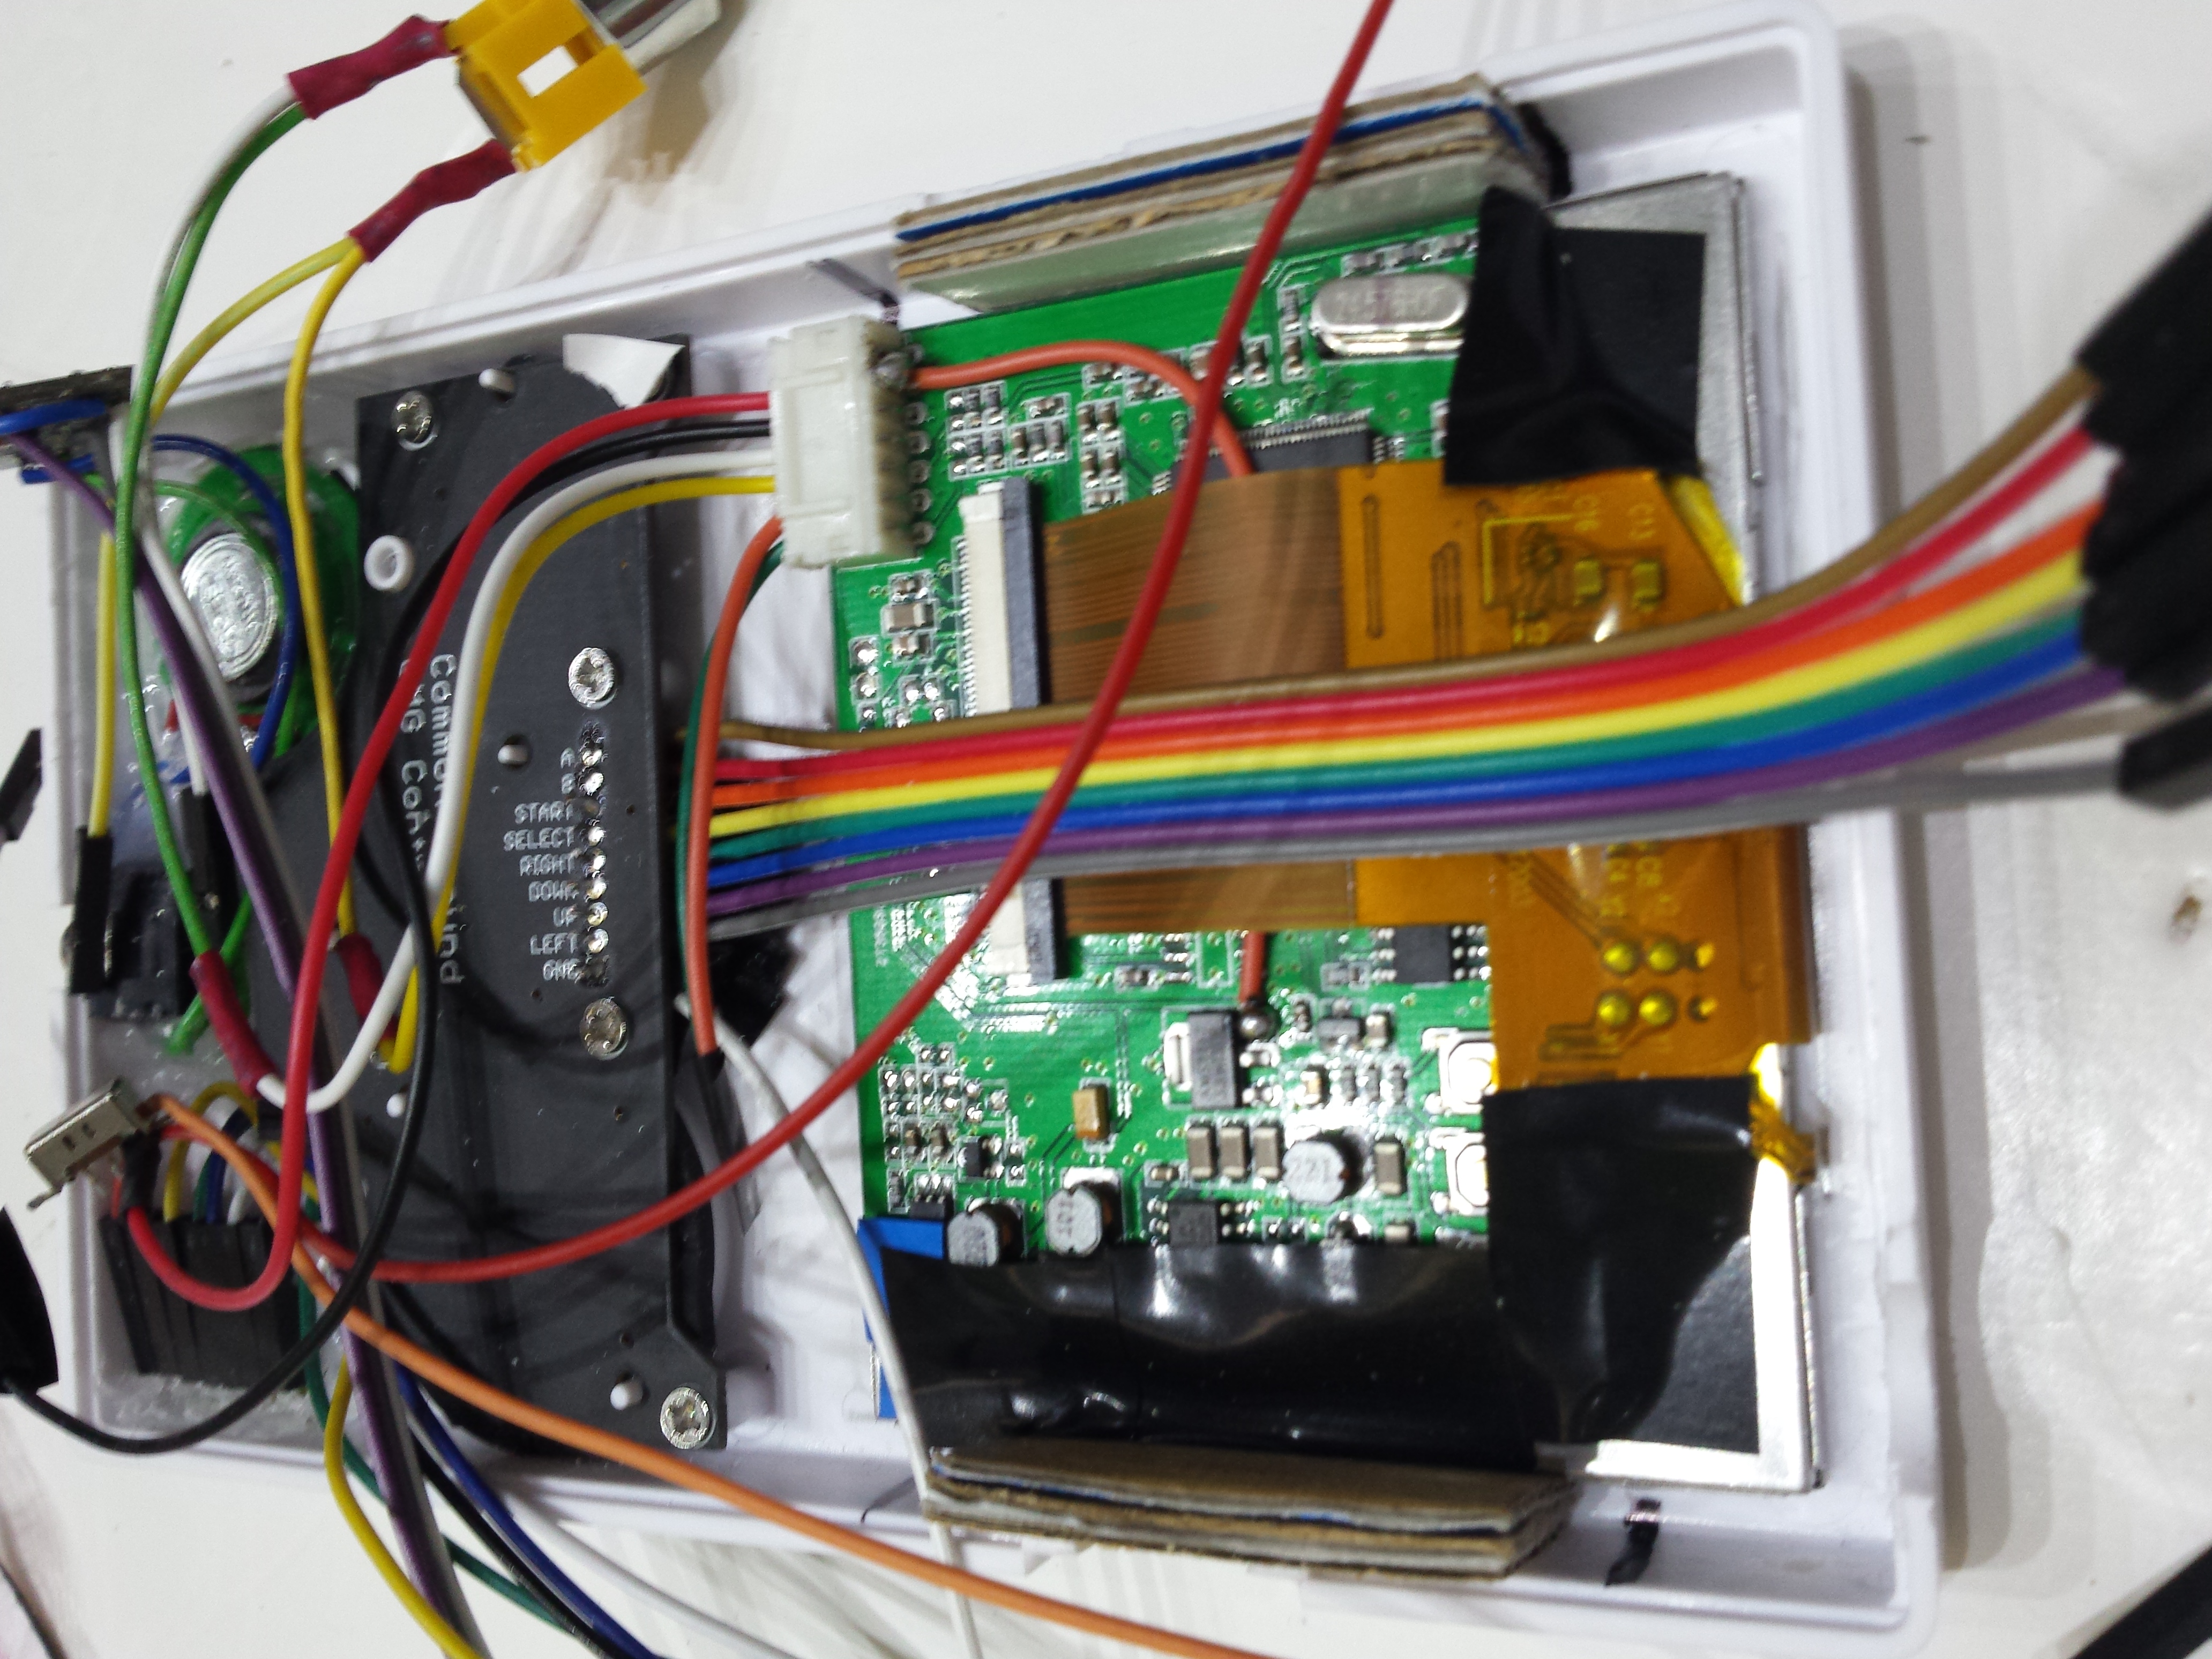
- Game Boy replacement case with silicon buttons + buttons PCB (I took it here)
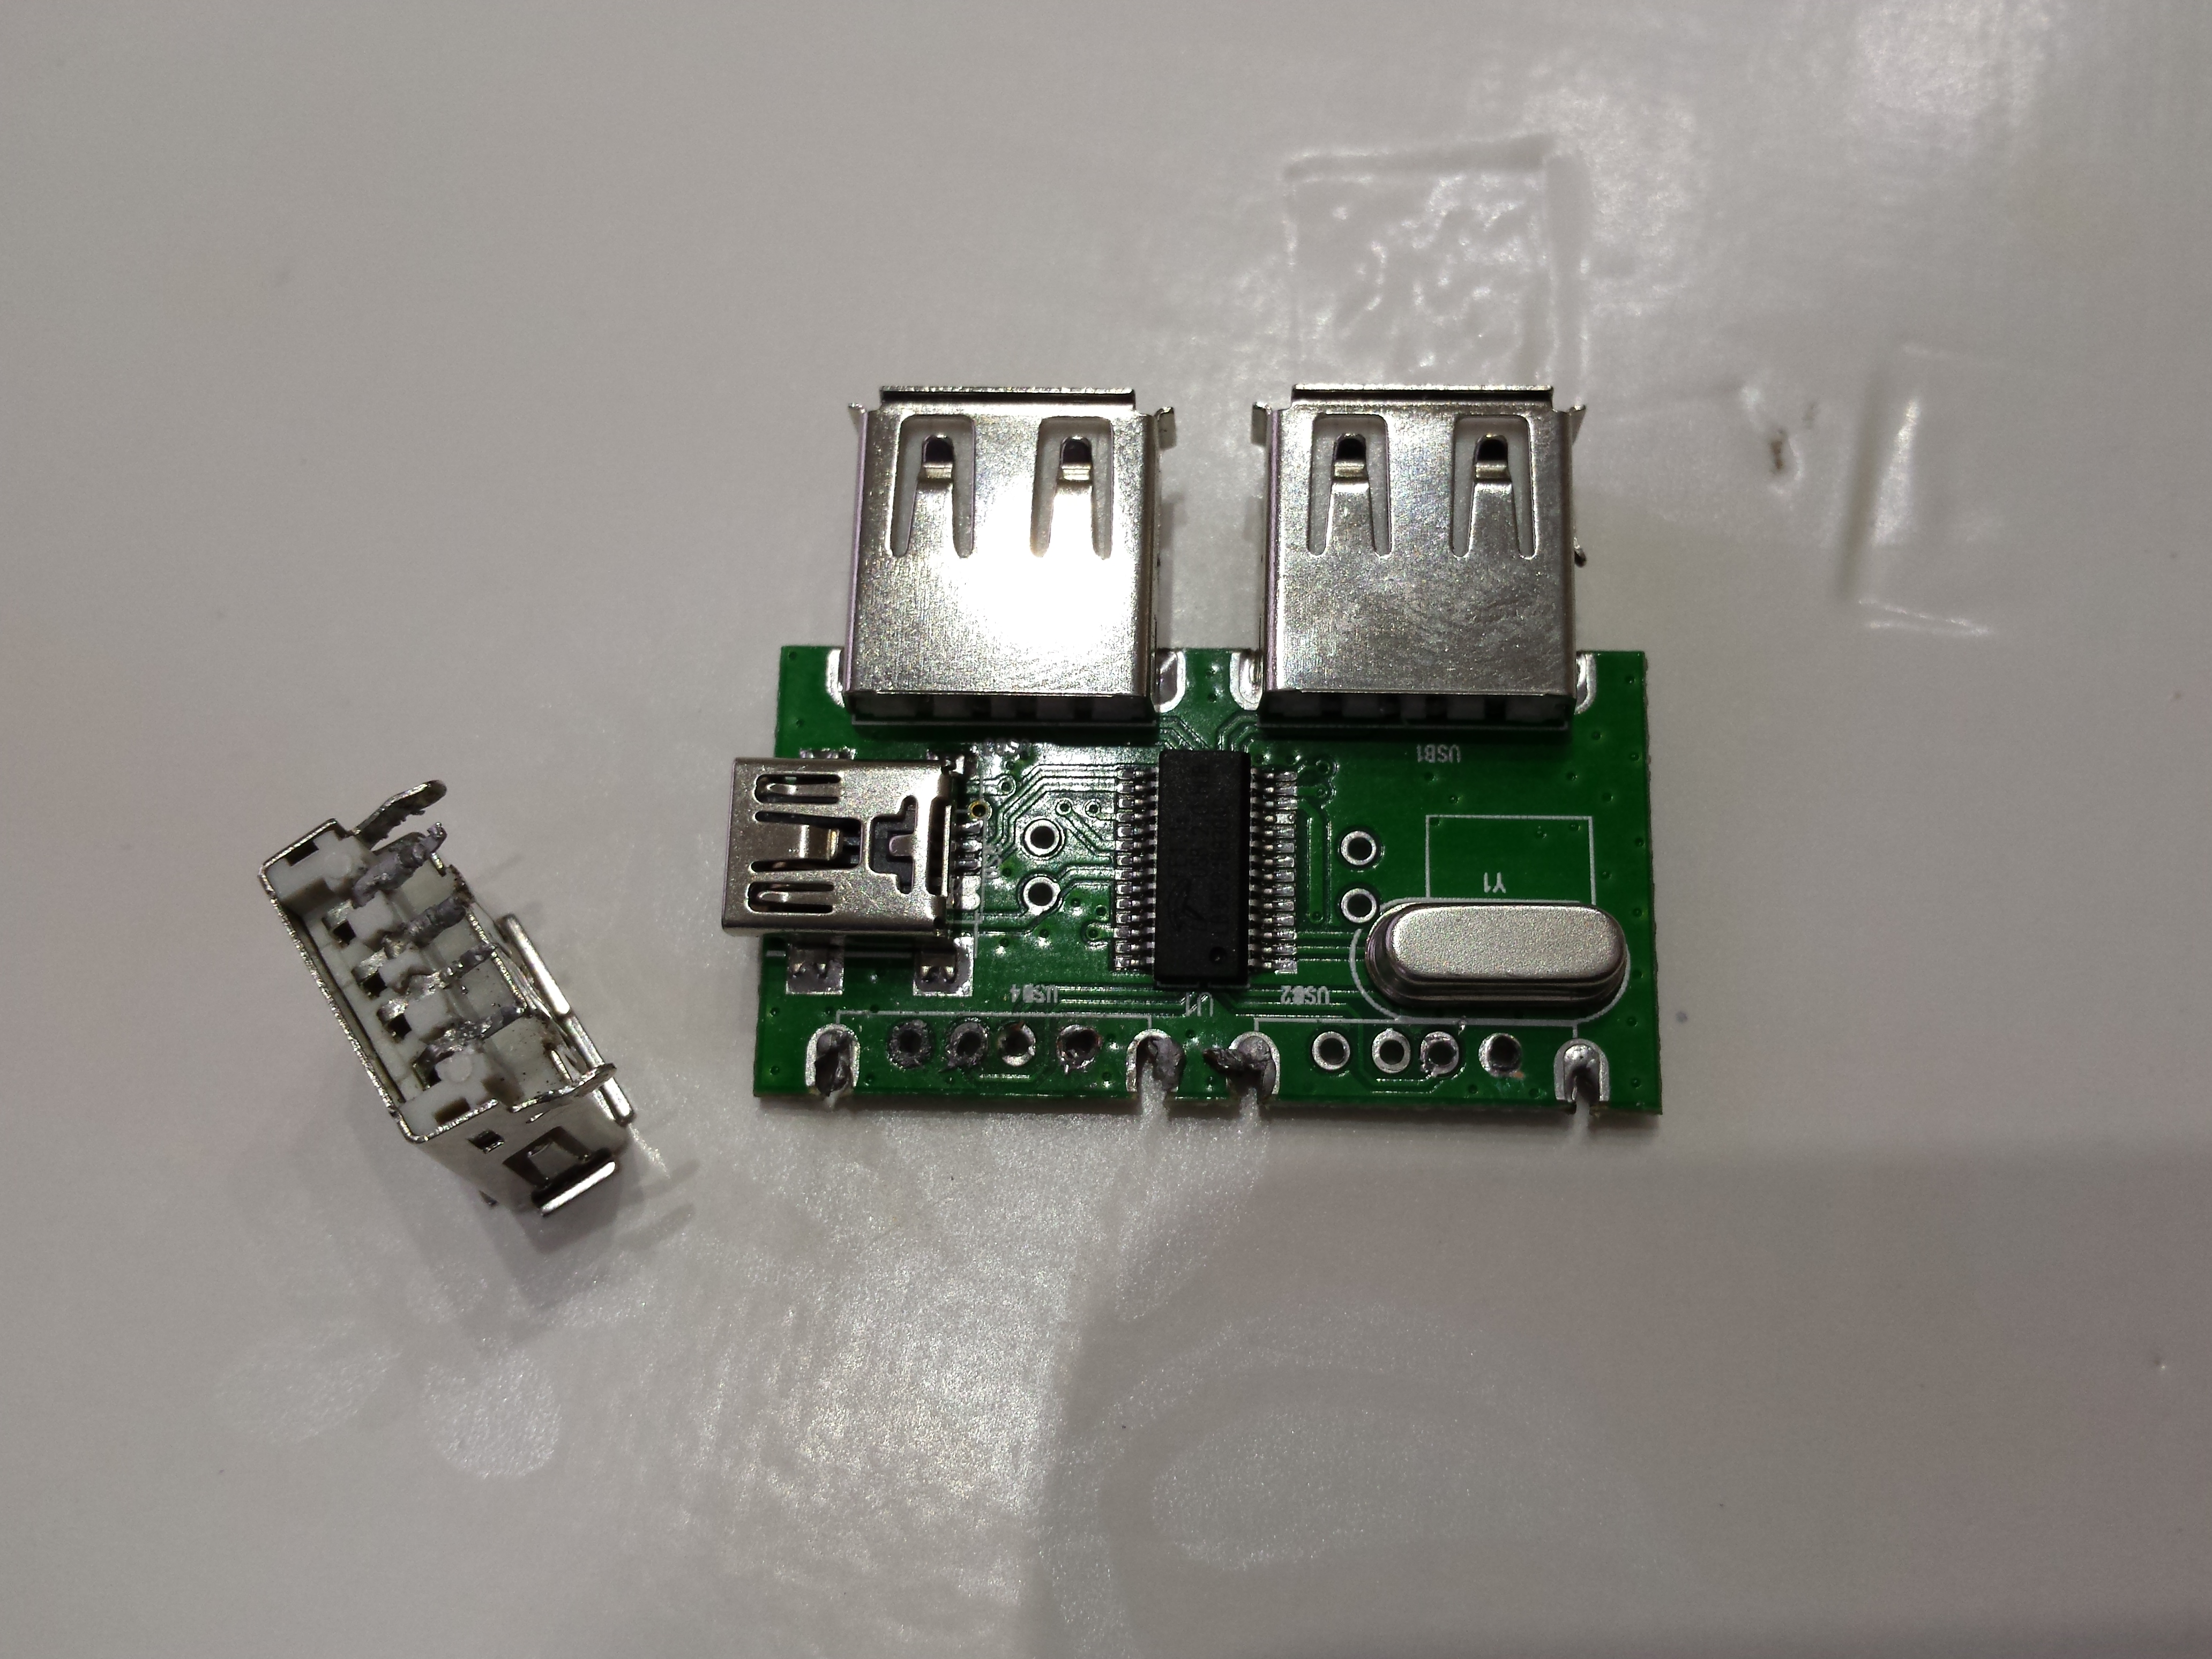
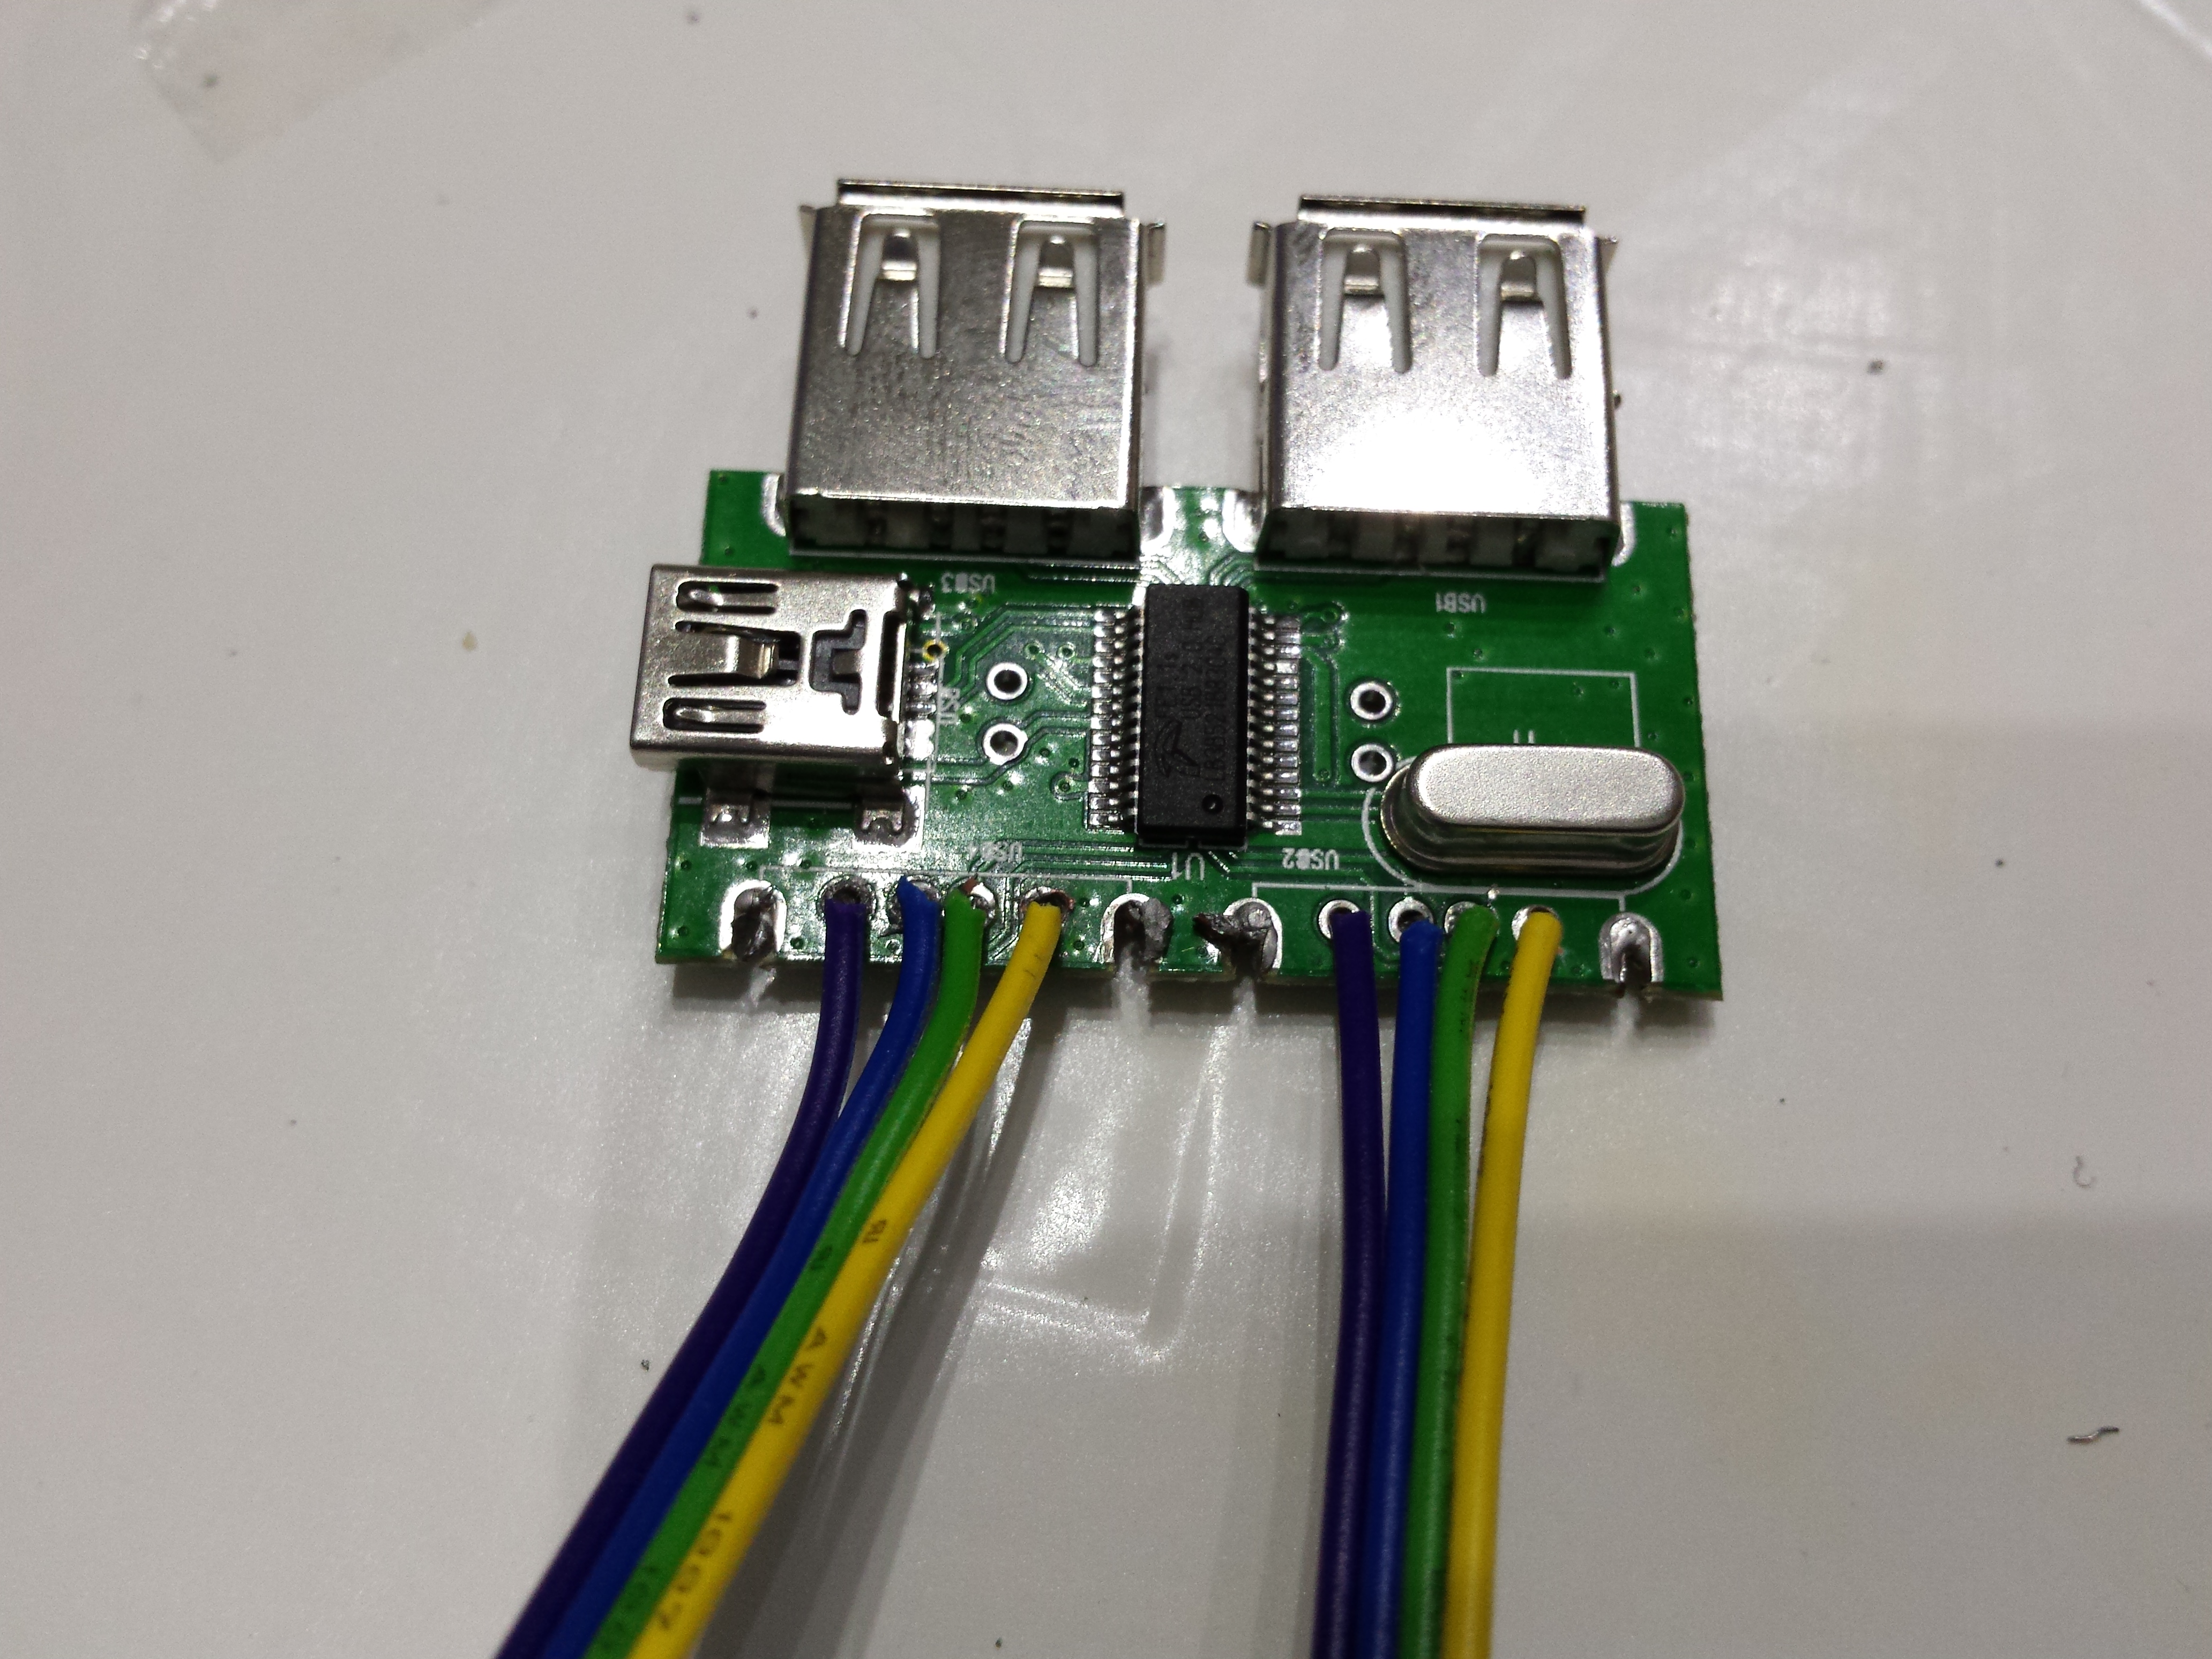
- Small USB hub with flat cable (USB / Micro Usb)
- Raspberry pi copper heatsink
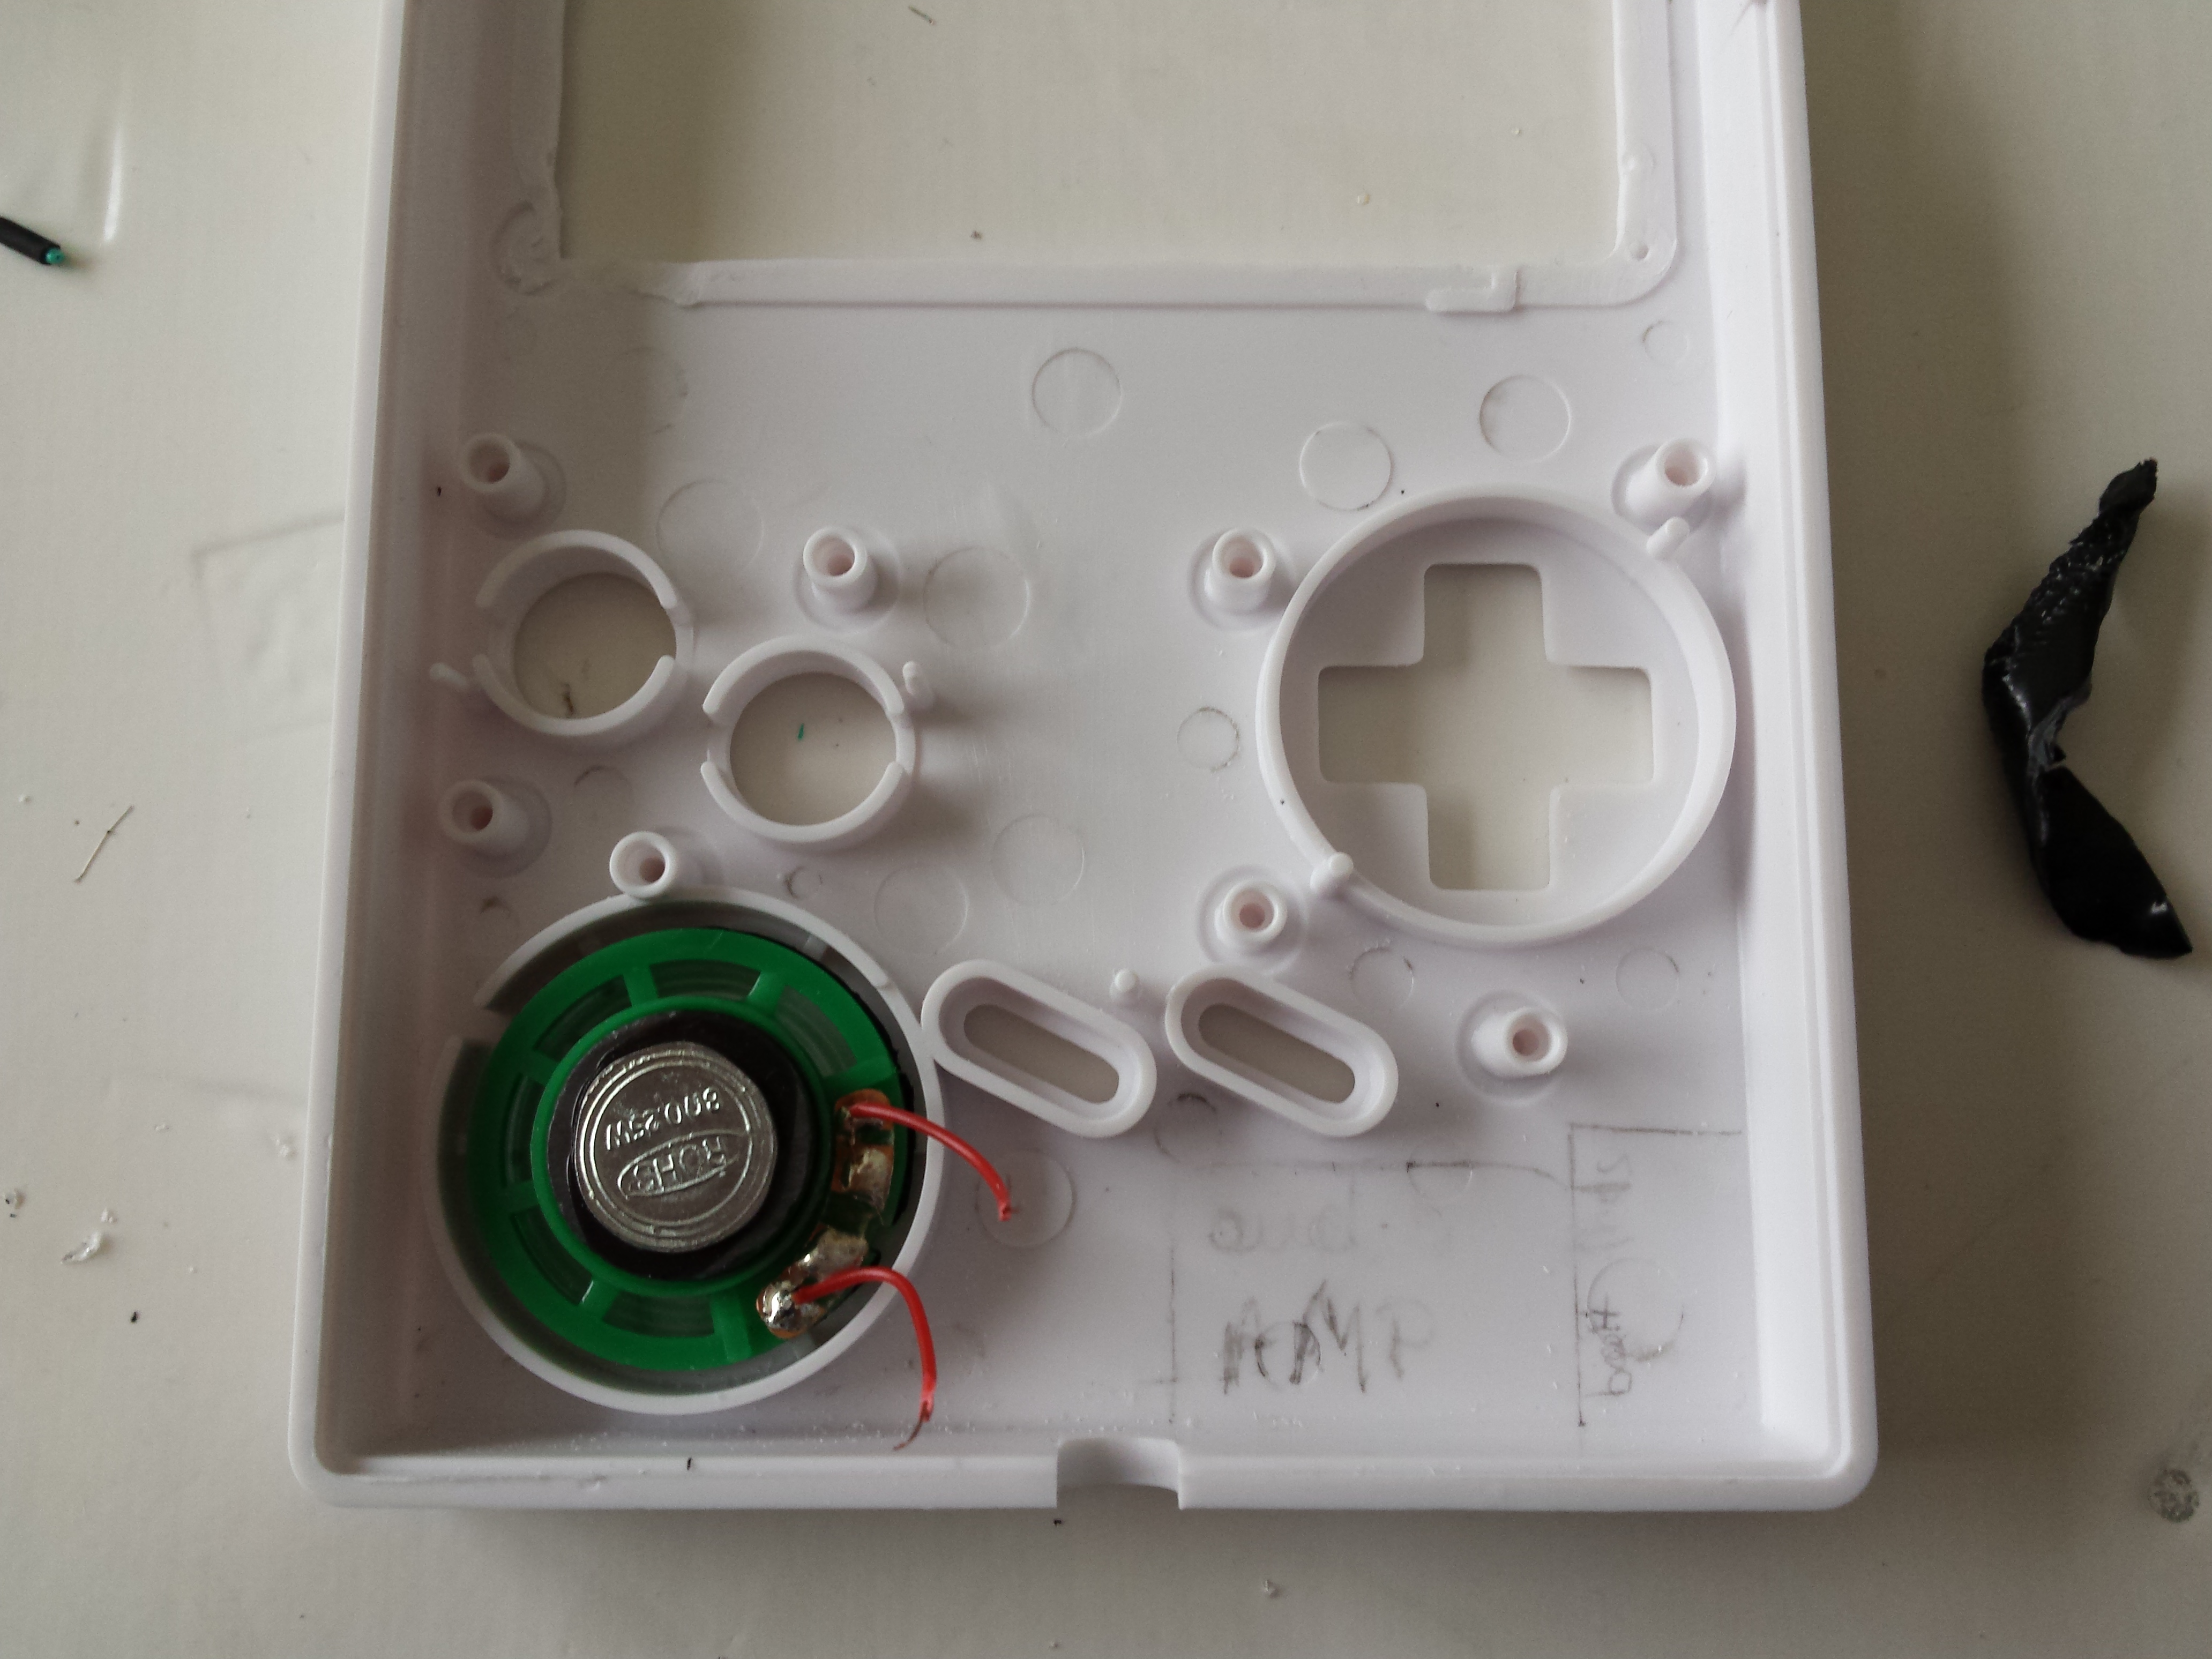
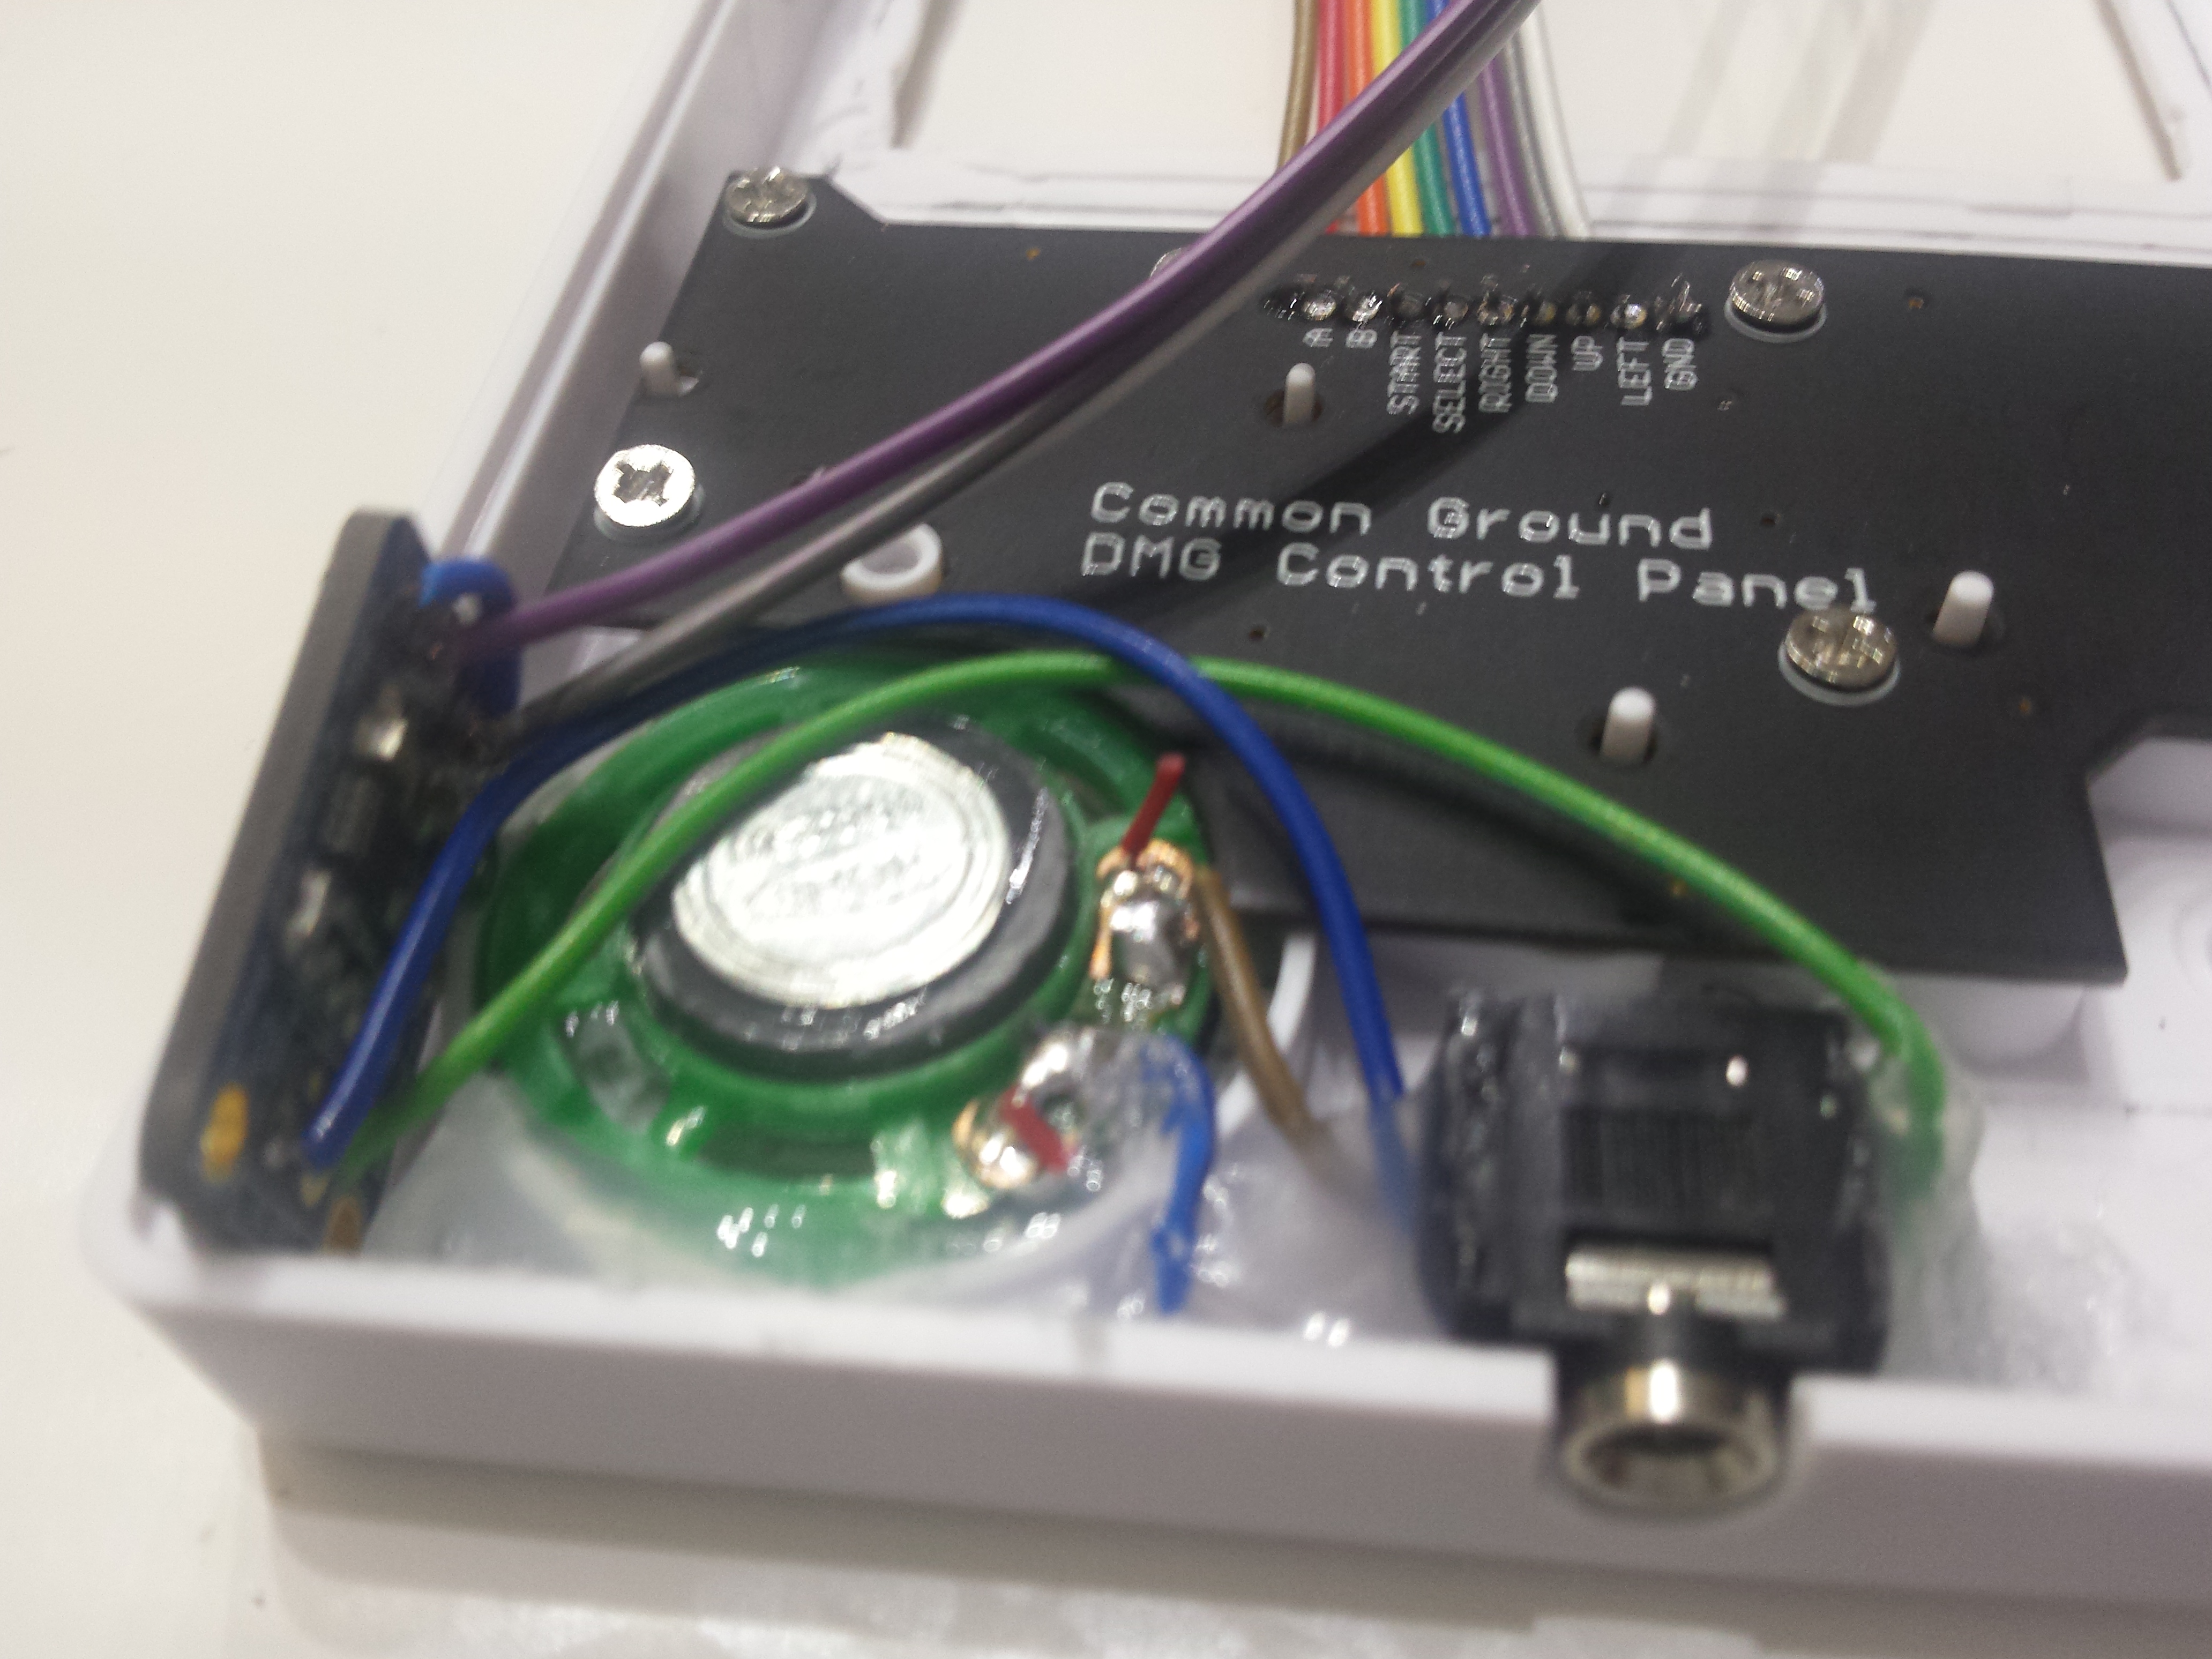
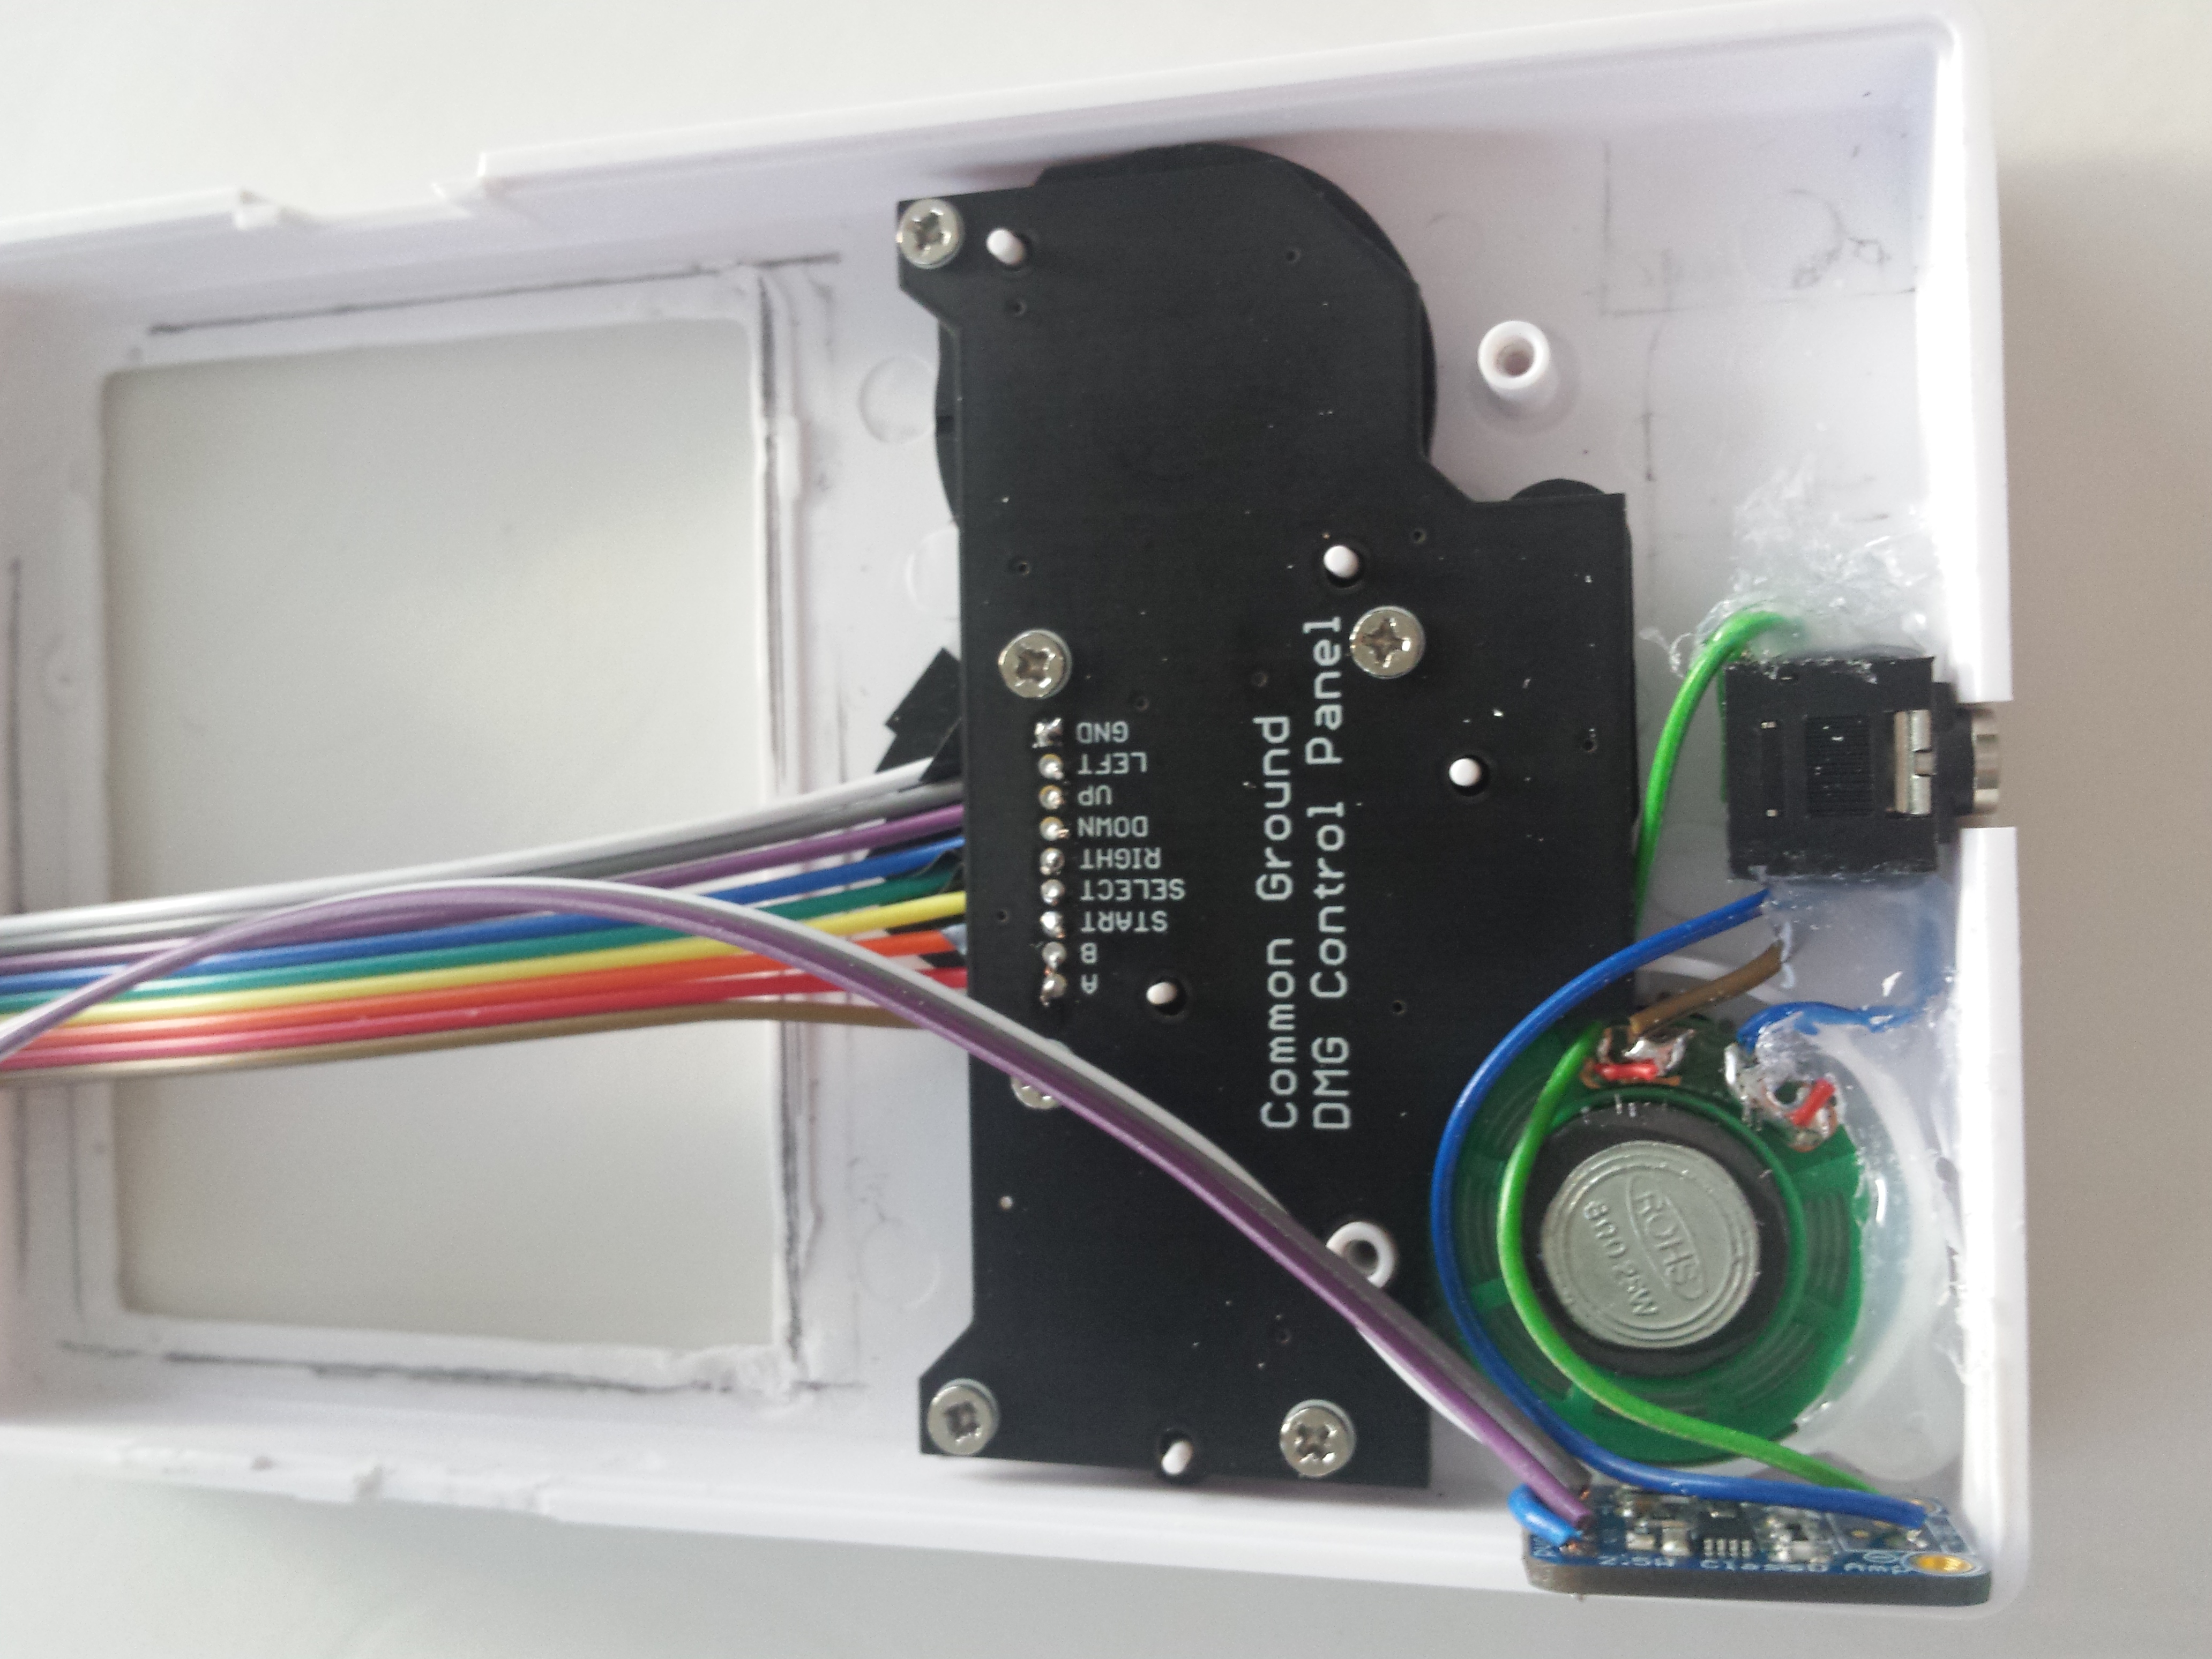
- Mini Speaker from Adafruit (ref. ada-1898)
- Class D mono audio amplifier from Adafruit (ref. ada-2130
- A 3.5 Inches PAL/NTSC small TV Display from Adafruit (ref. ada-913)
- Push buttons from amazon (as found here)
- Some generic push buttons (for Wifi On/off, volume and power switch)
- Generic usb wifi dongle (linux compatible)
- 6bit Multicolor LED breadboard, found on ebay
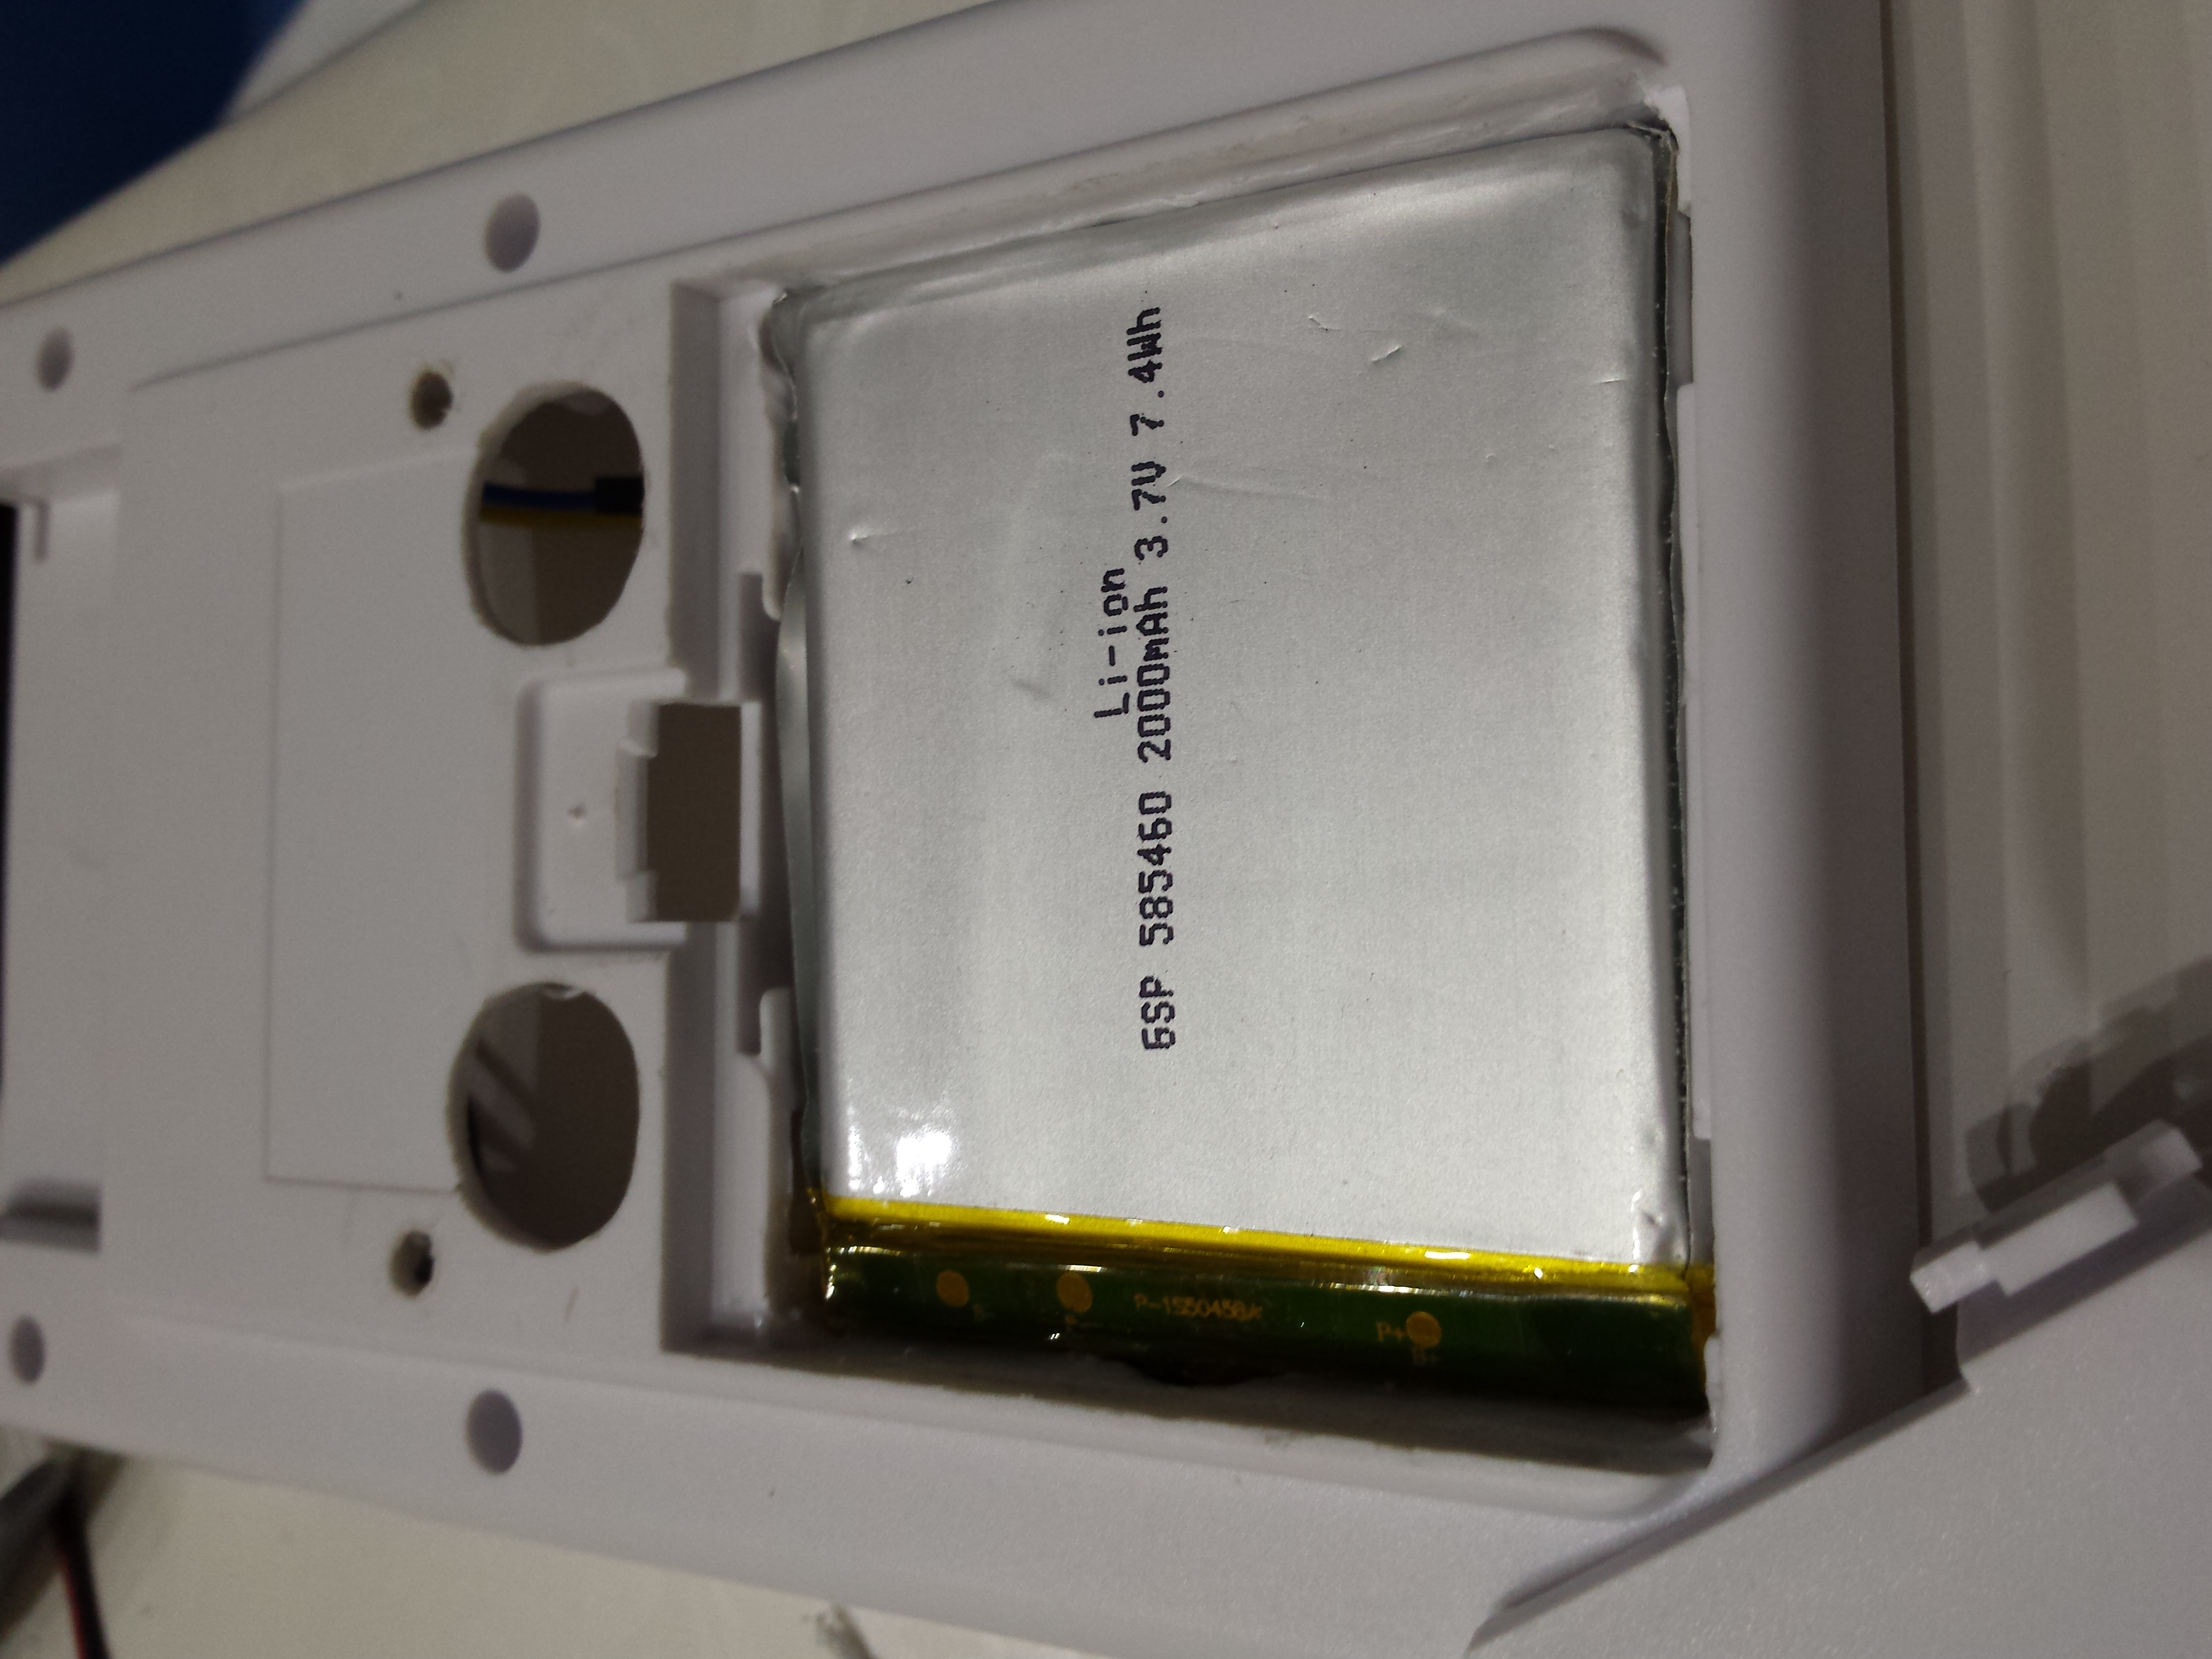
- 2 x 2000 mAh lipo batteries from Sparkfun (ref. 8483)
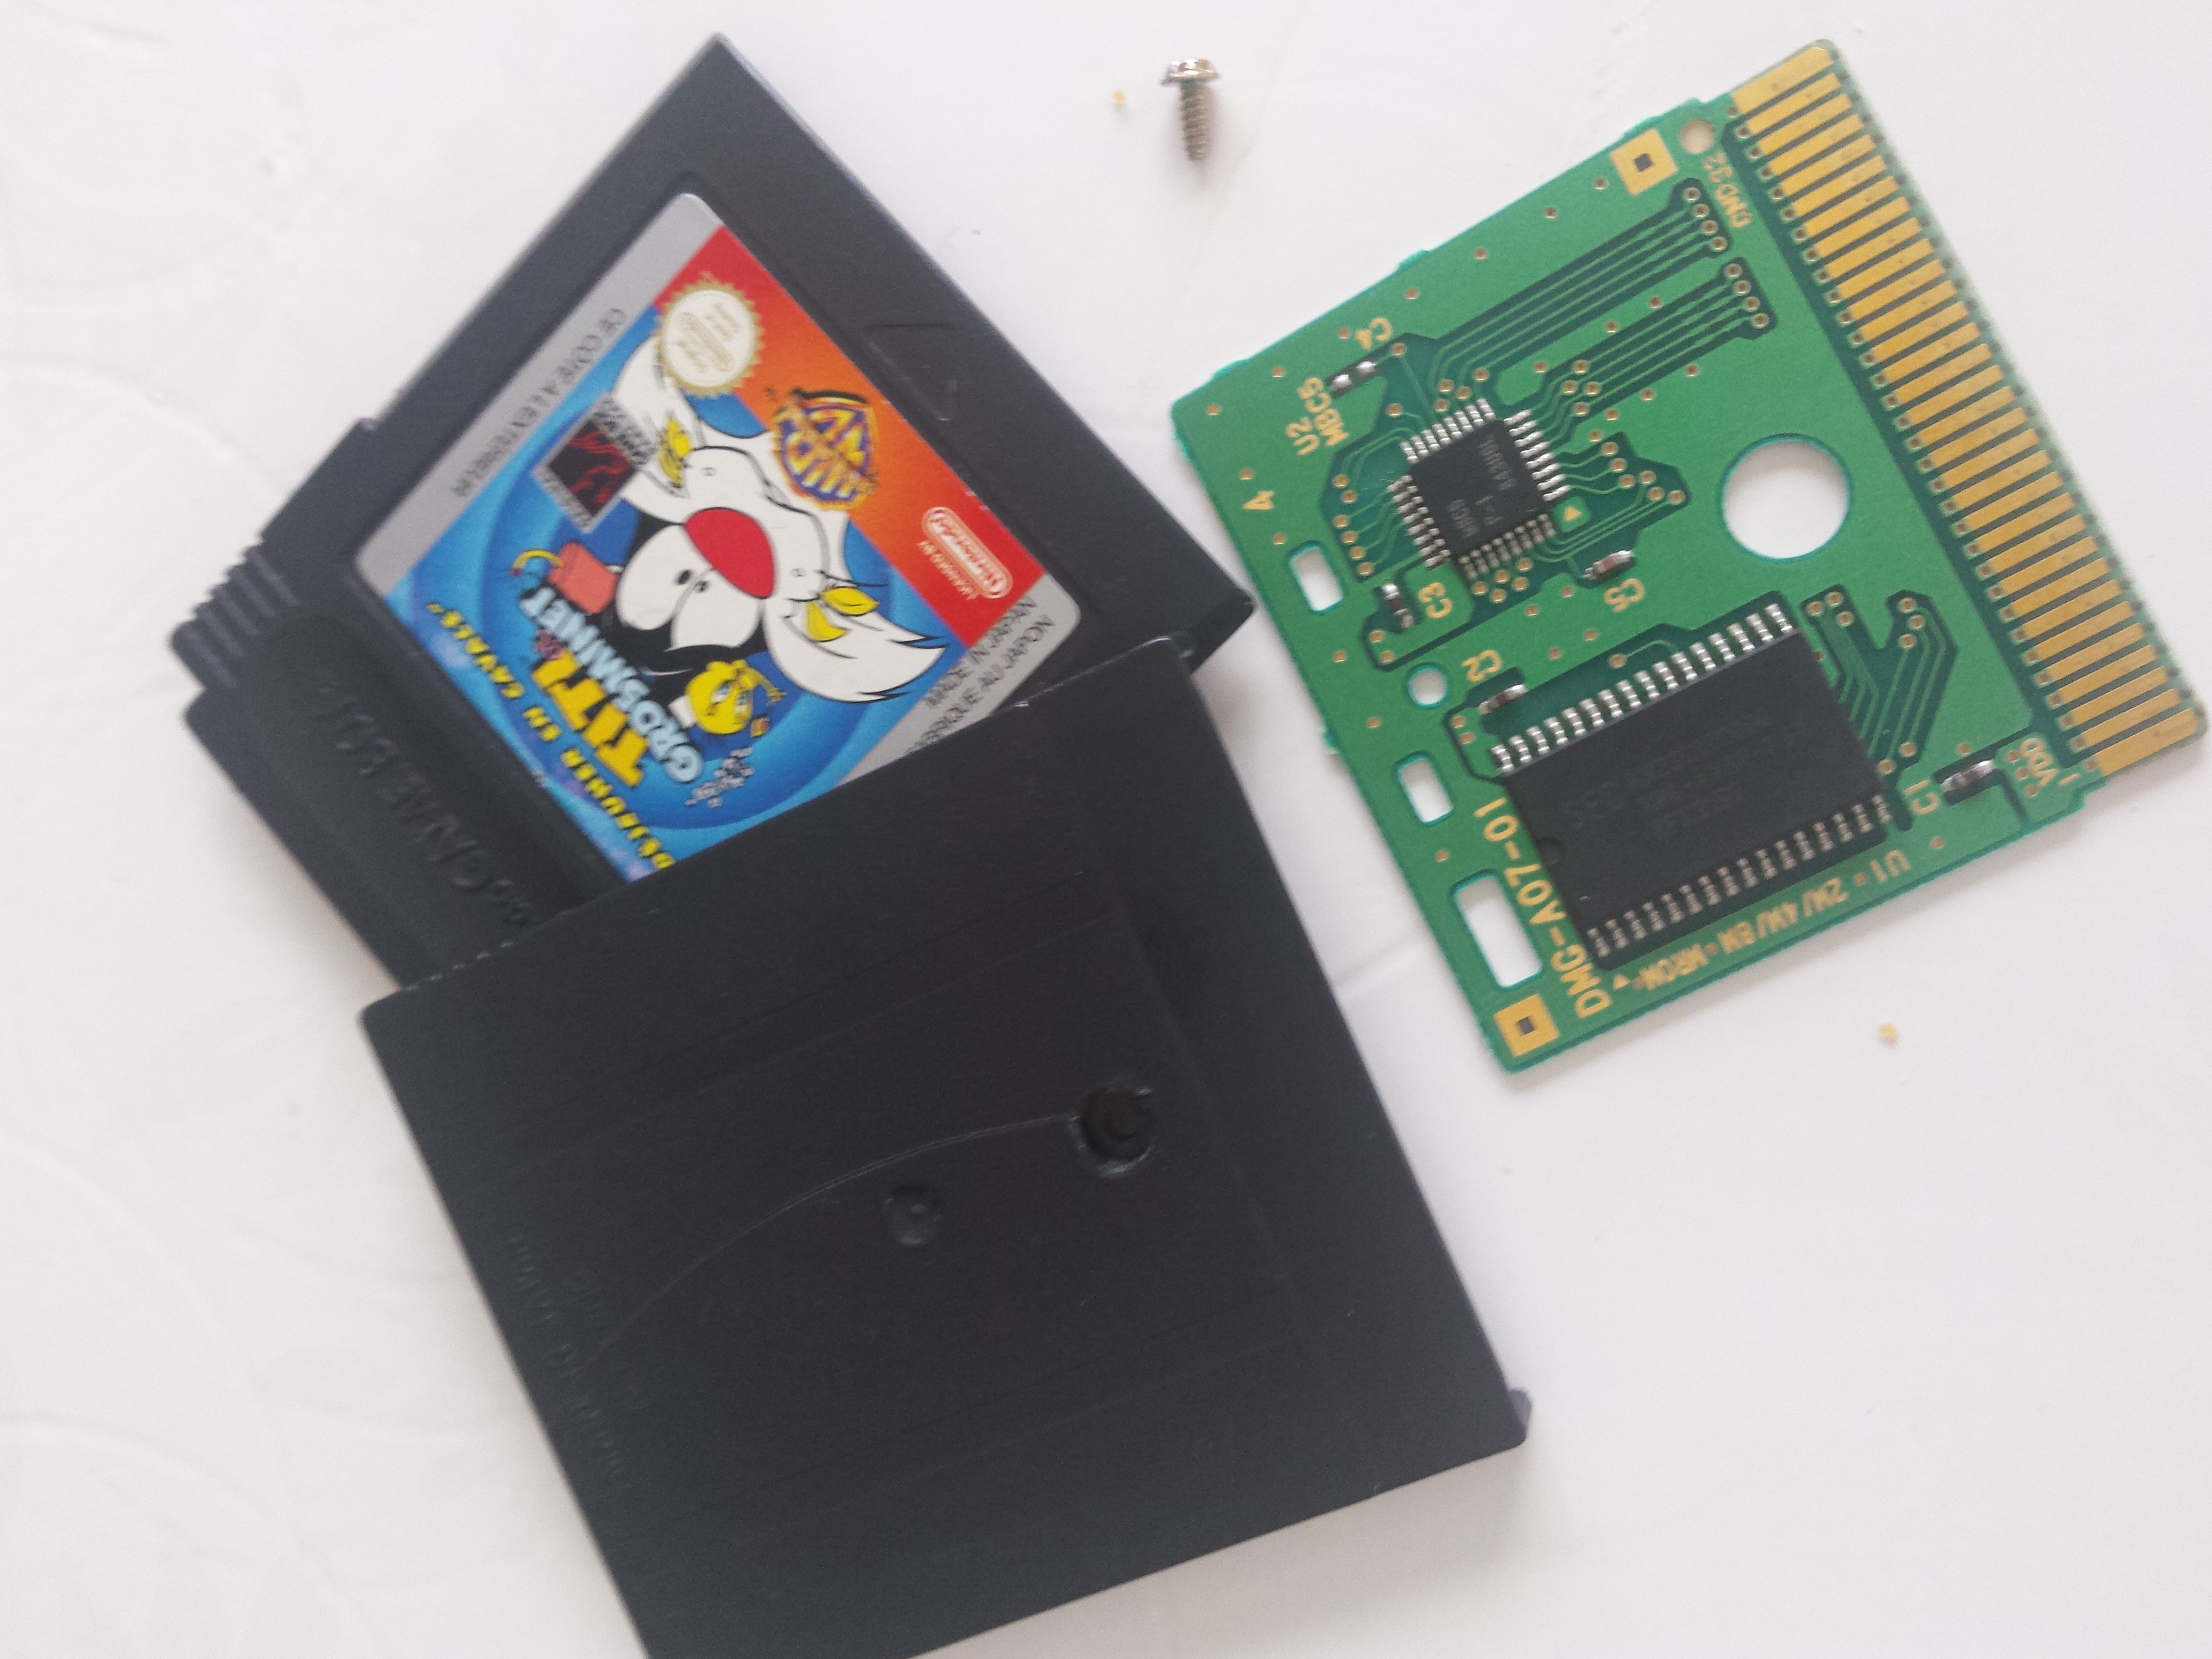
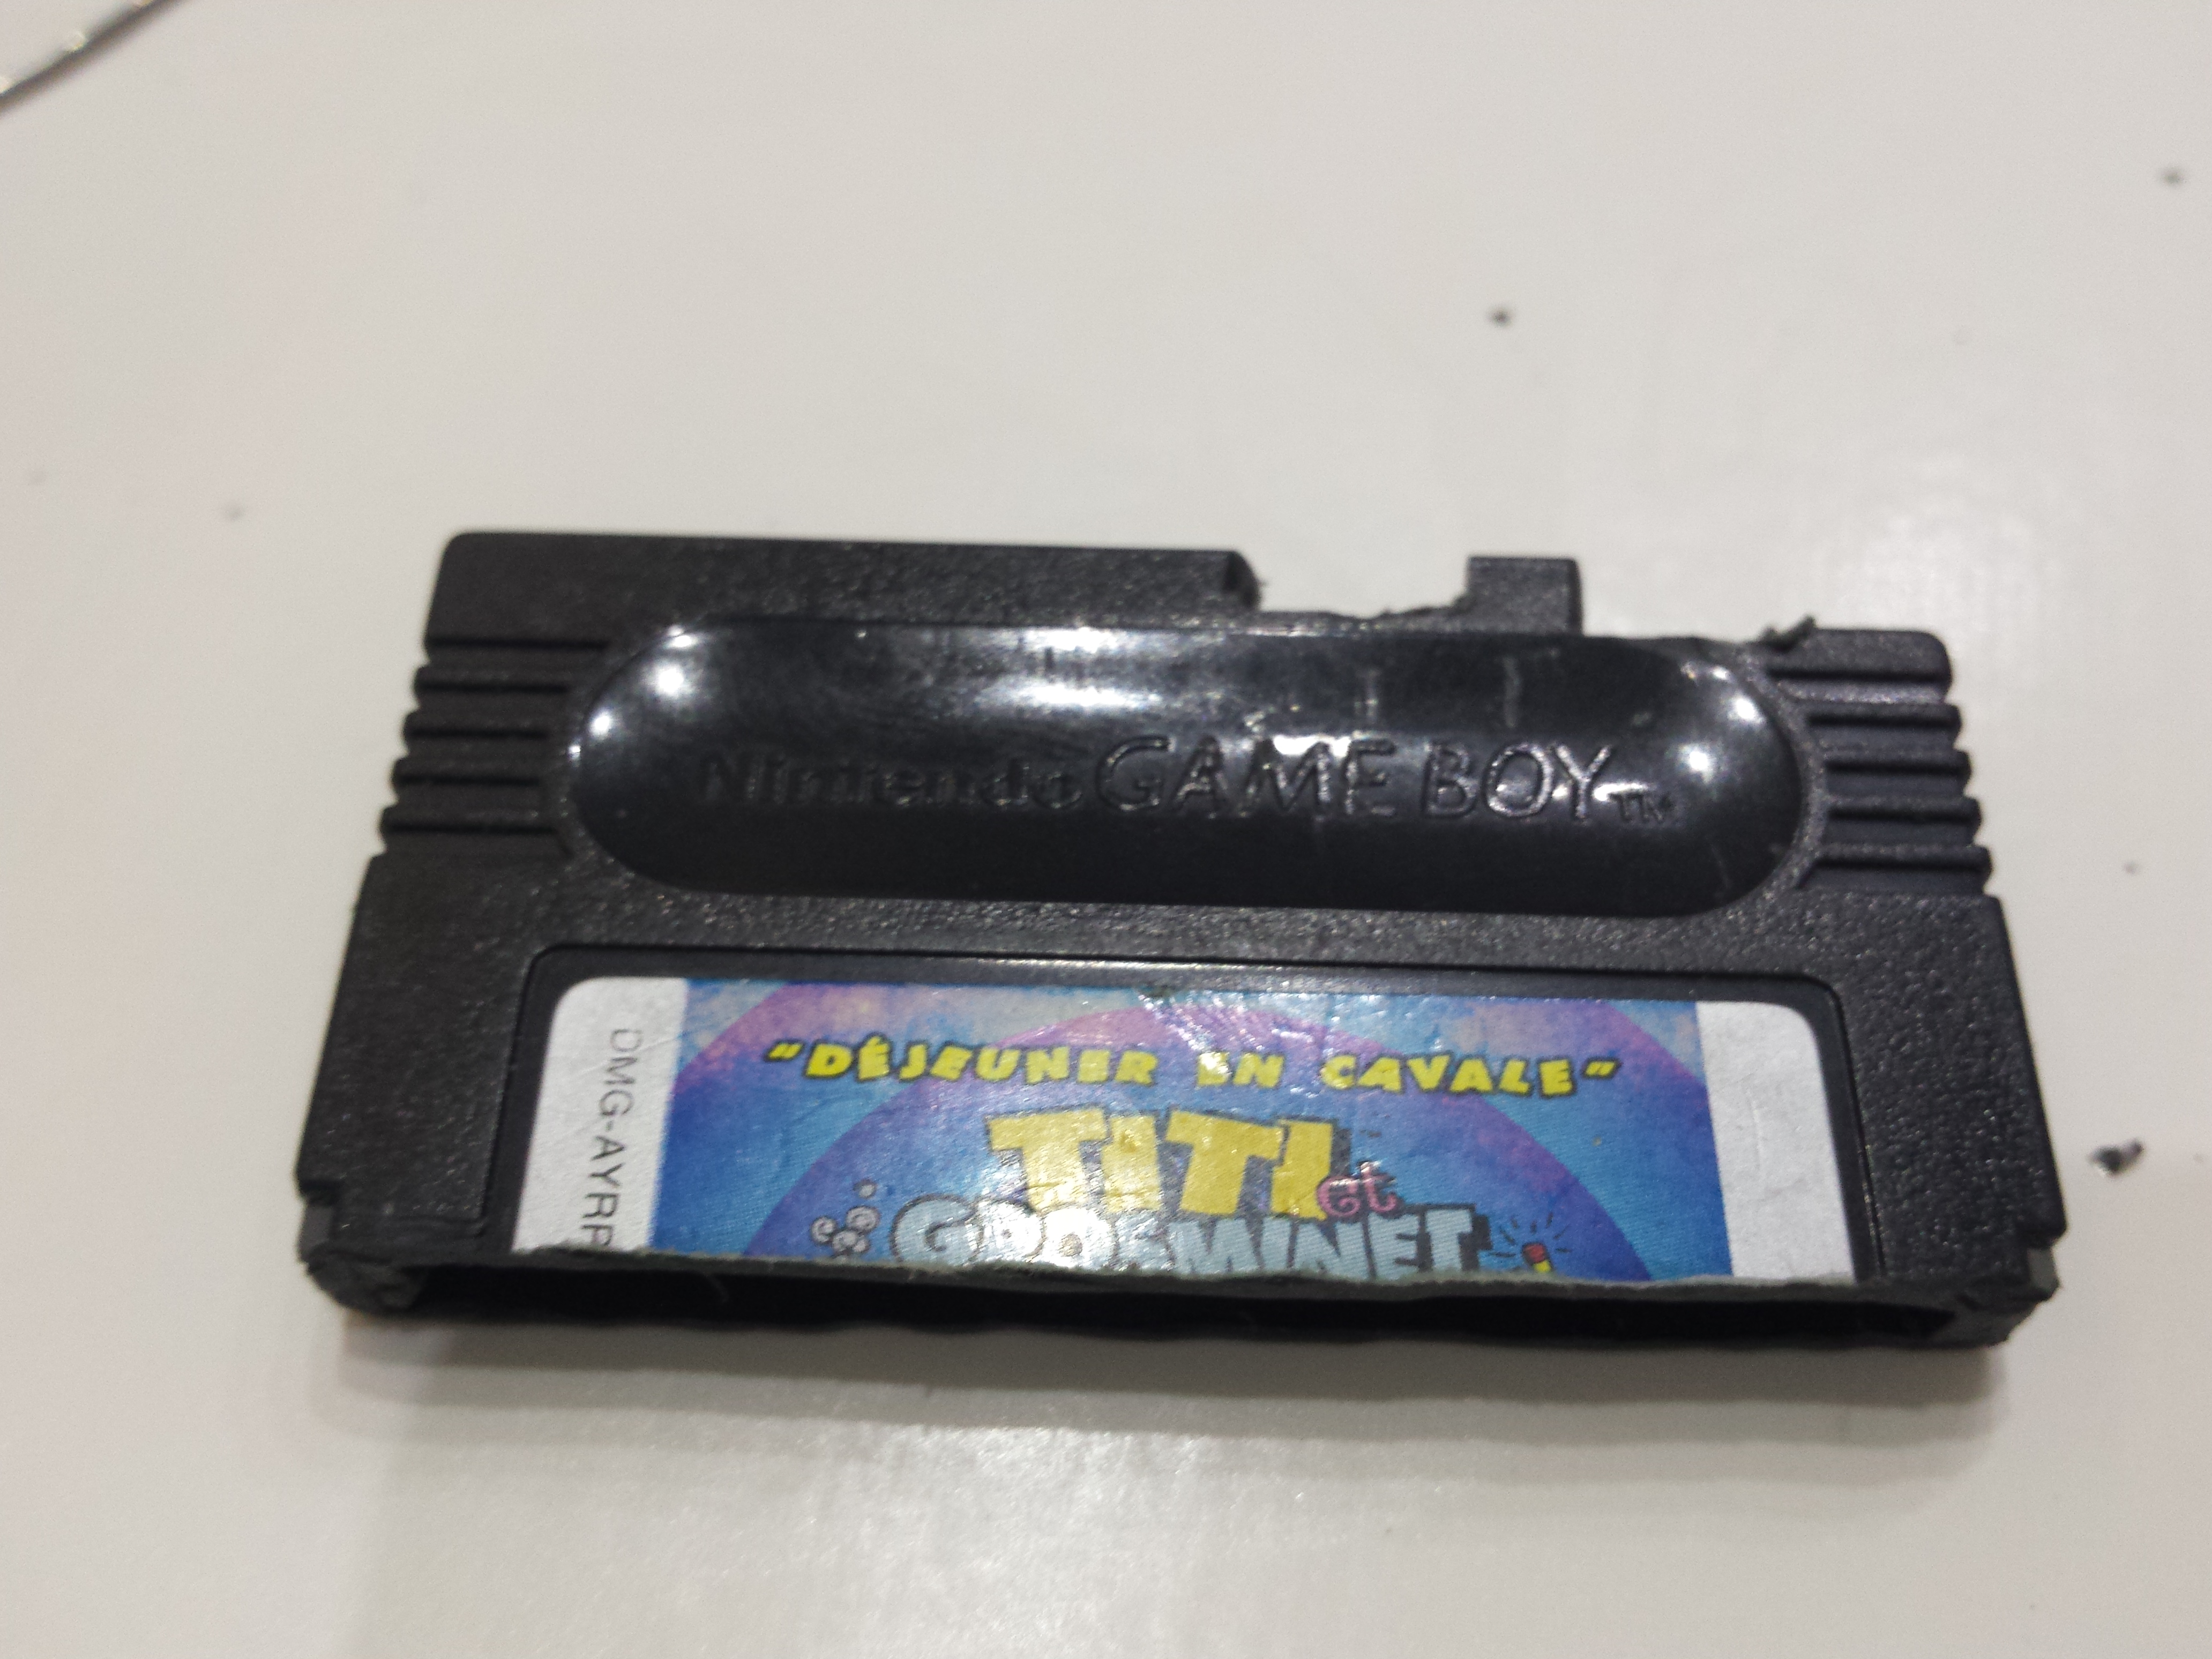
- a Game boy (color) game (the cheapest I could found)
- Micro usb breakout board (charging connector)
Off course, I also used some wires and electrical tape.
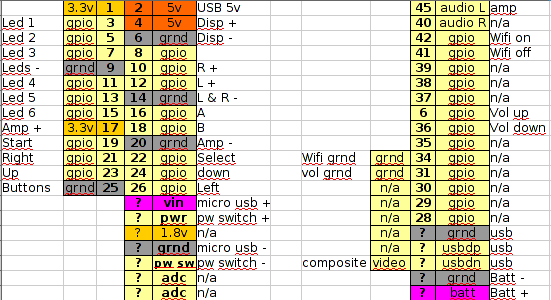
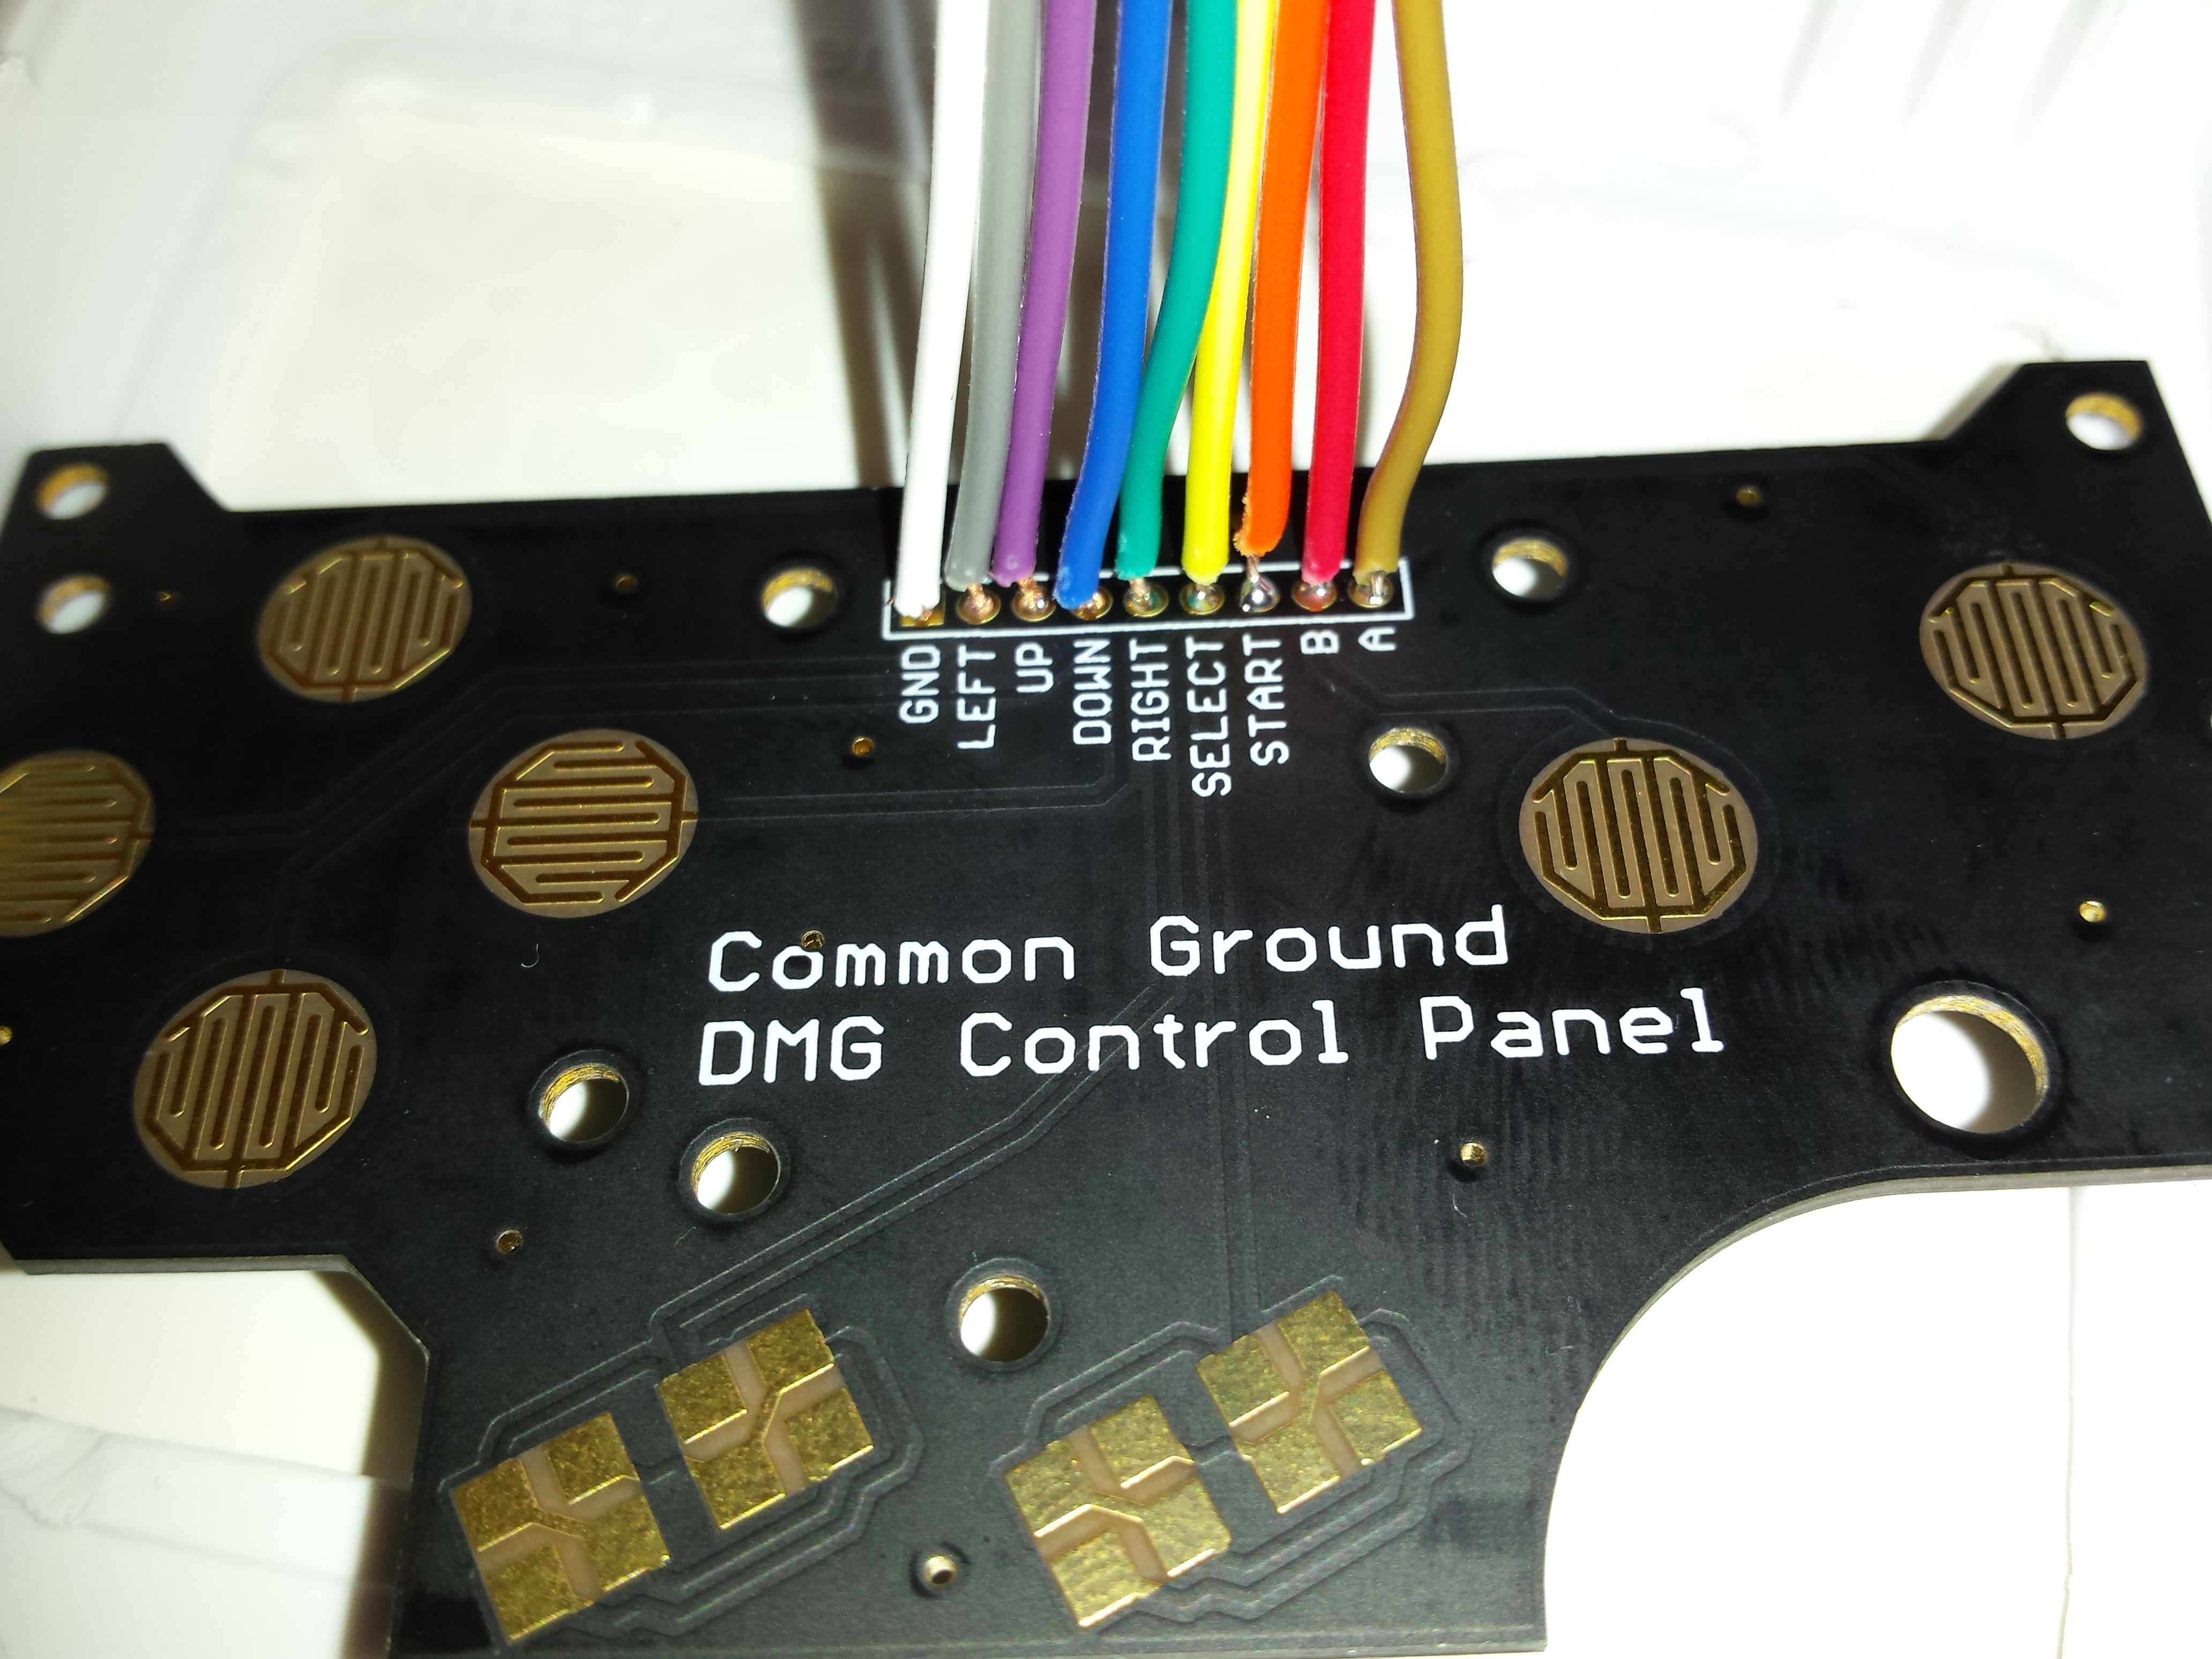
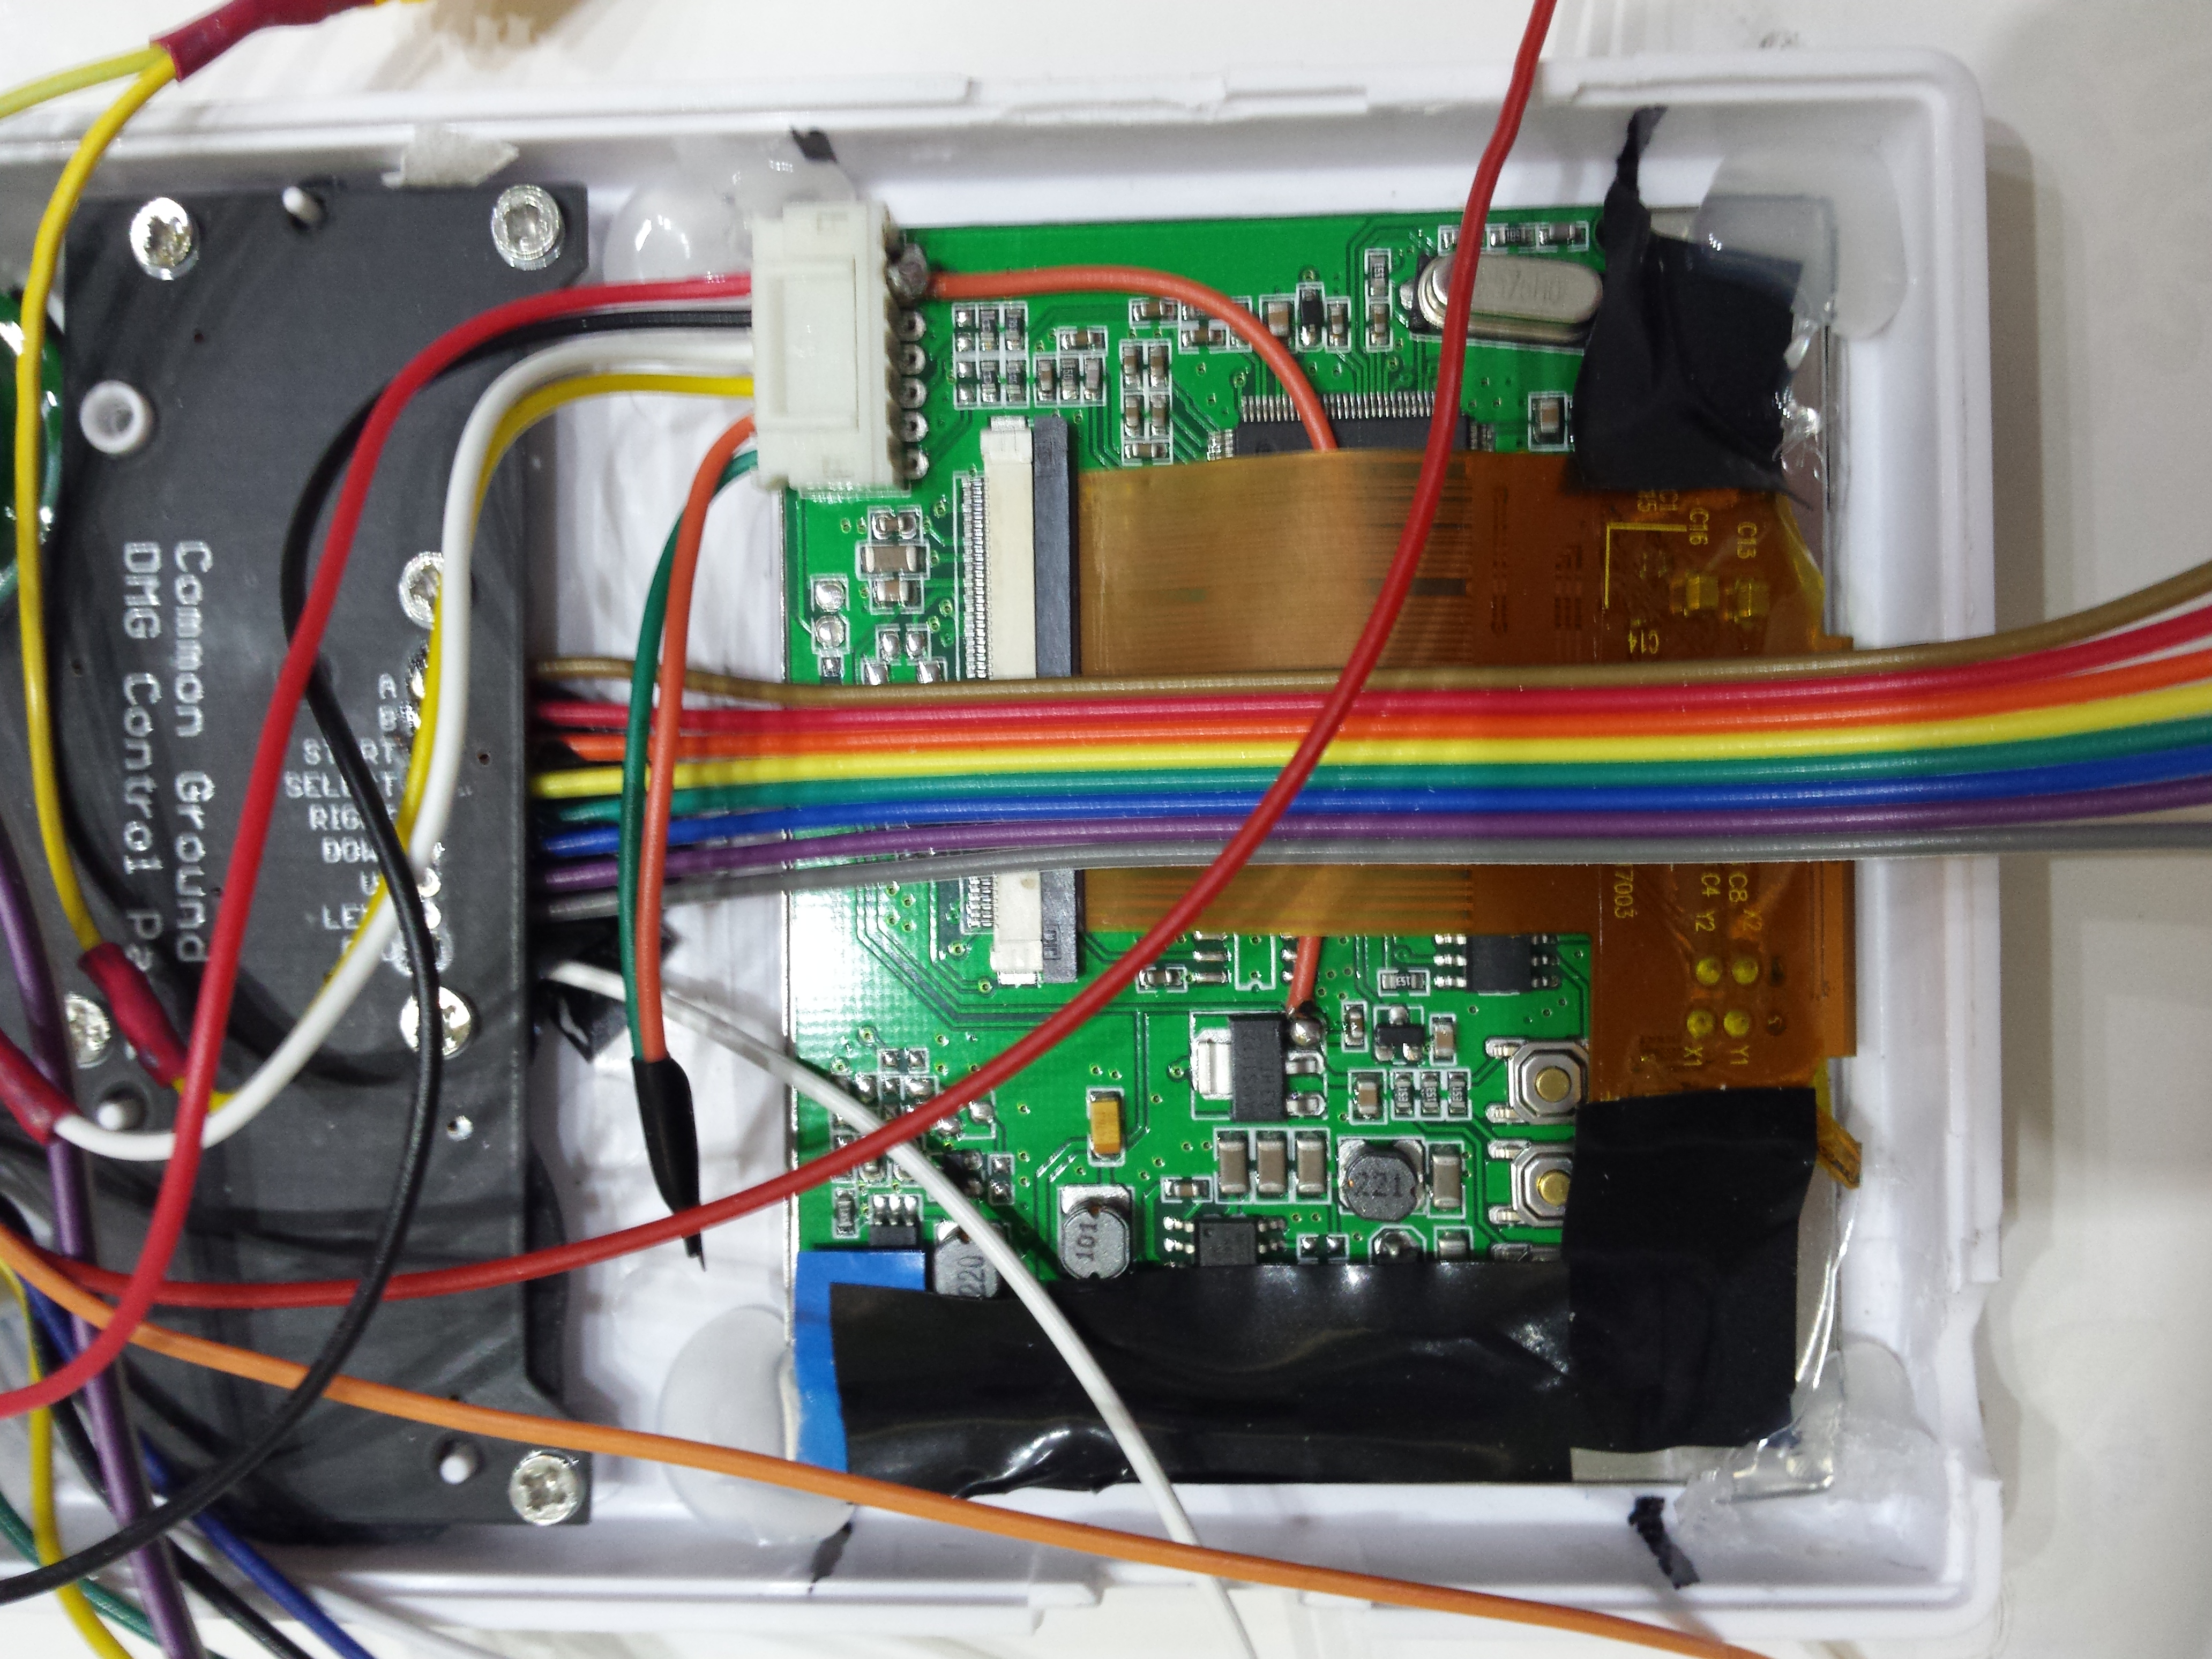
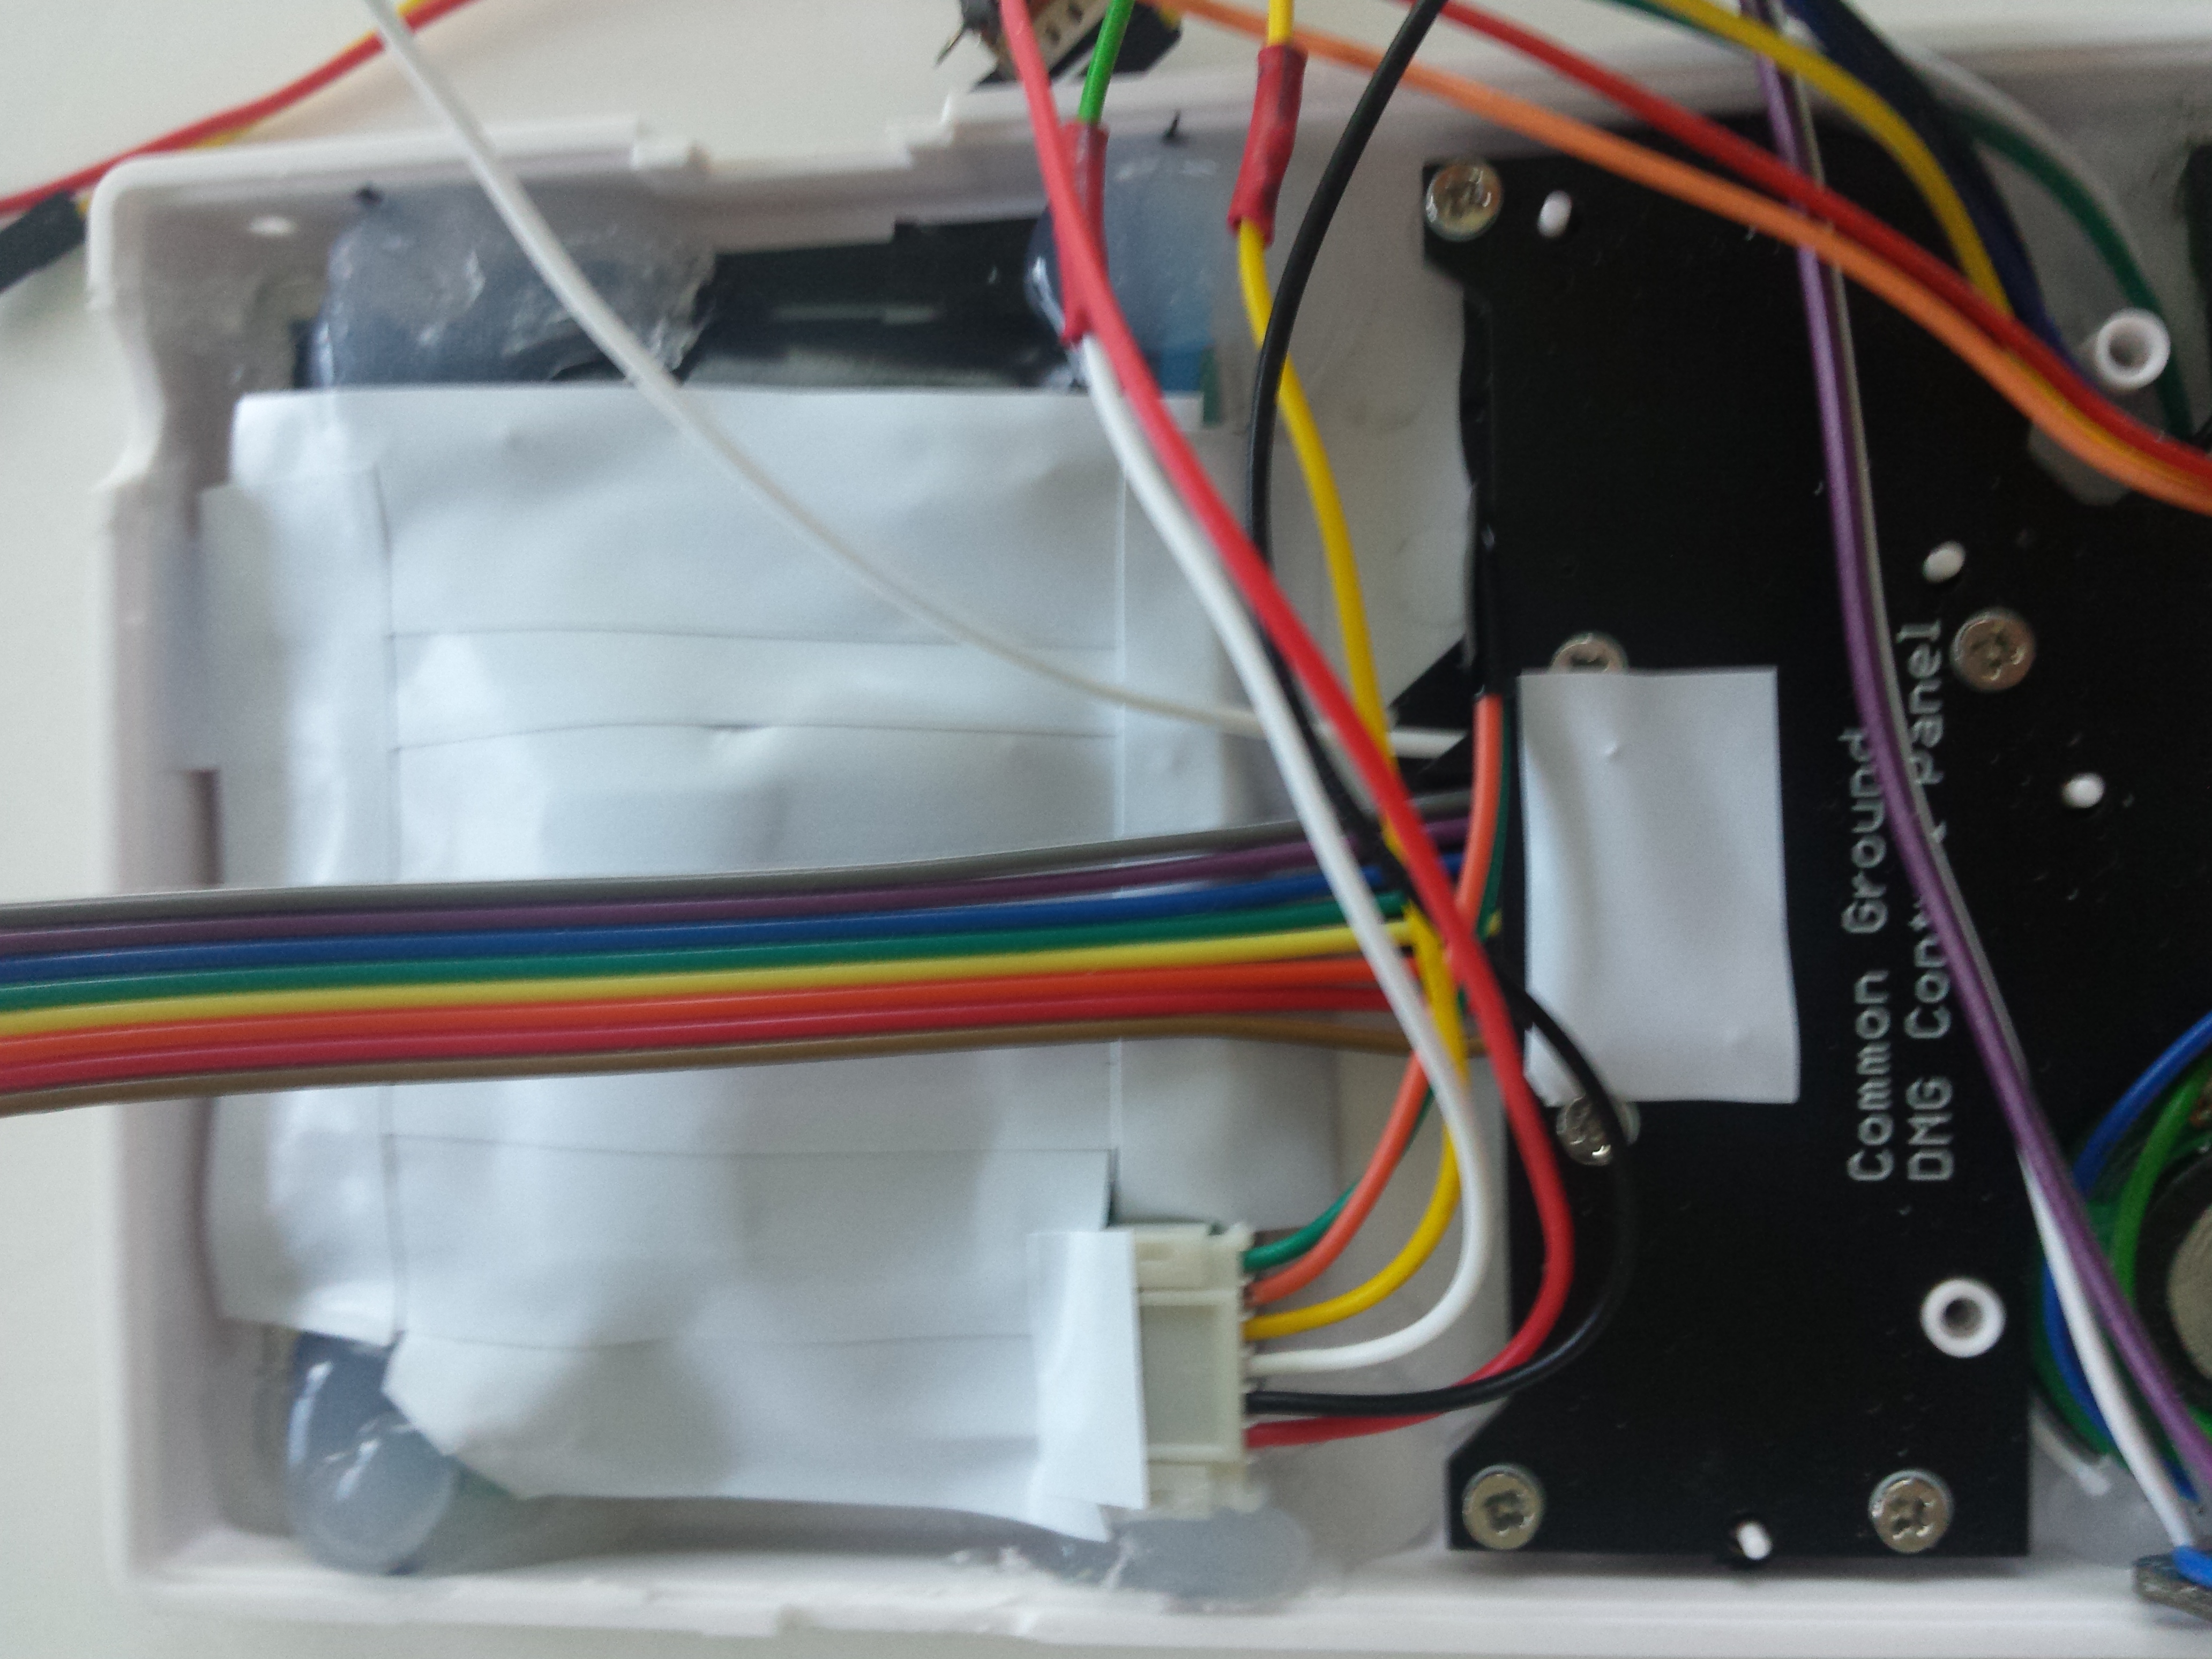
GPIO Wiring plan
Assembly steps
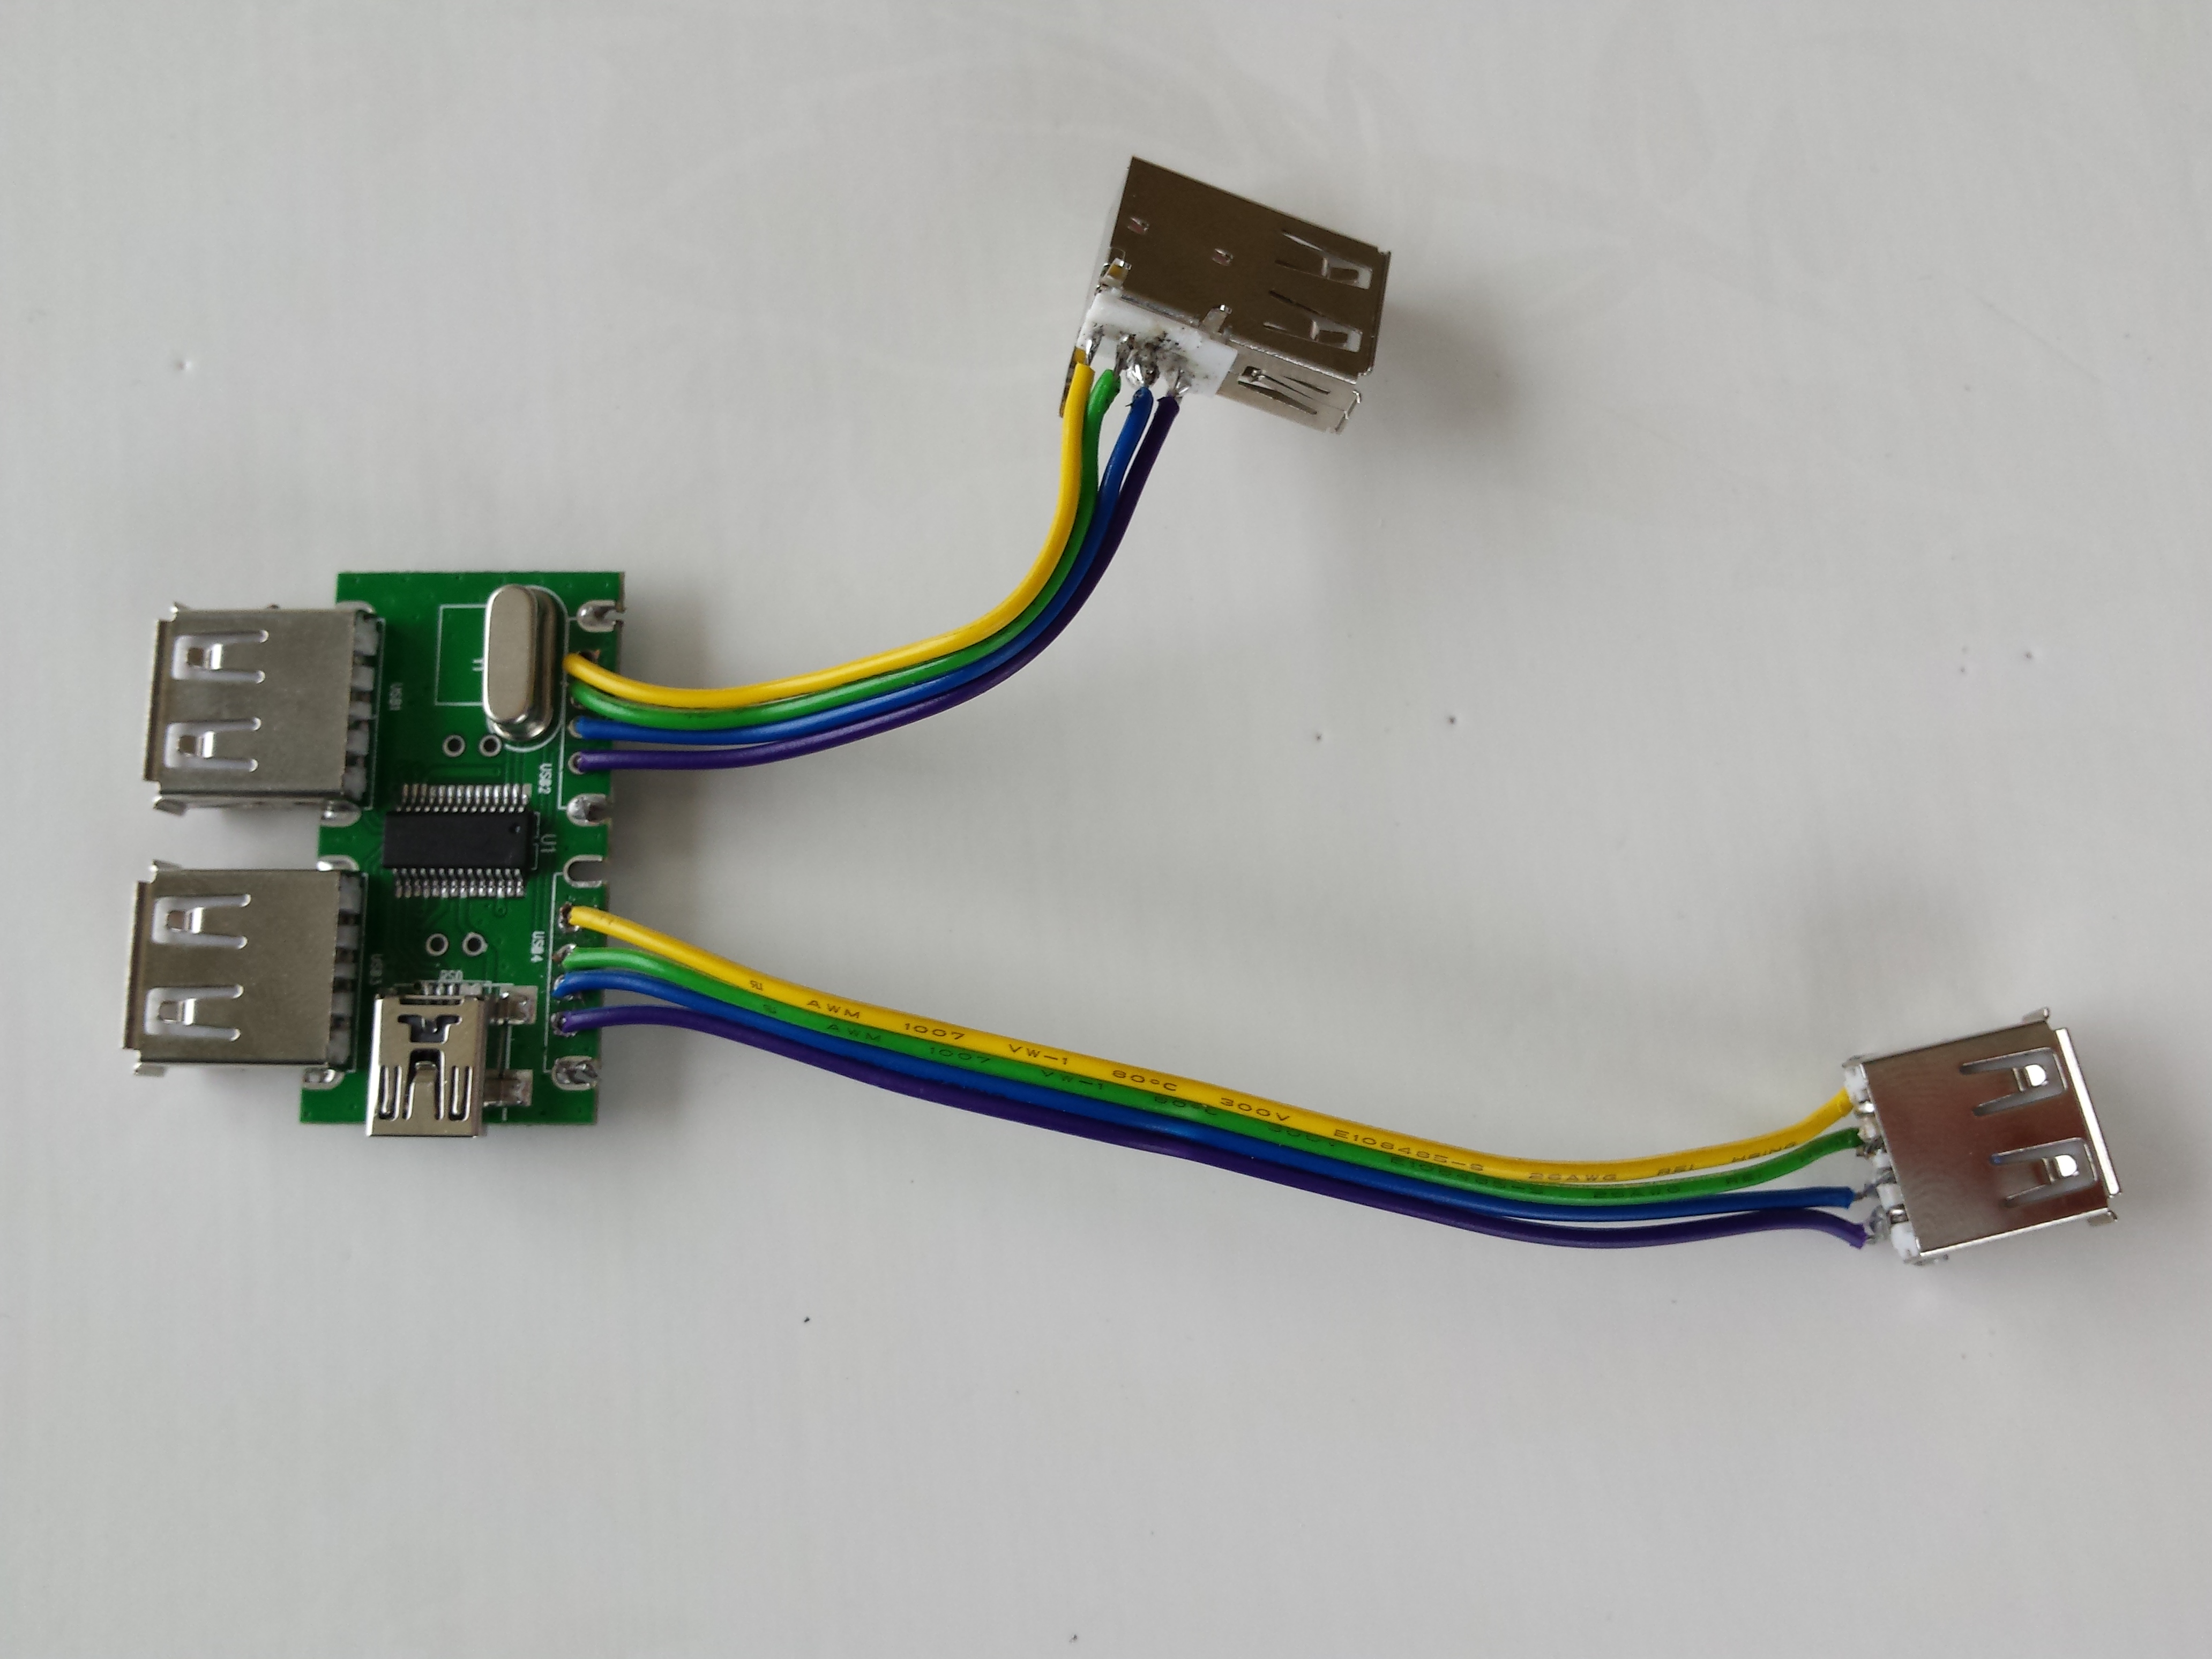
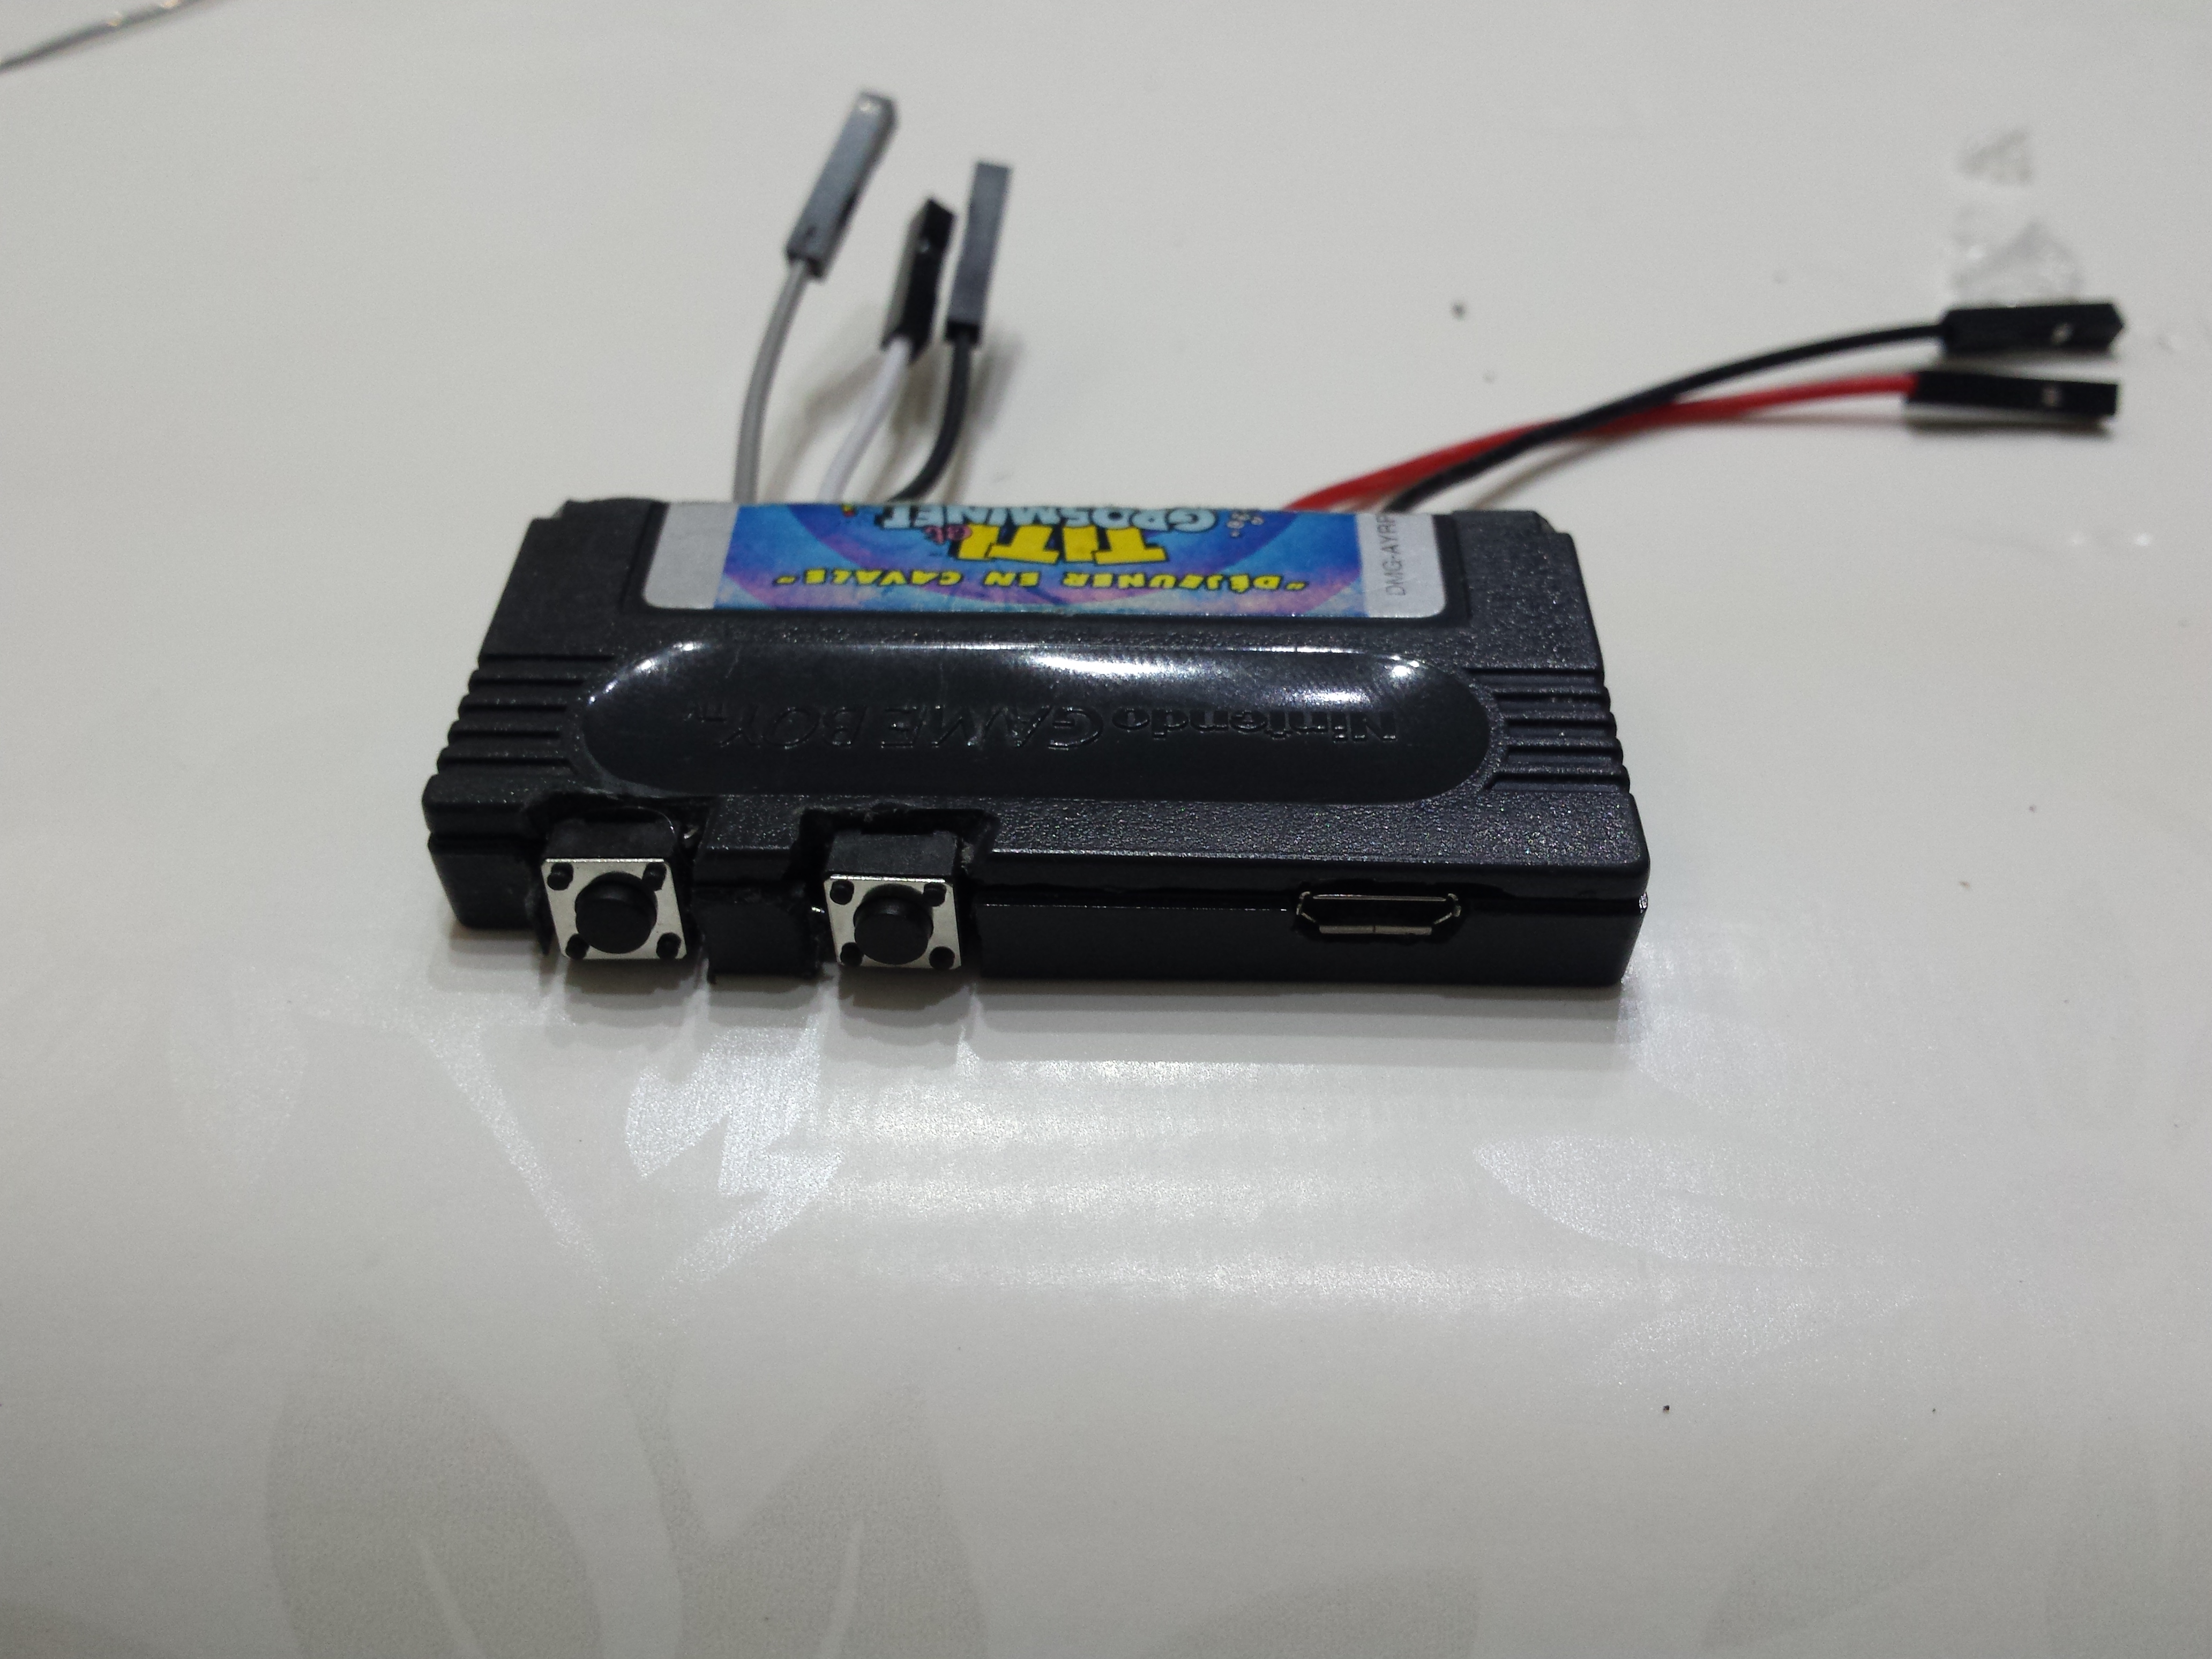
USB Hub preparation
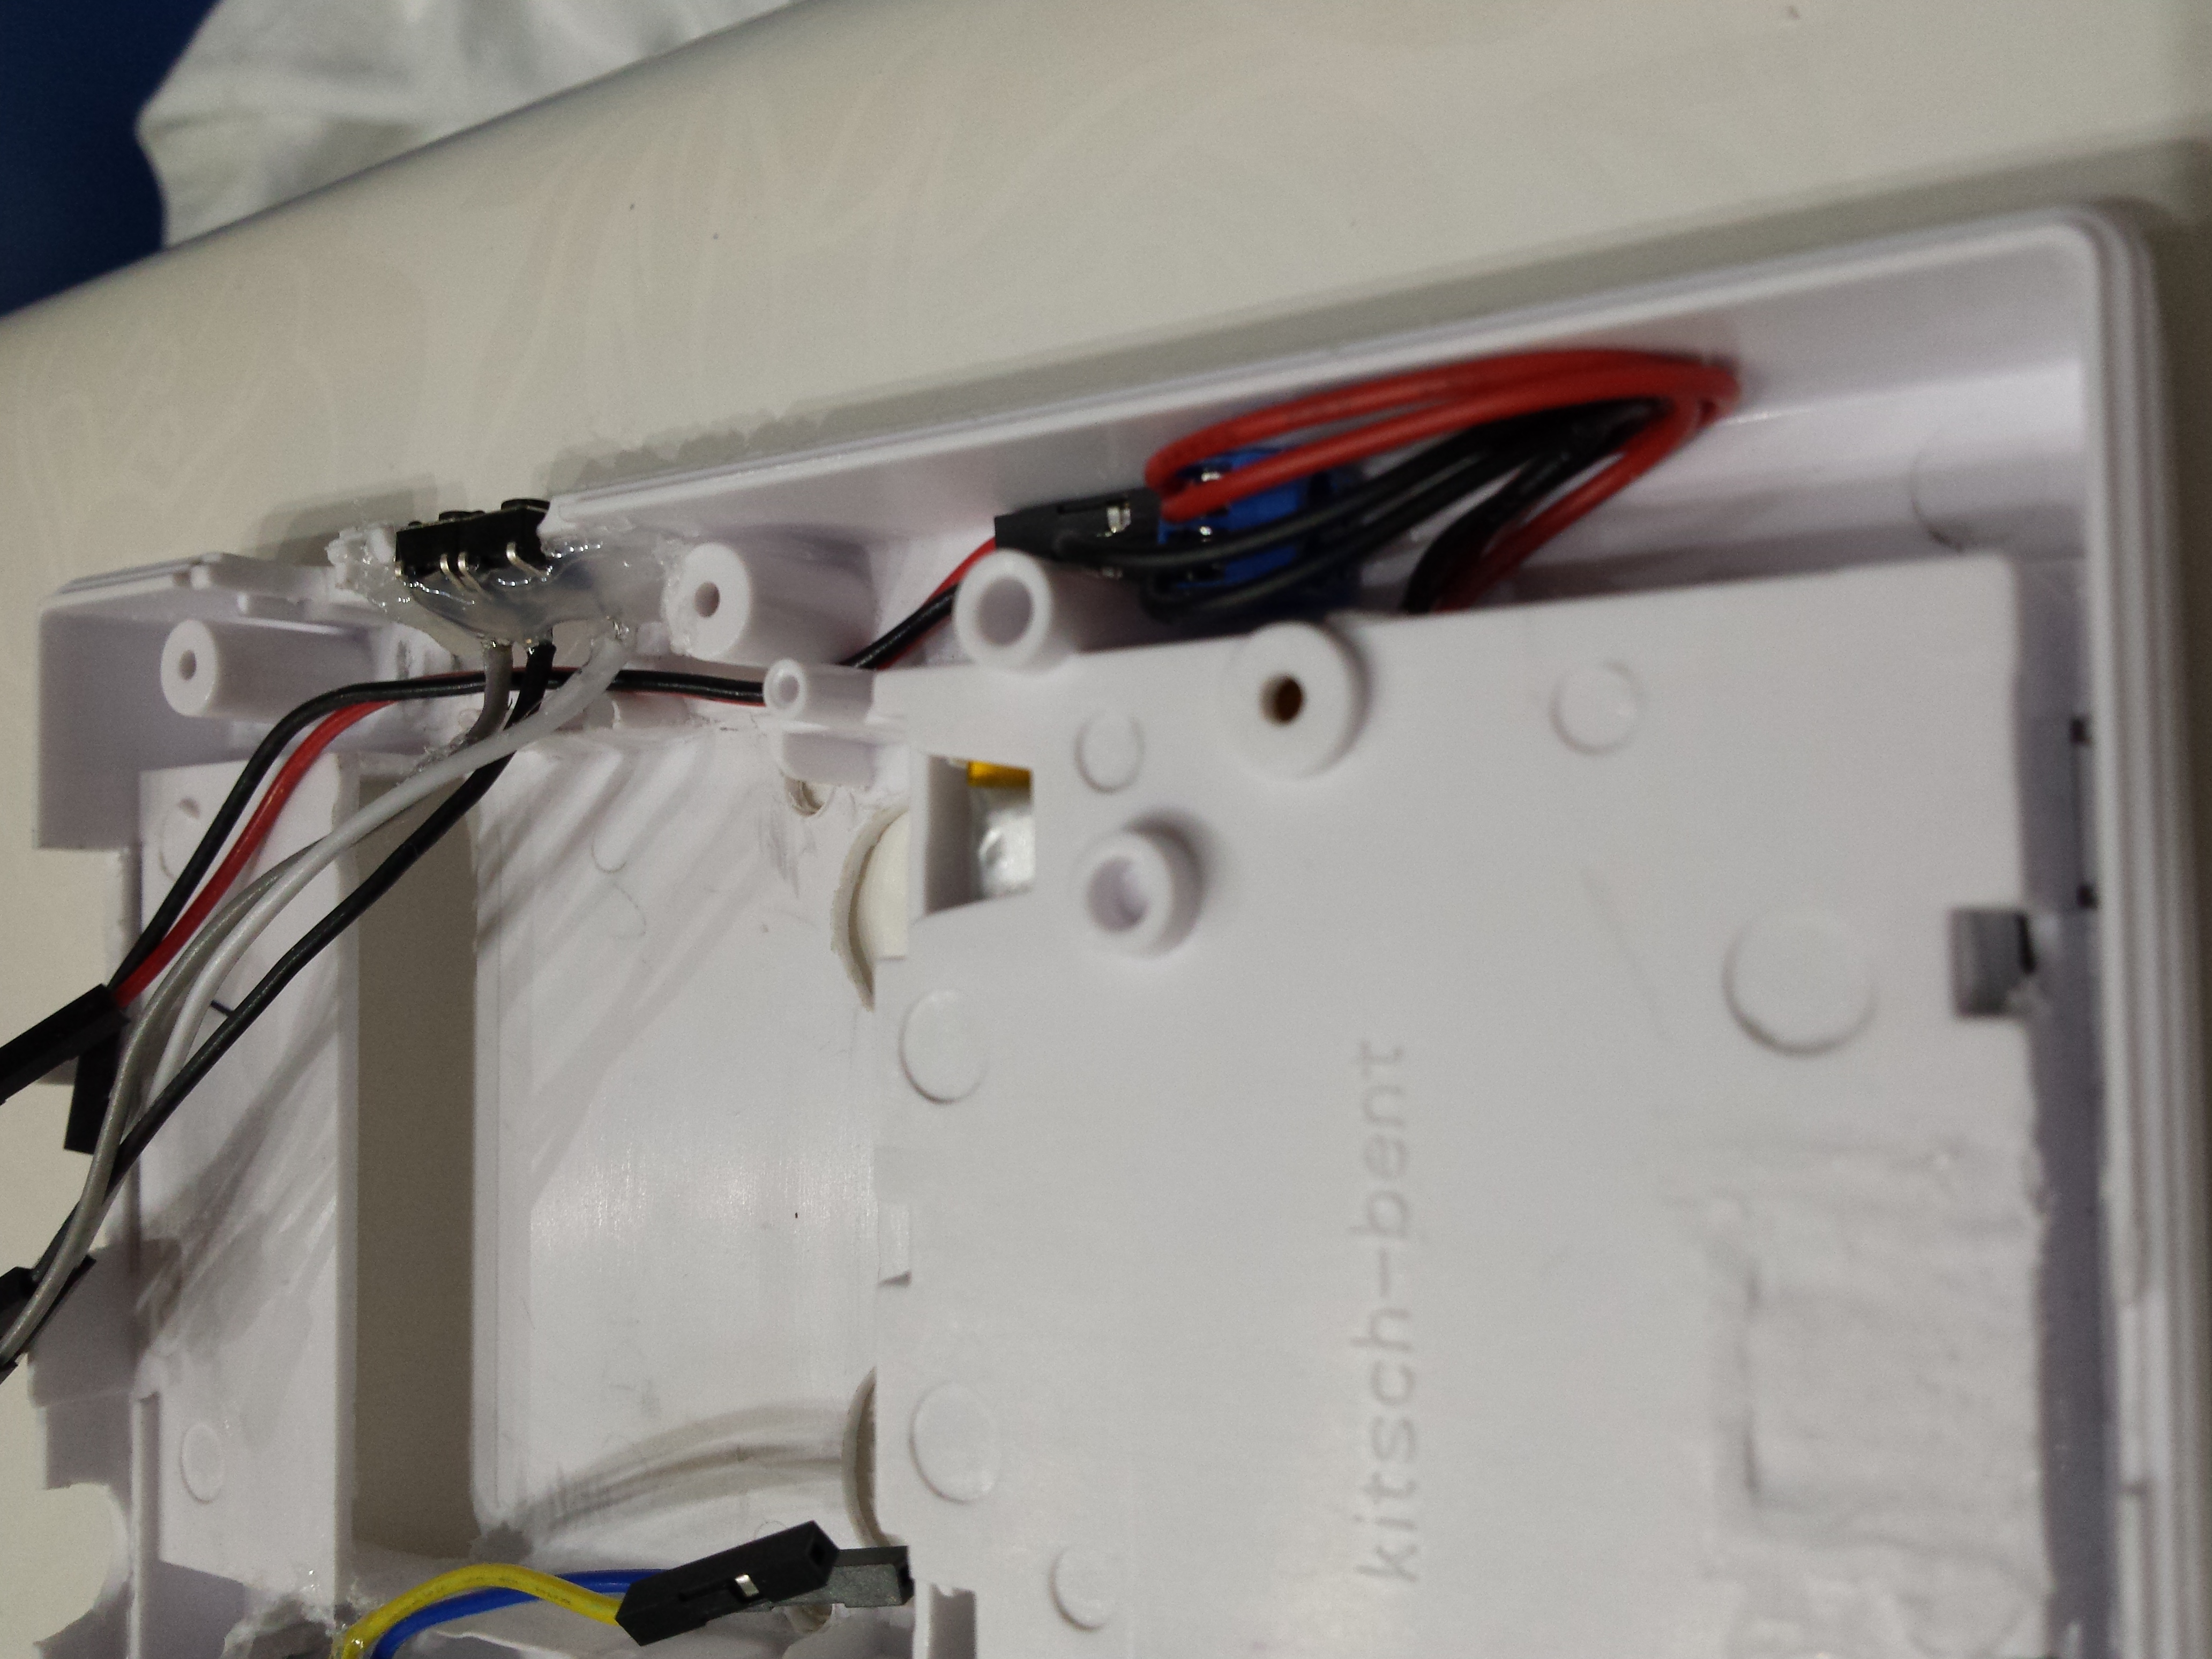
I Unsoldered 2 ports : one for internal wifi and one for the right side, in place of the original Gameboy Link port. I also splitted the original USB hub cable to plug it directly on Odroid-W GPIO headers.
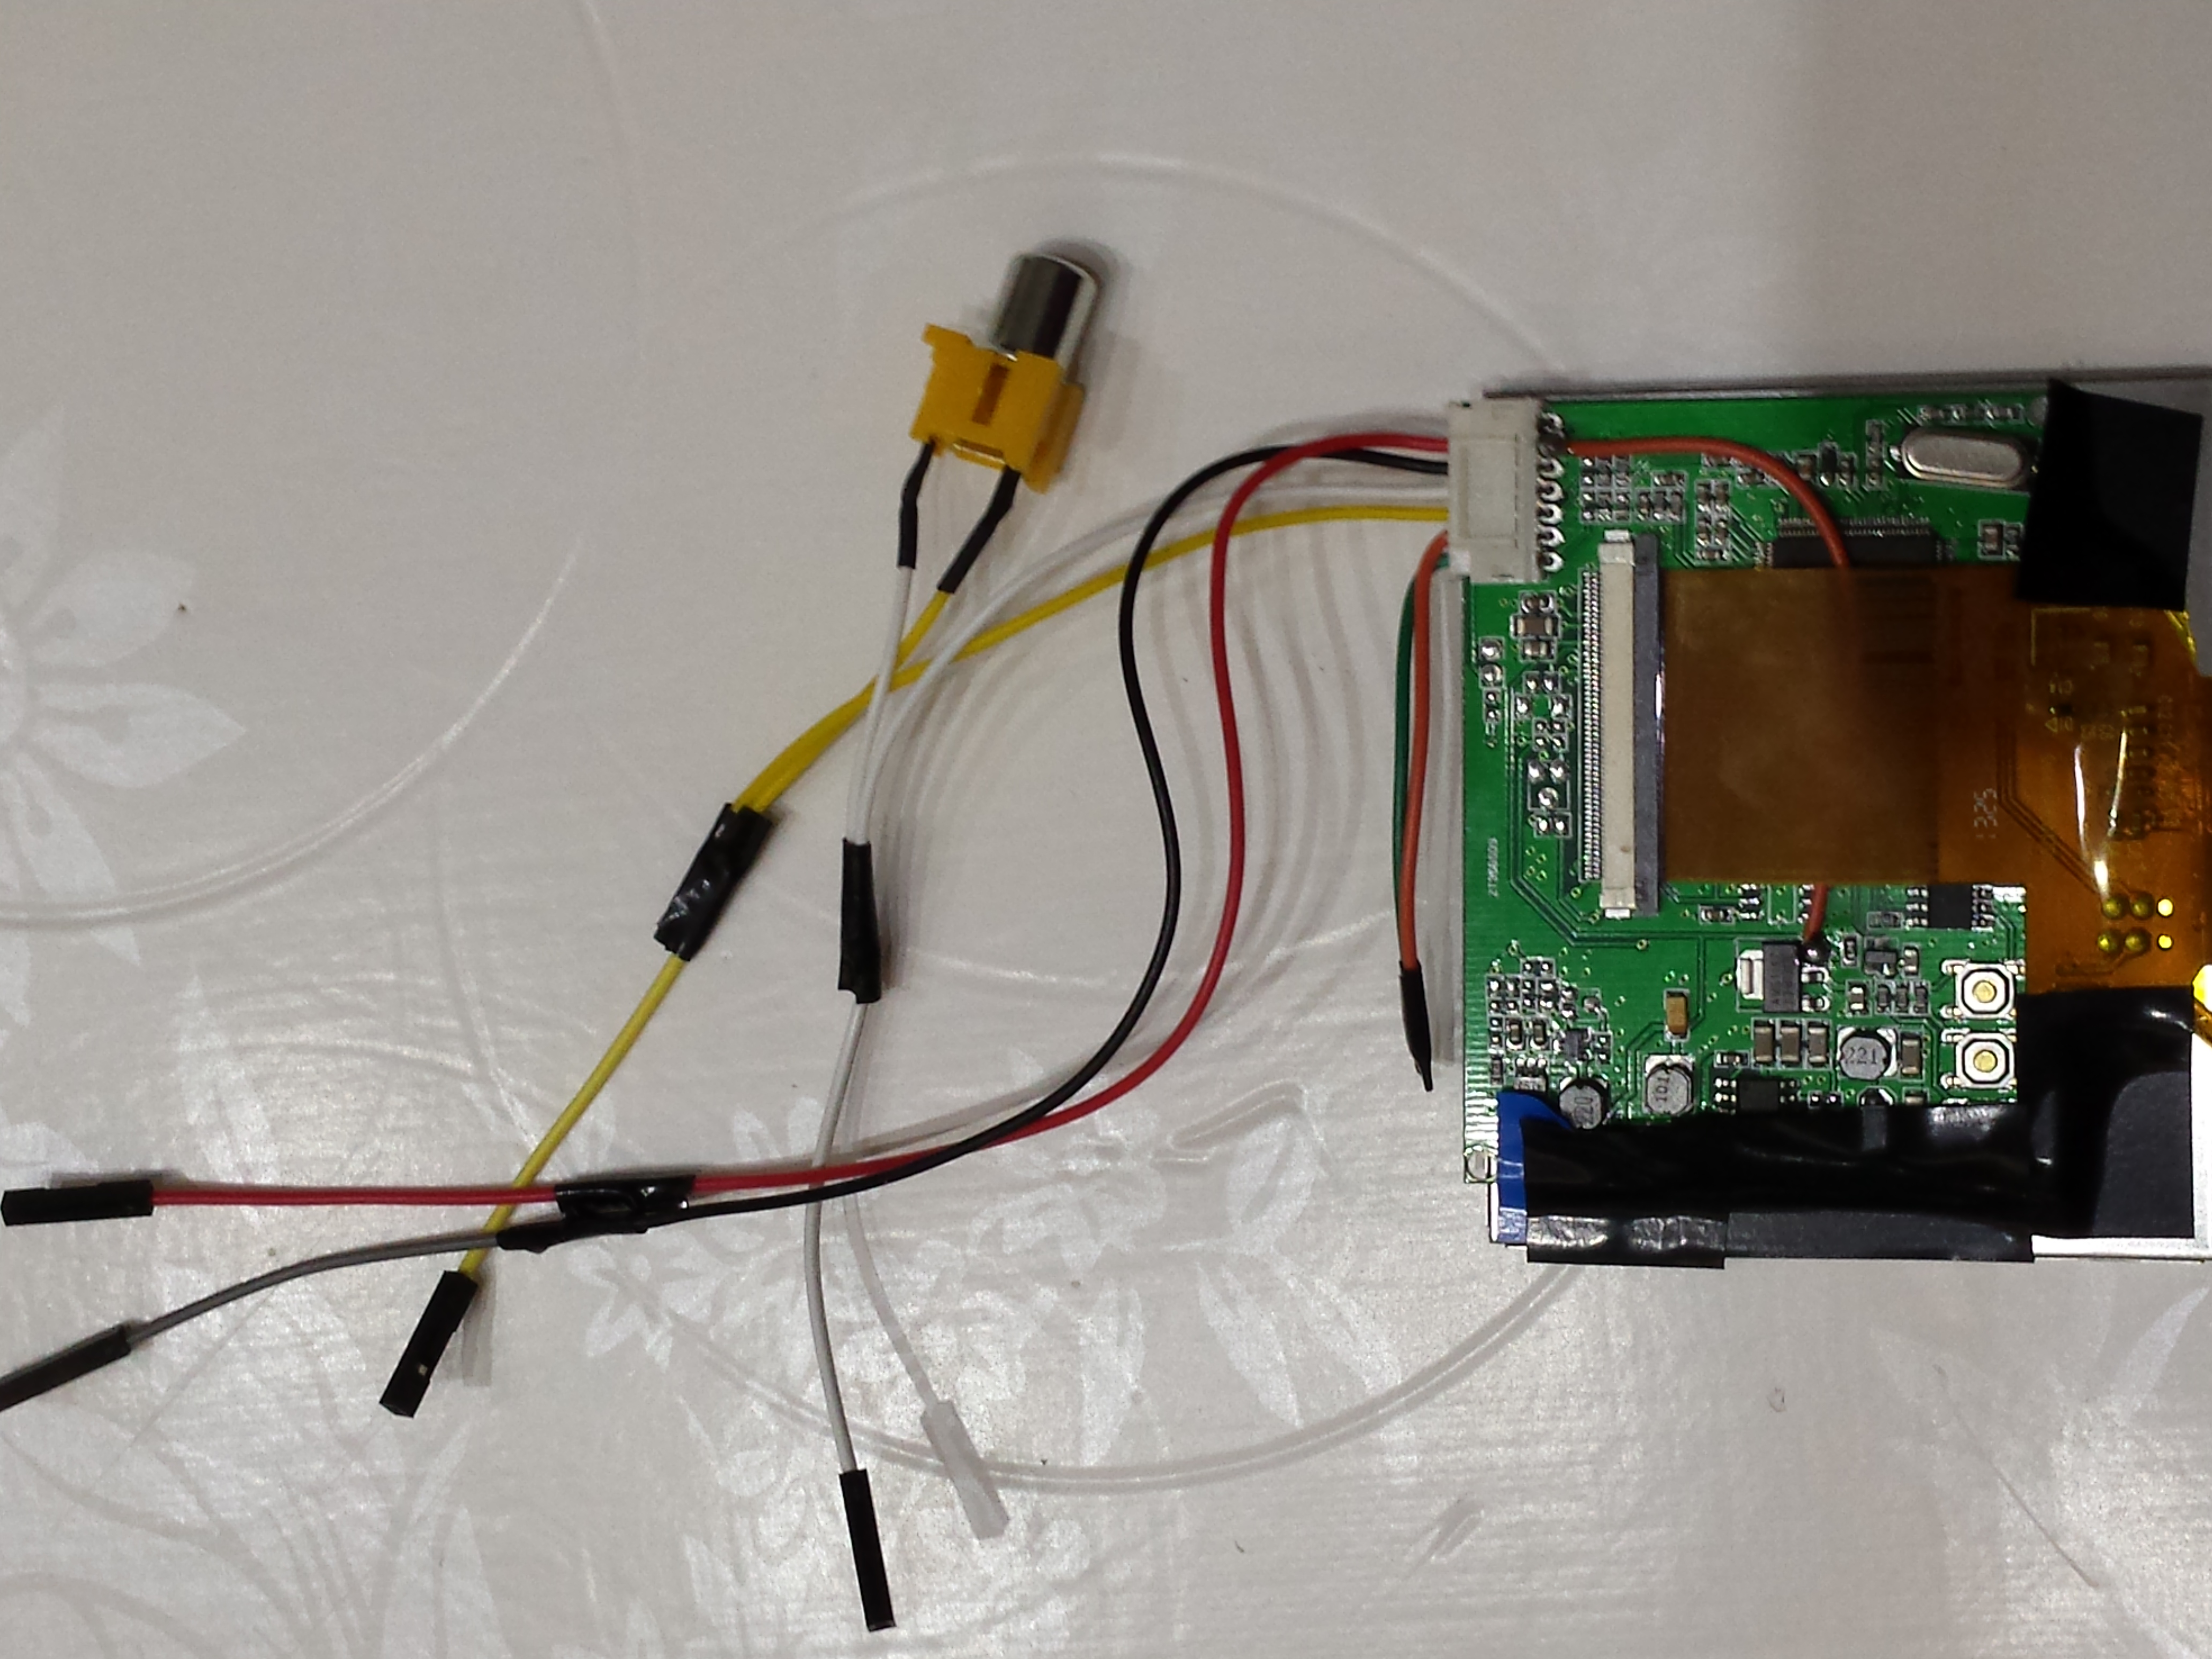
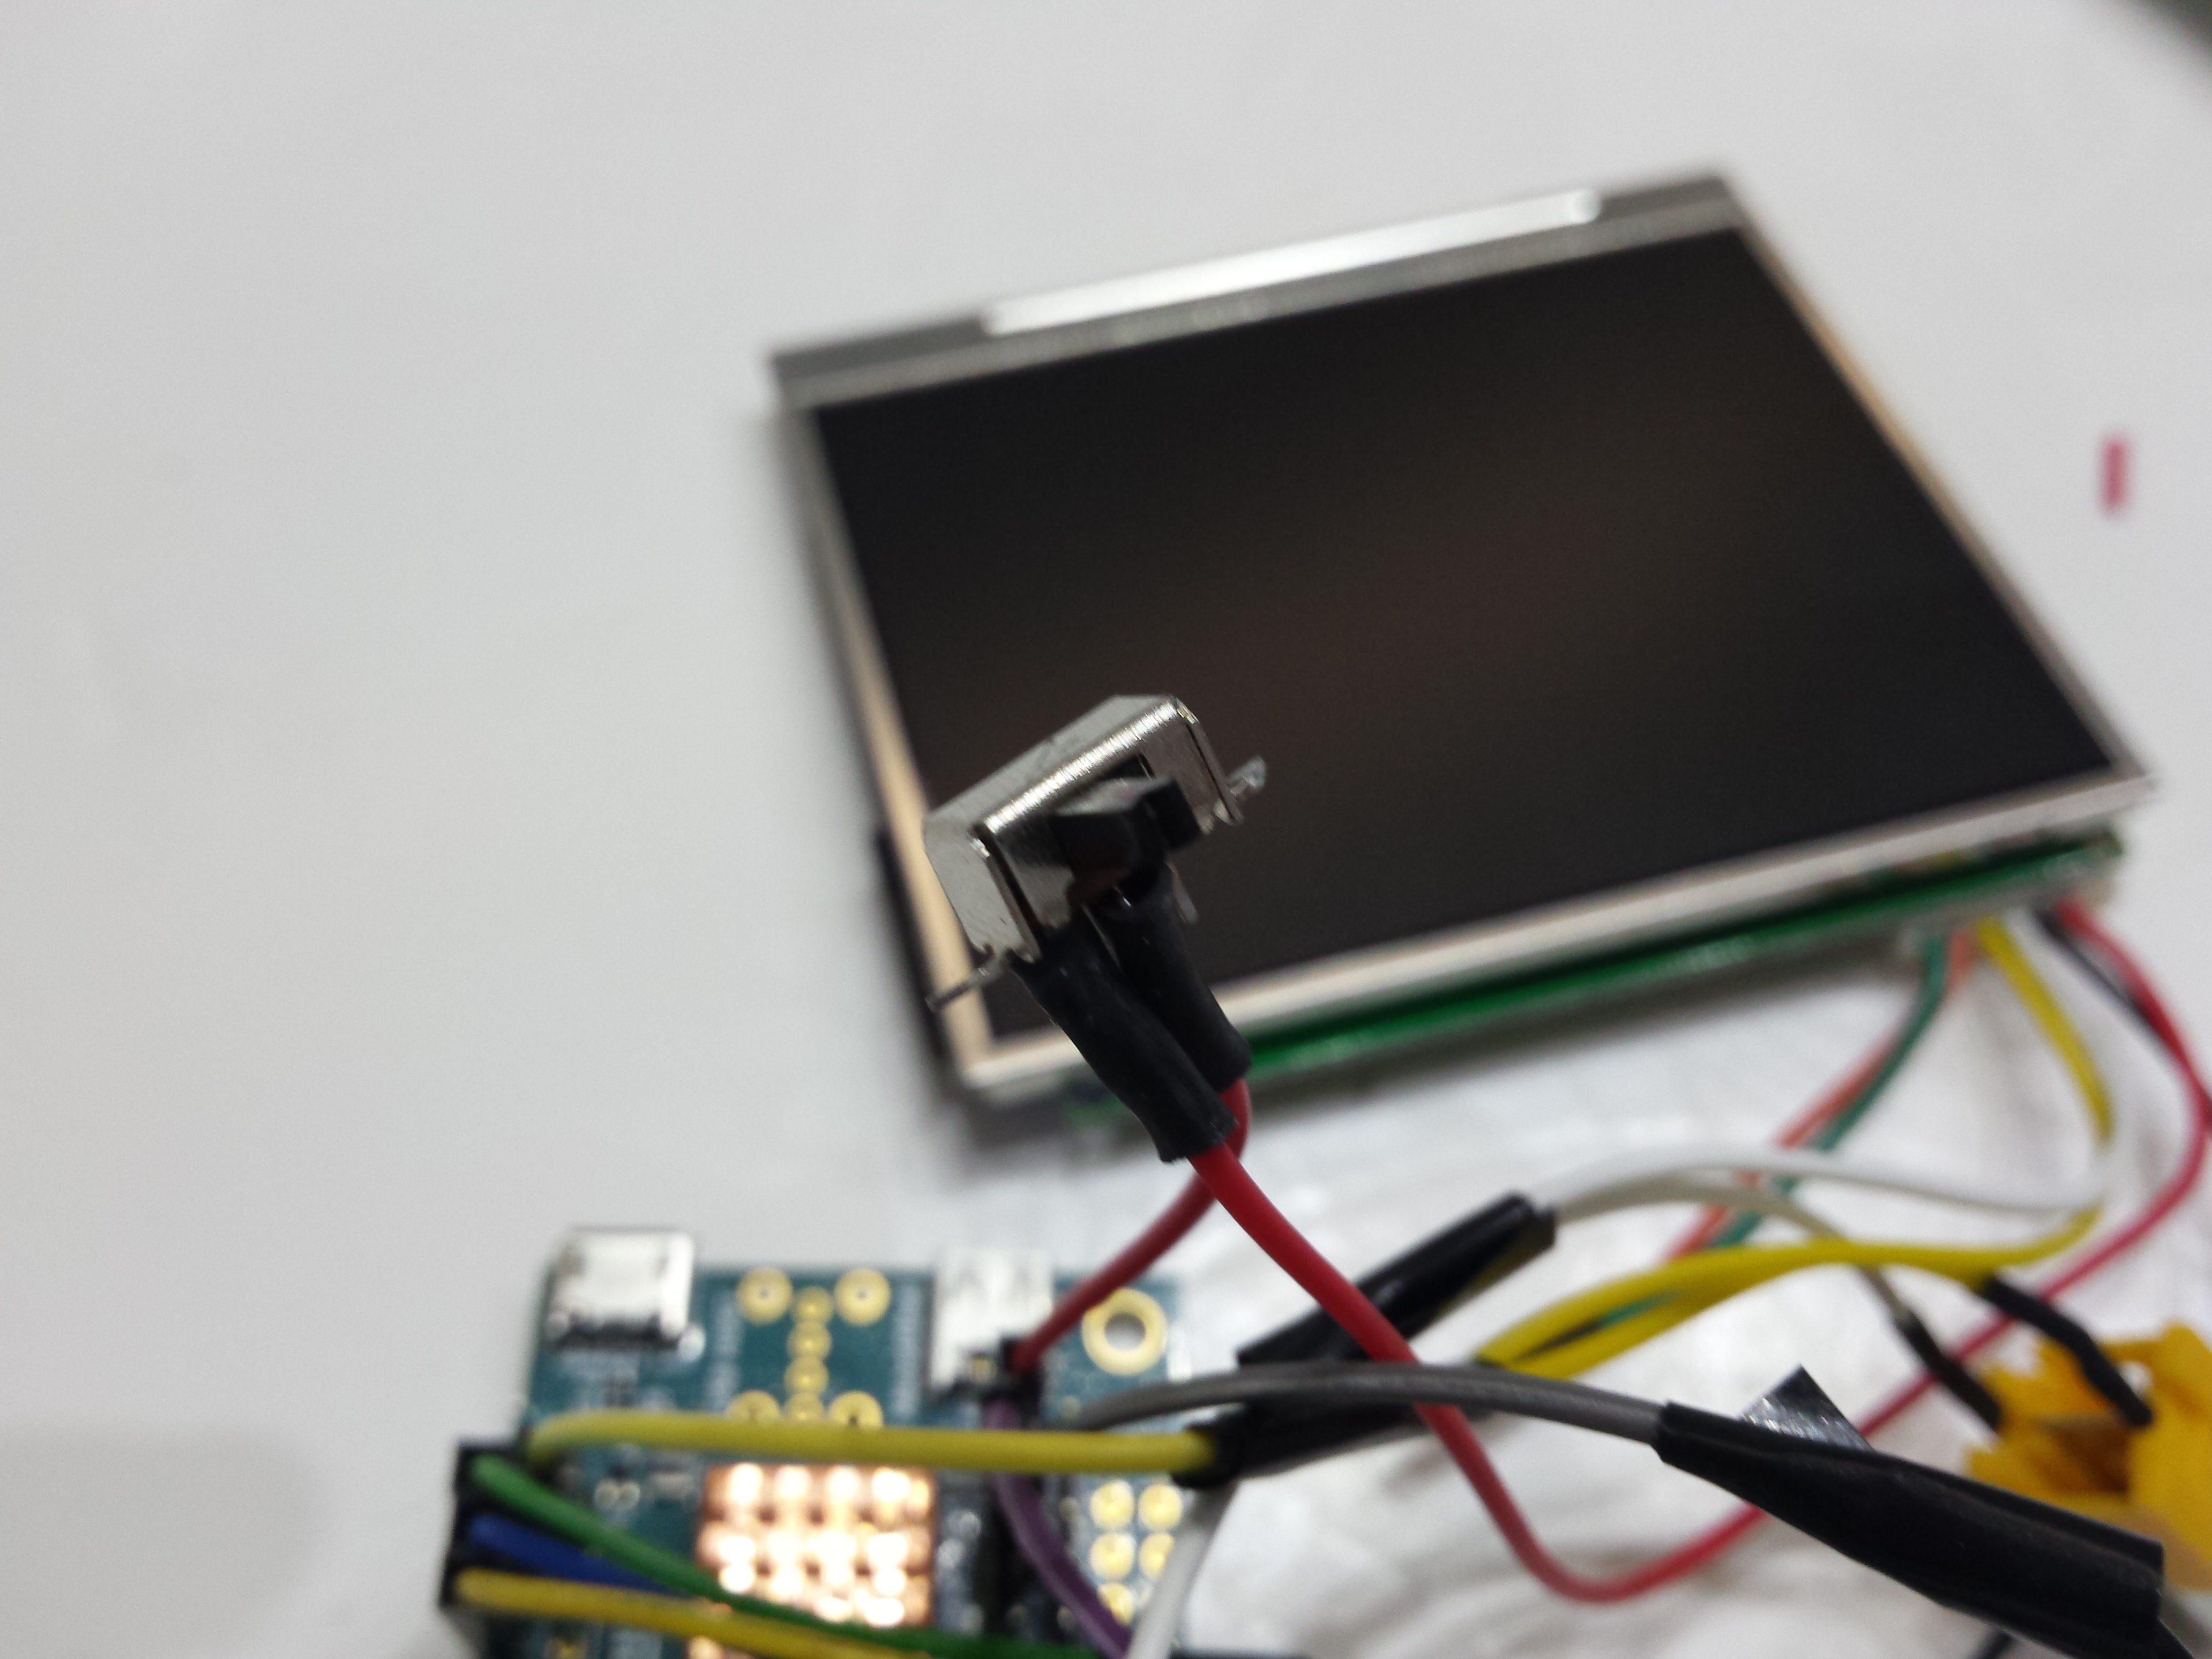
Display modifications
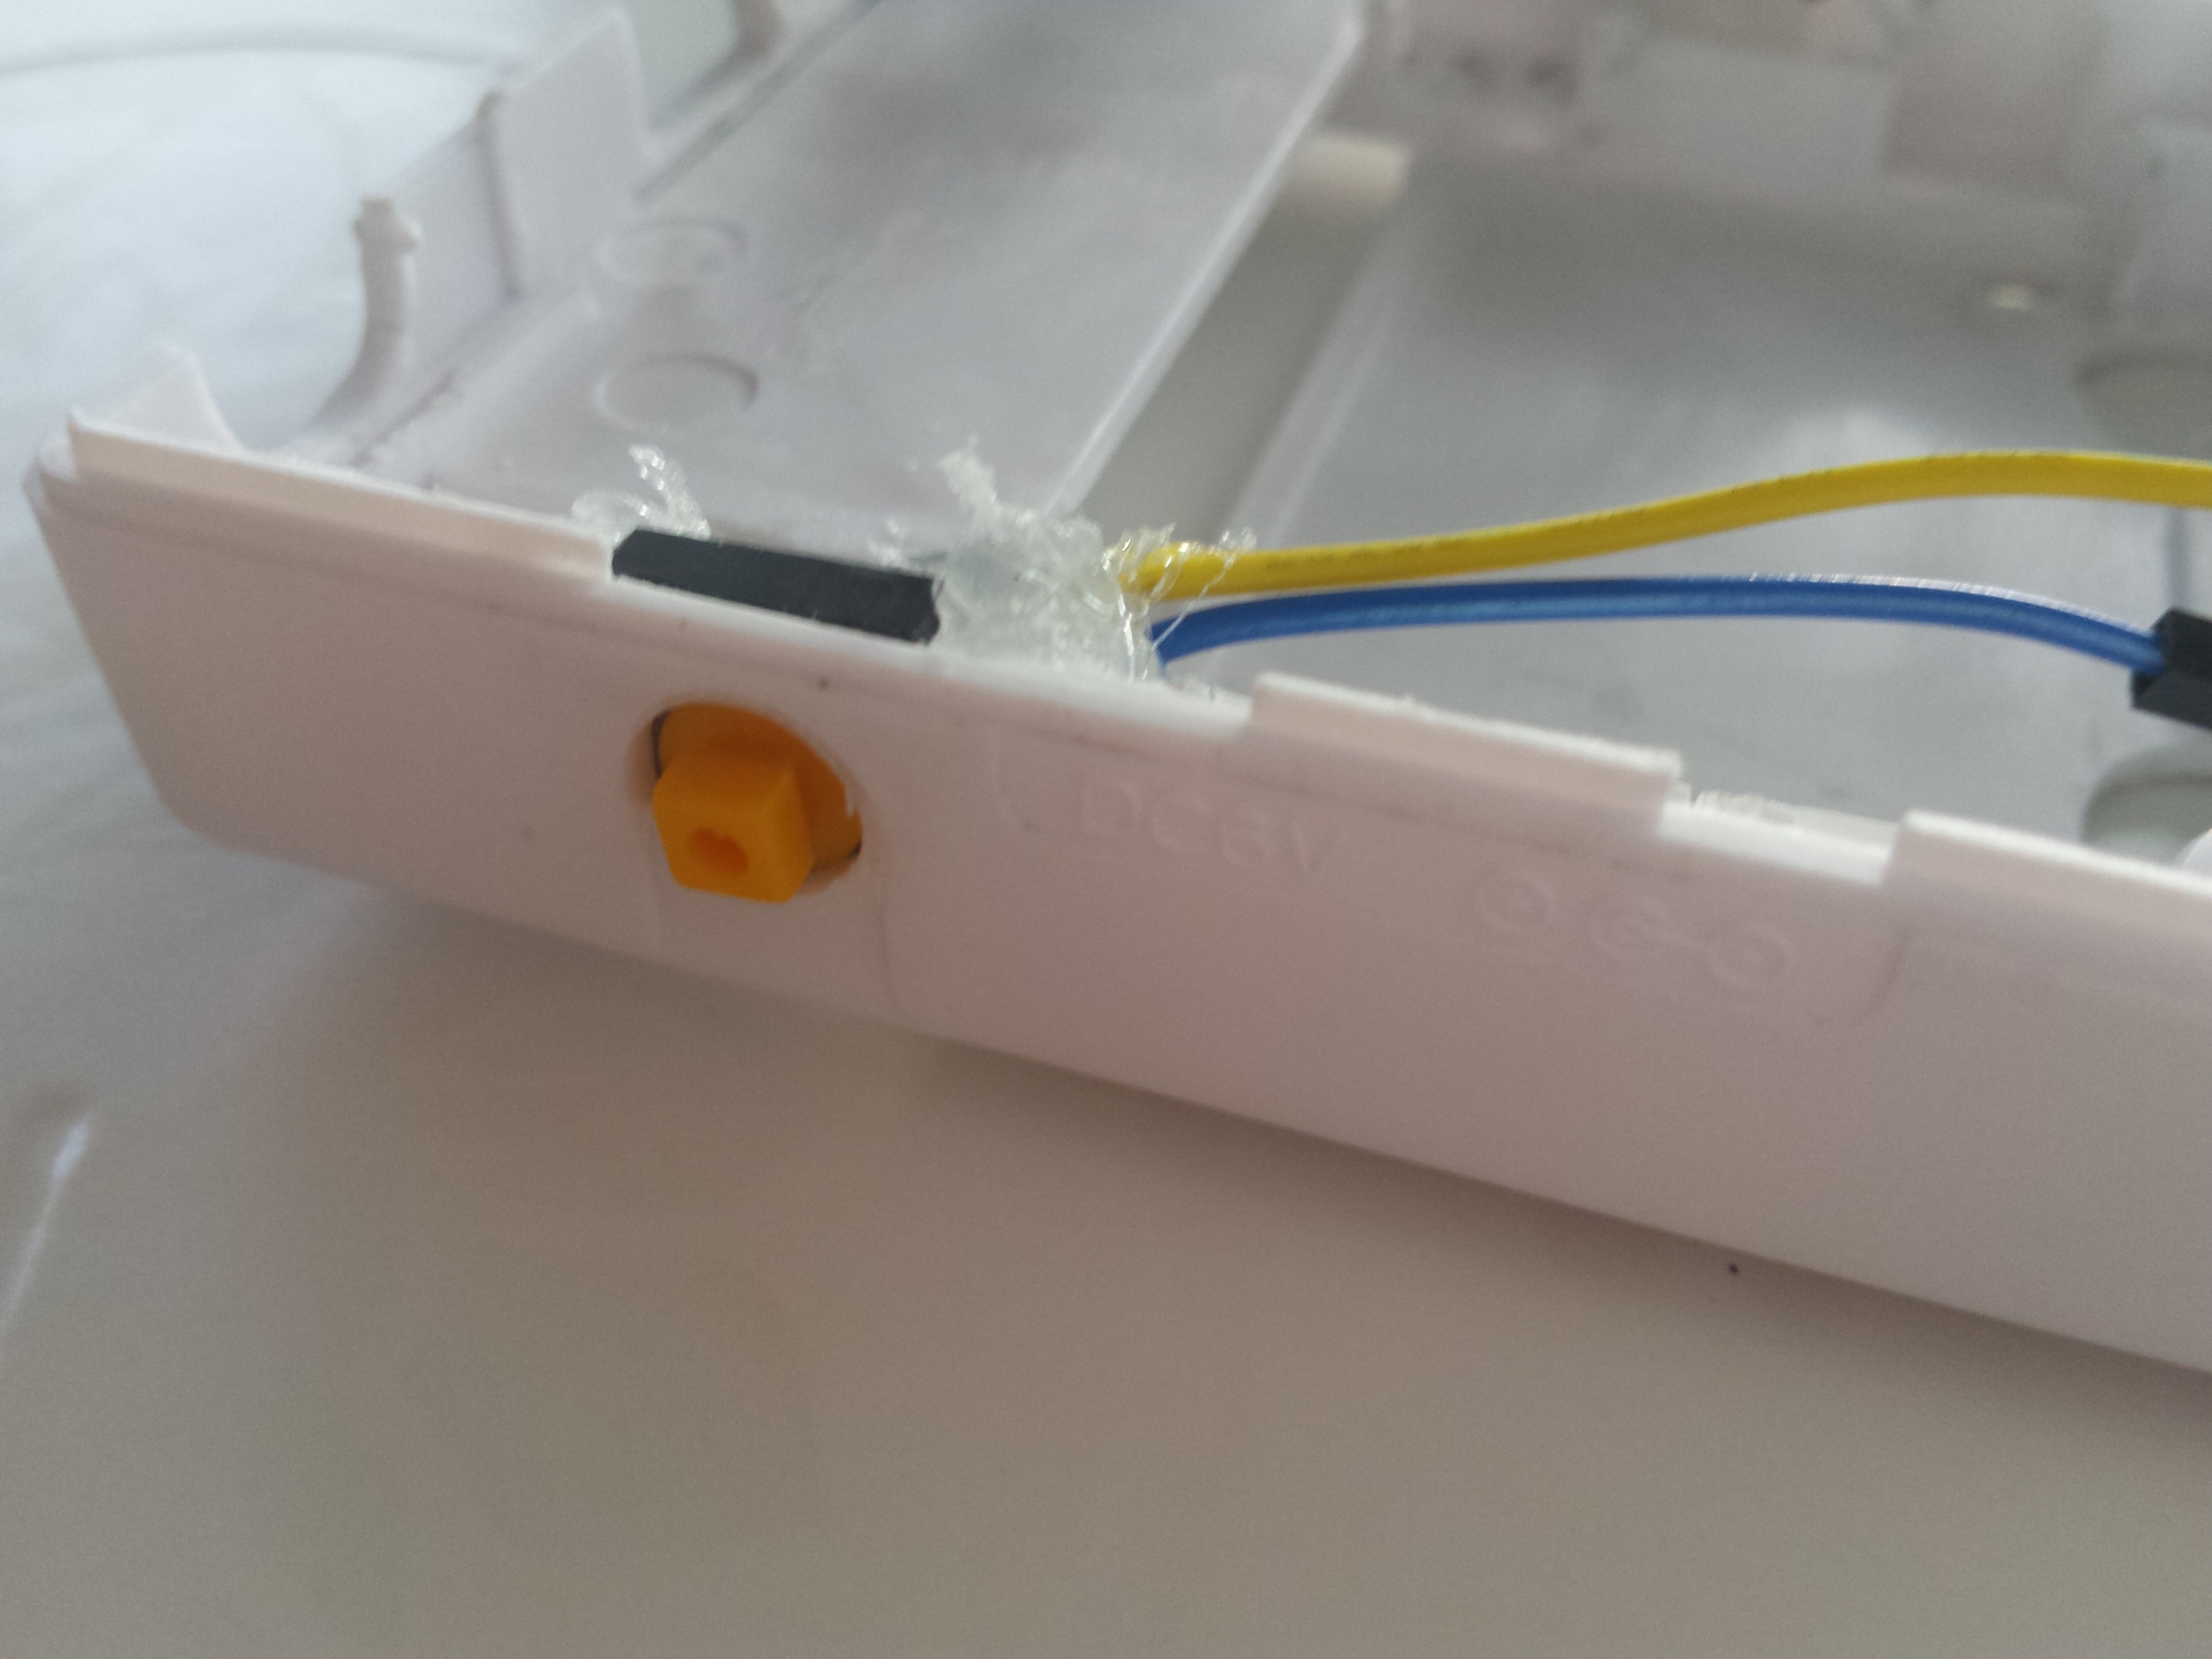
The display was said to work with 6-12V, but could easily be used with 5V by bypassing the voltage regulator (the display is orginaly for cars).
I also replaced one of the two composite connectors by a jumper cable and added a small on/off switch. Turning the screen off allows for better battery life while pausing game and is also mandatory to use the composite output (else the video signal would be very poor and the video circuit could be damaged)

PCB Soldering
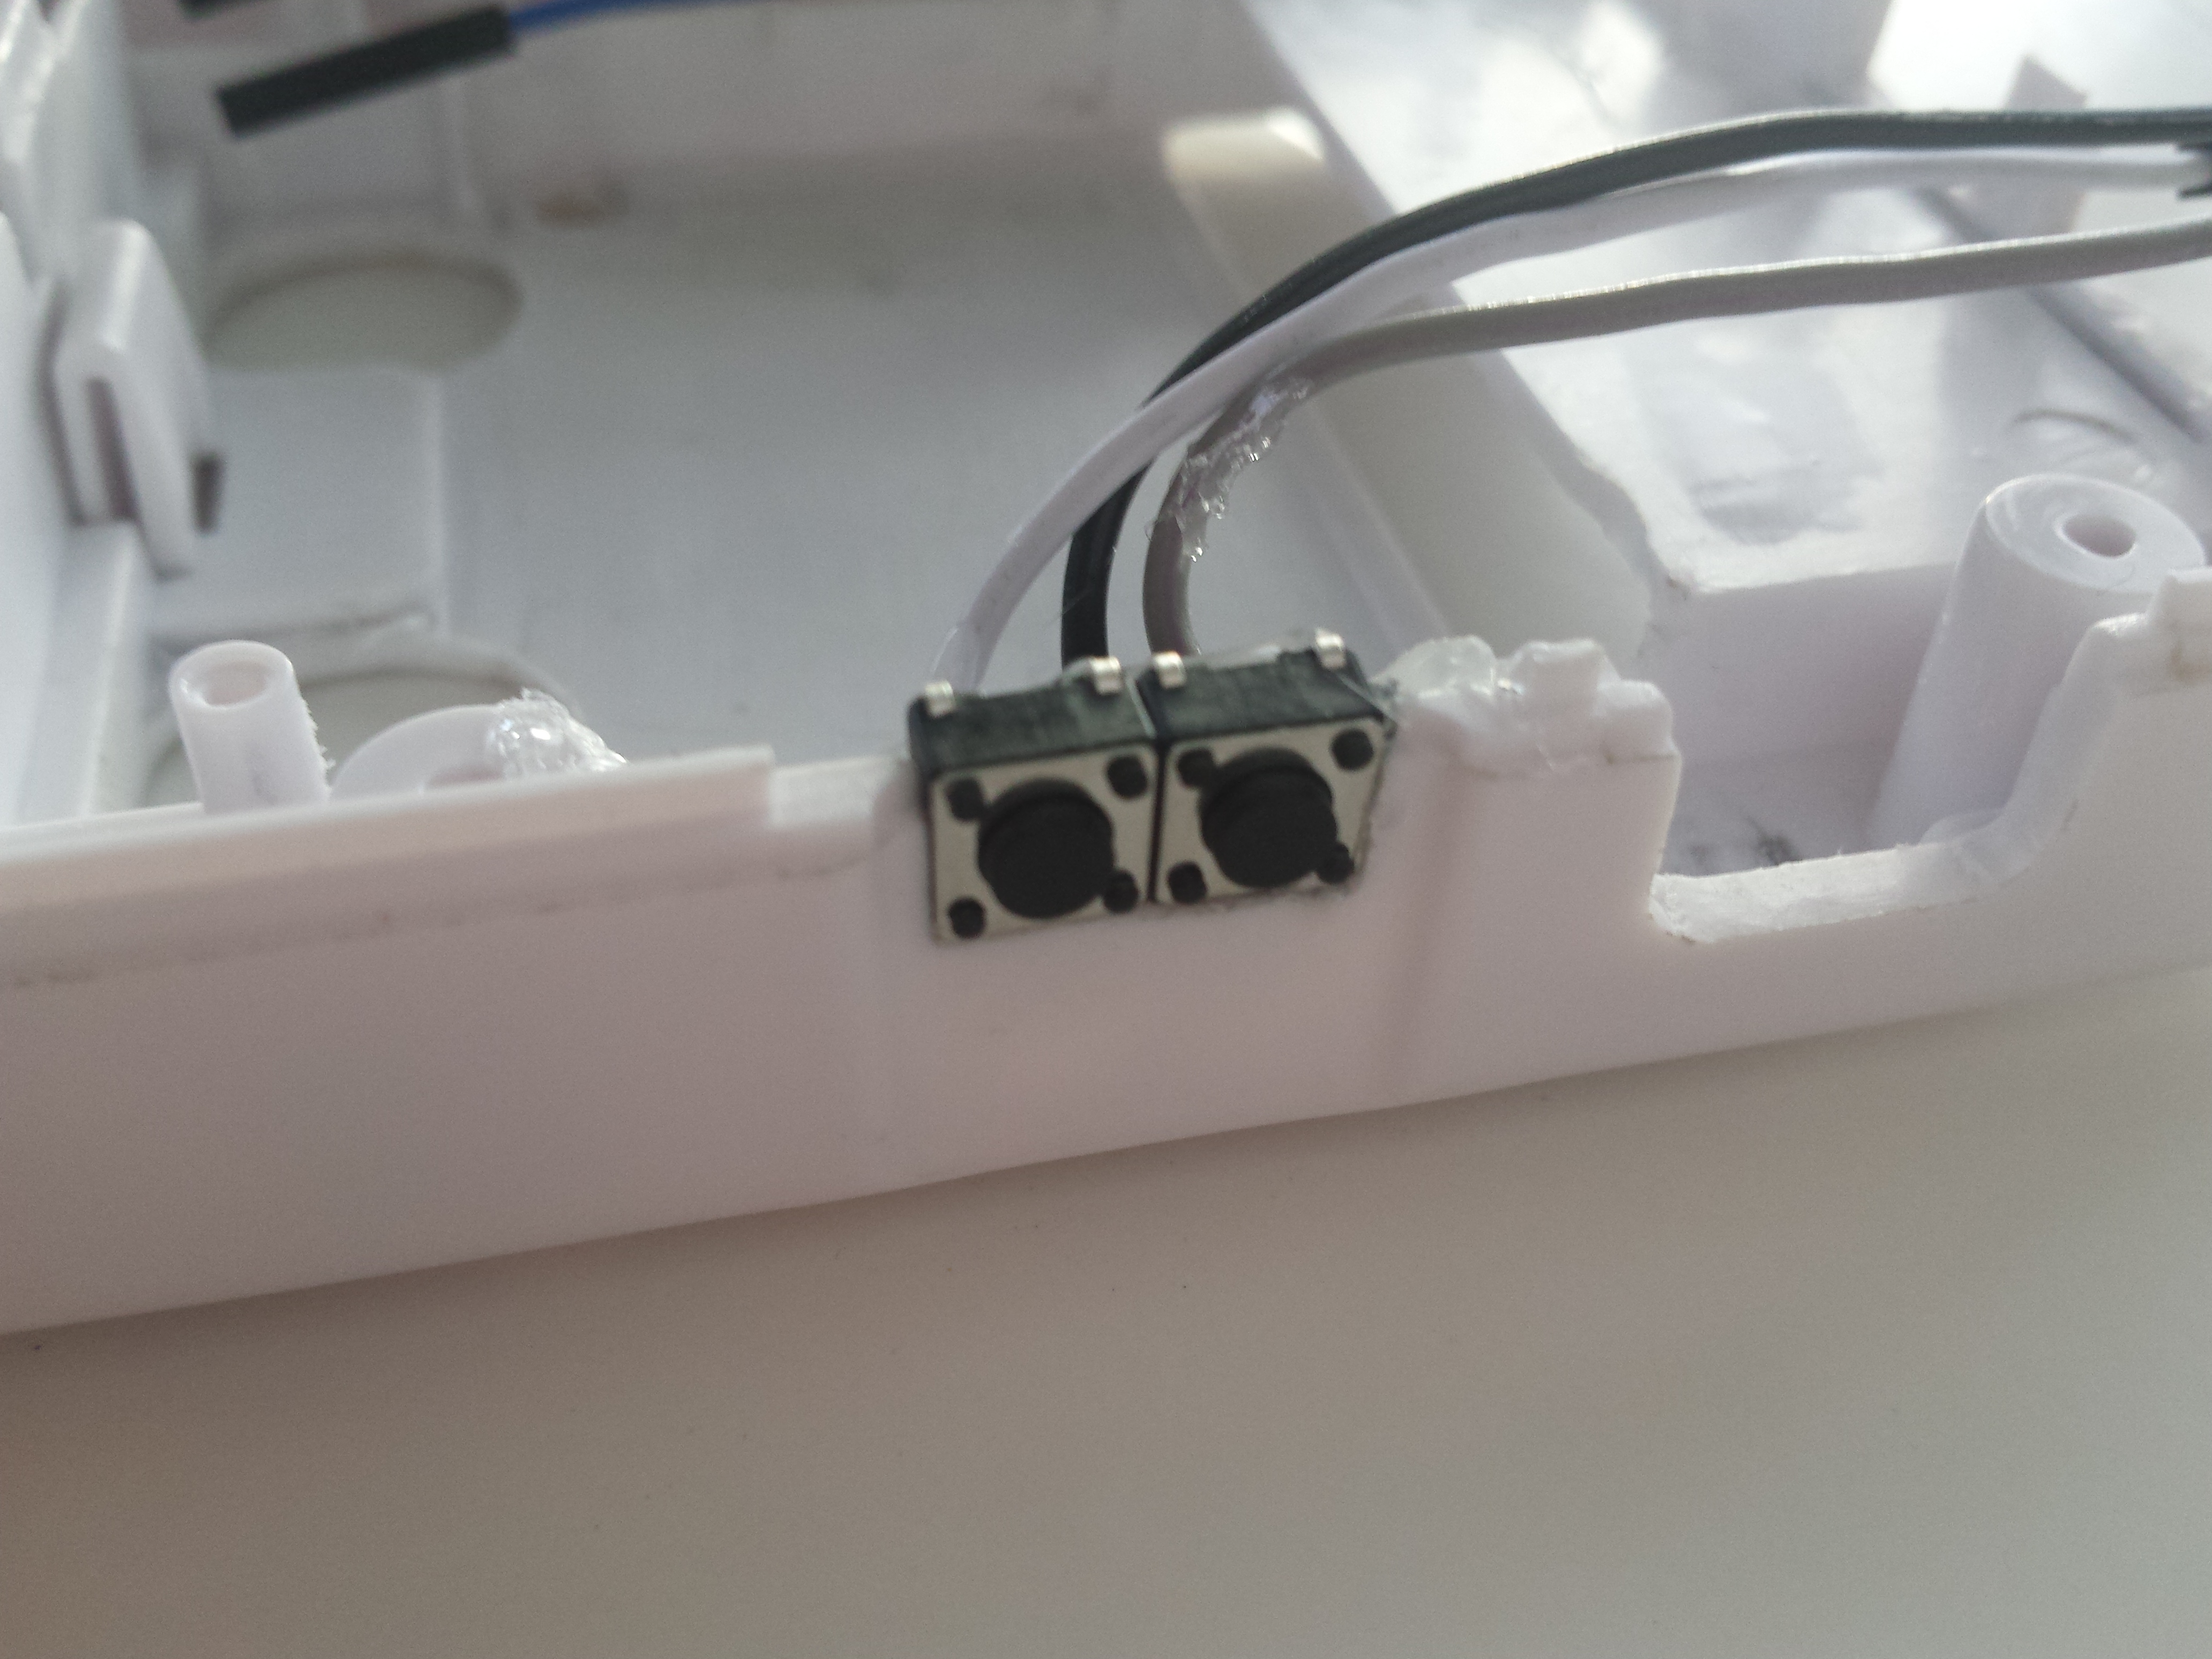
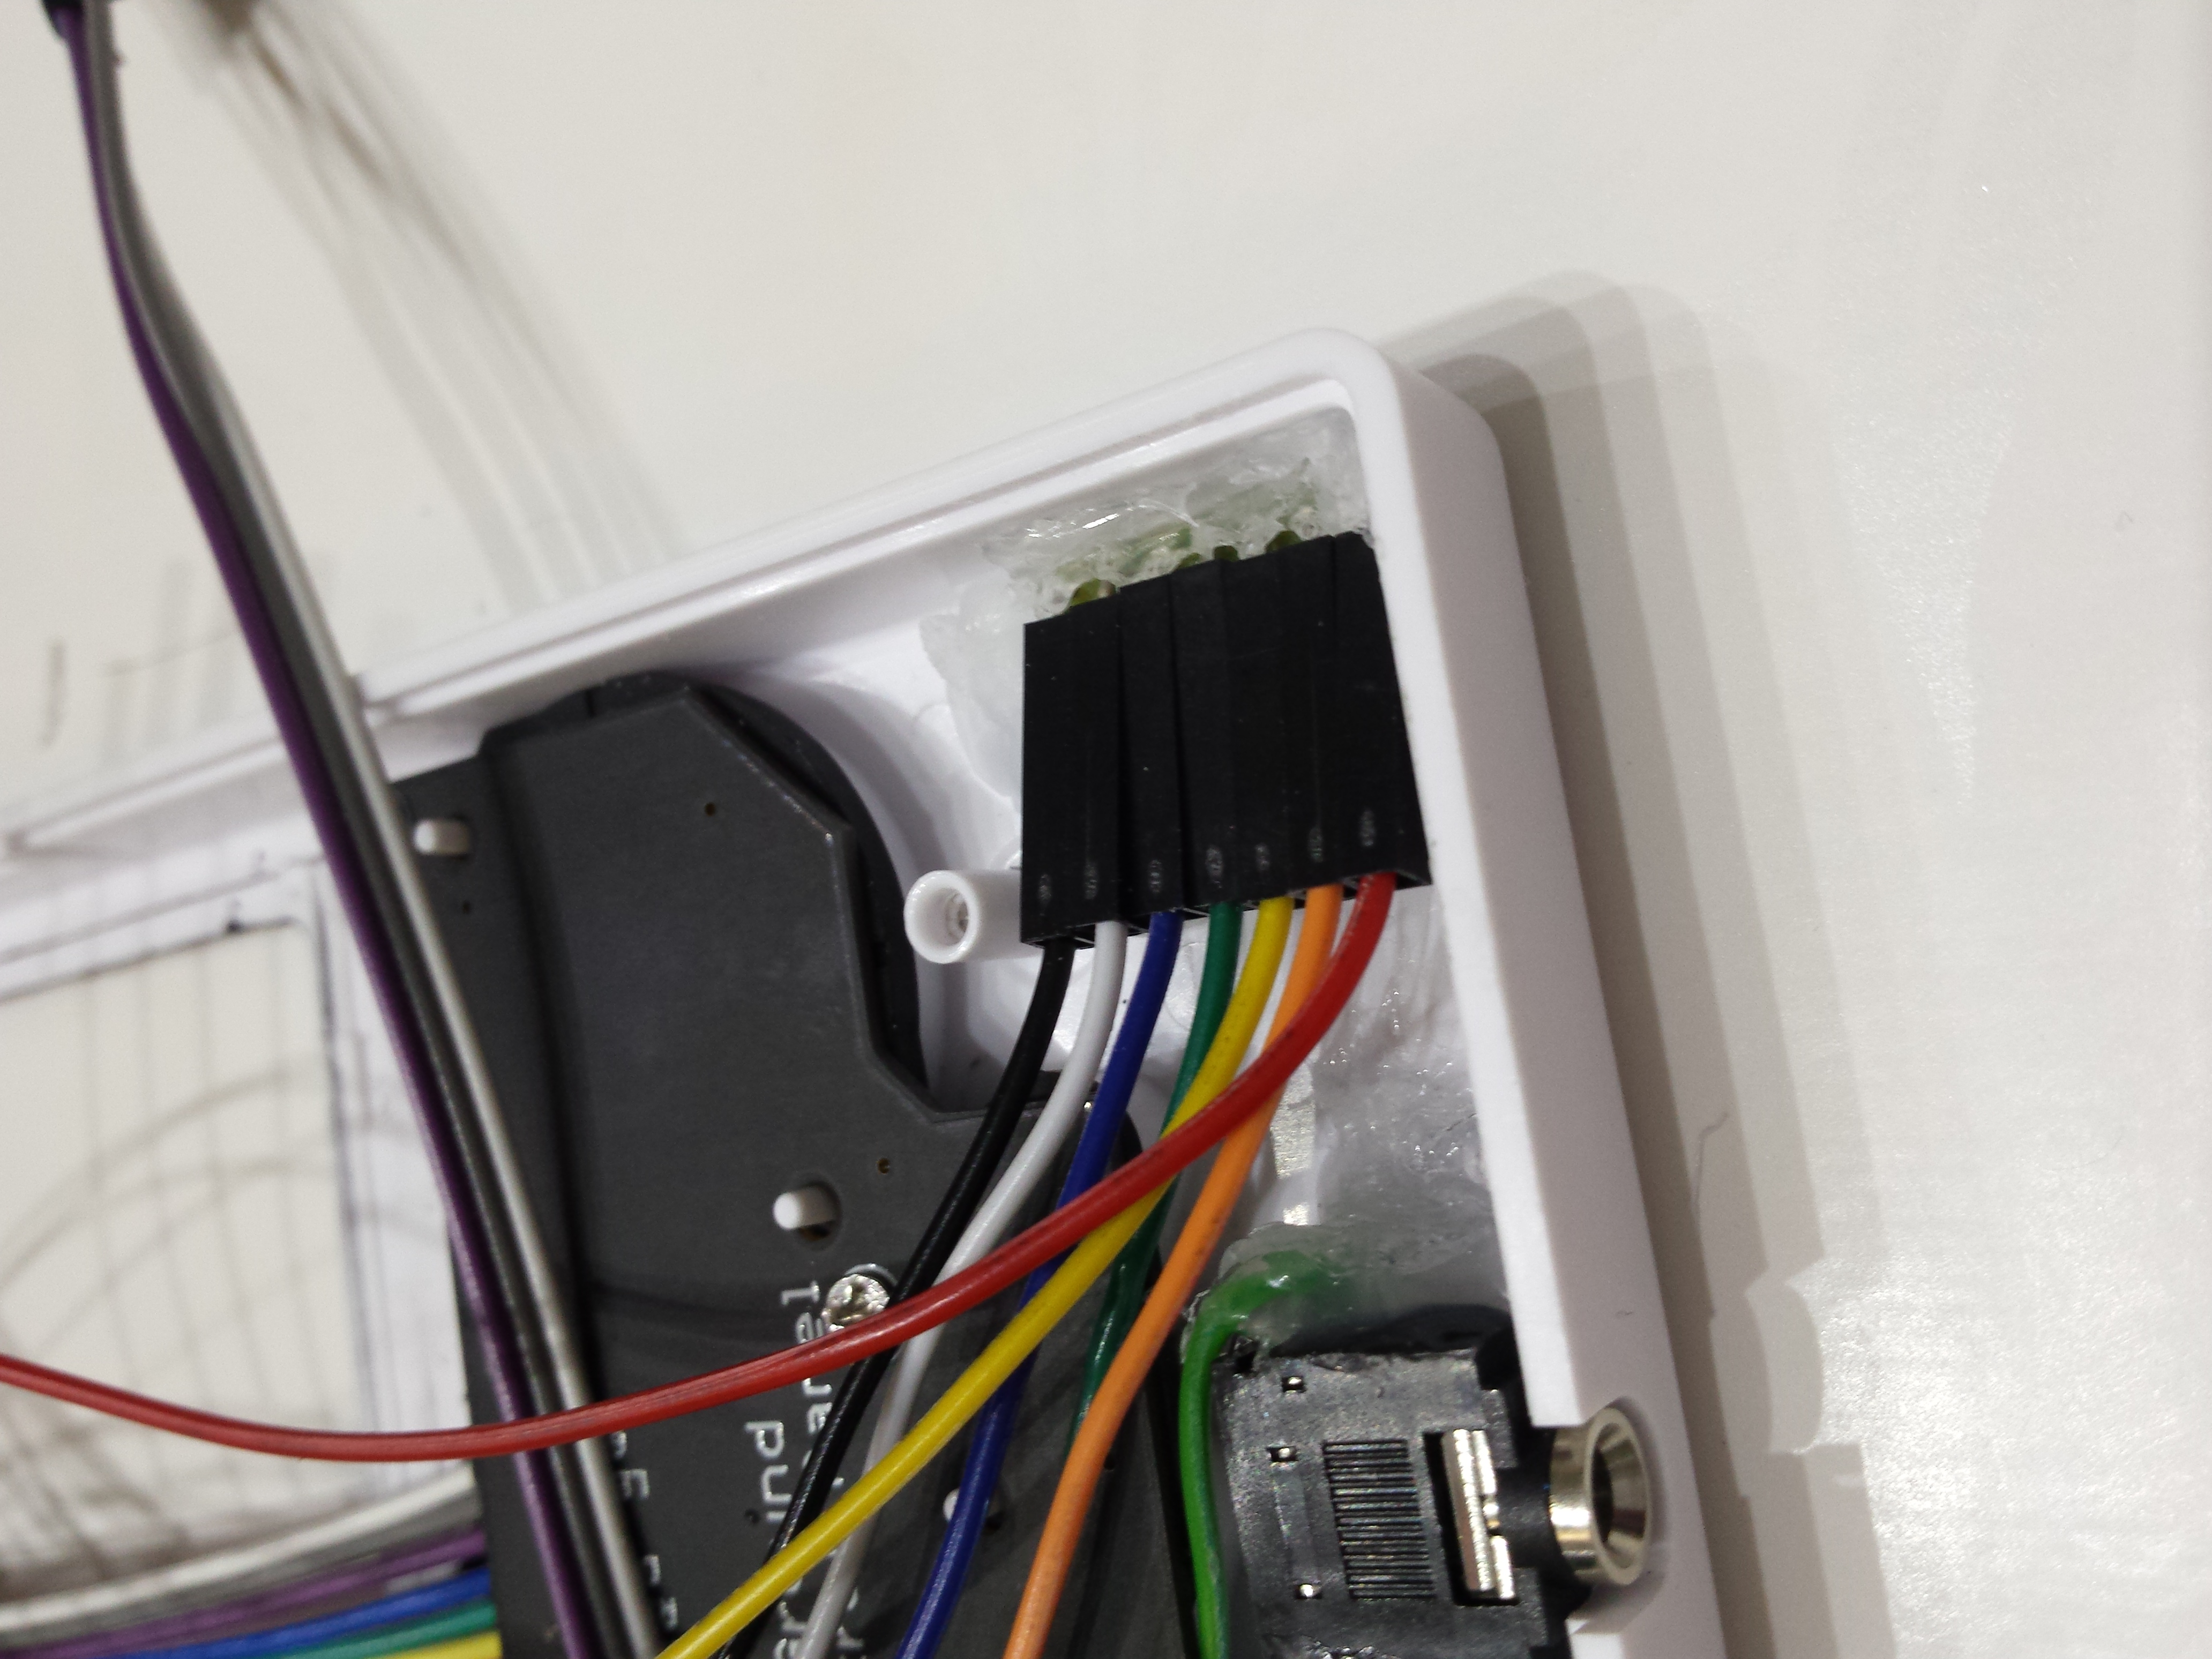
I soldered wires on buttons PCB and pin header on Odroid-W board and mounted the heatsink
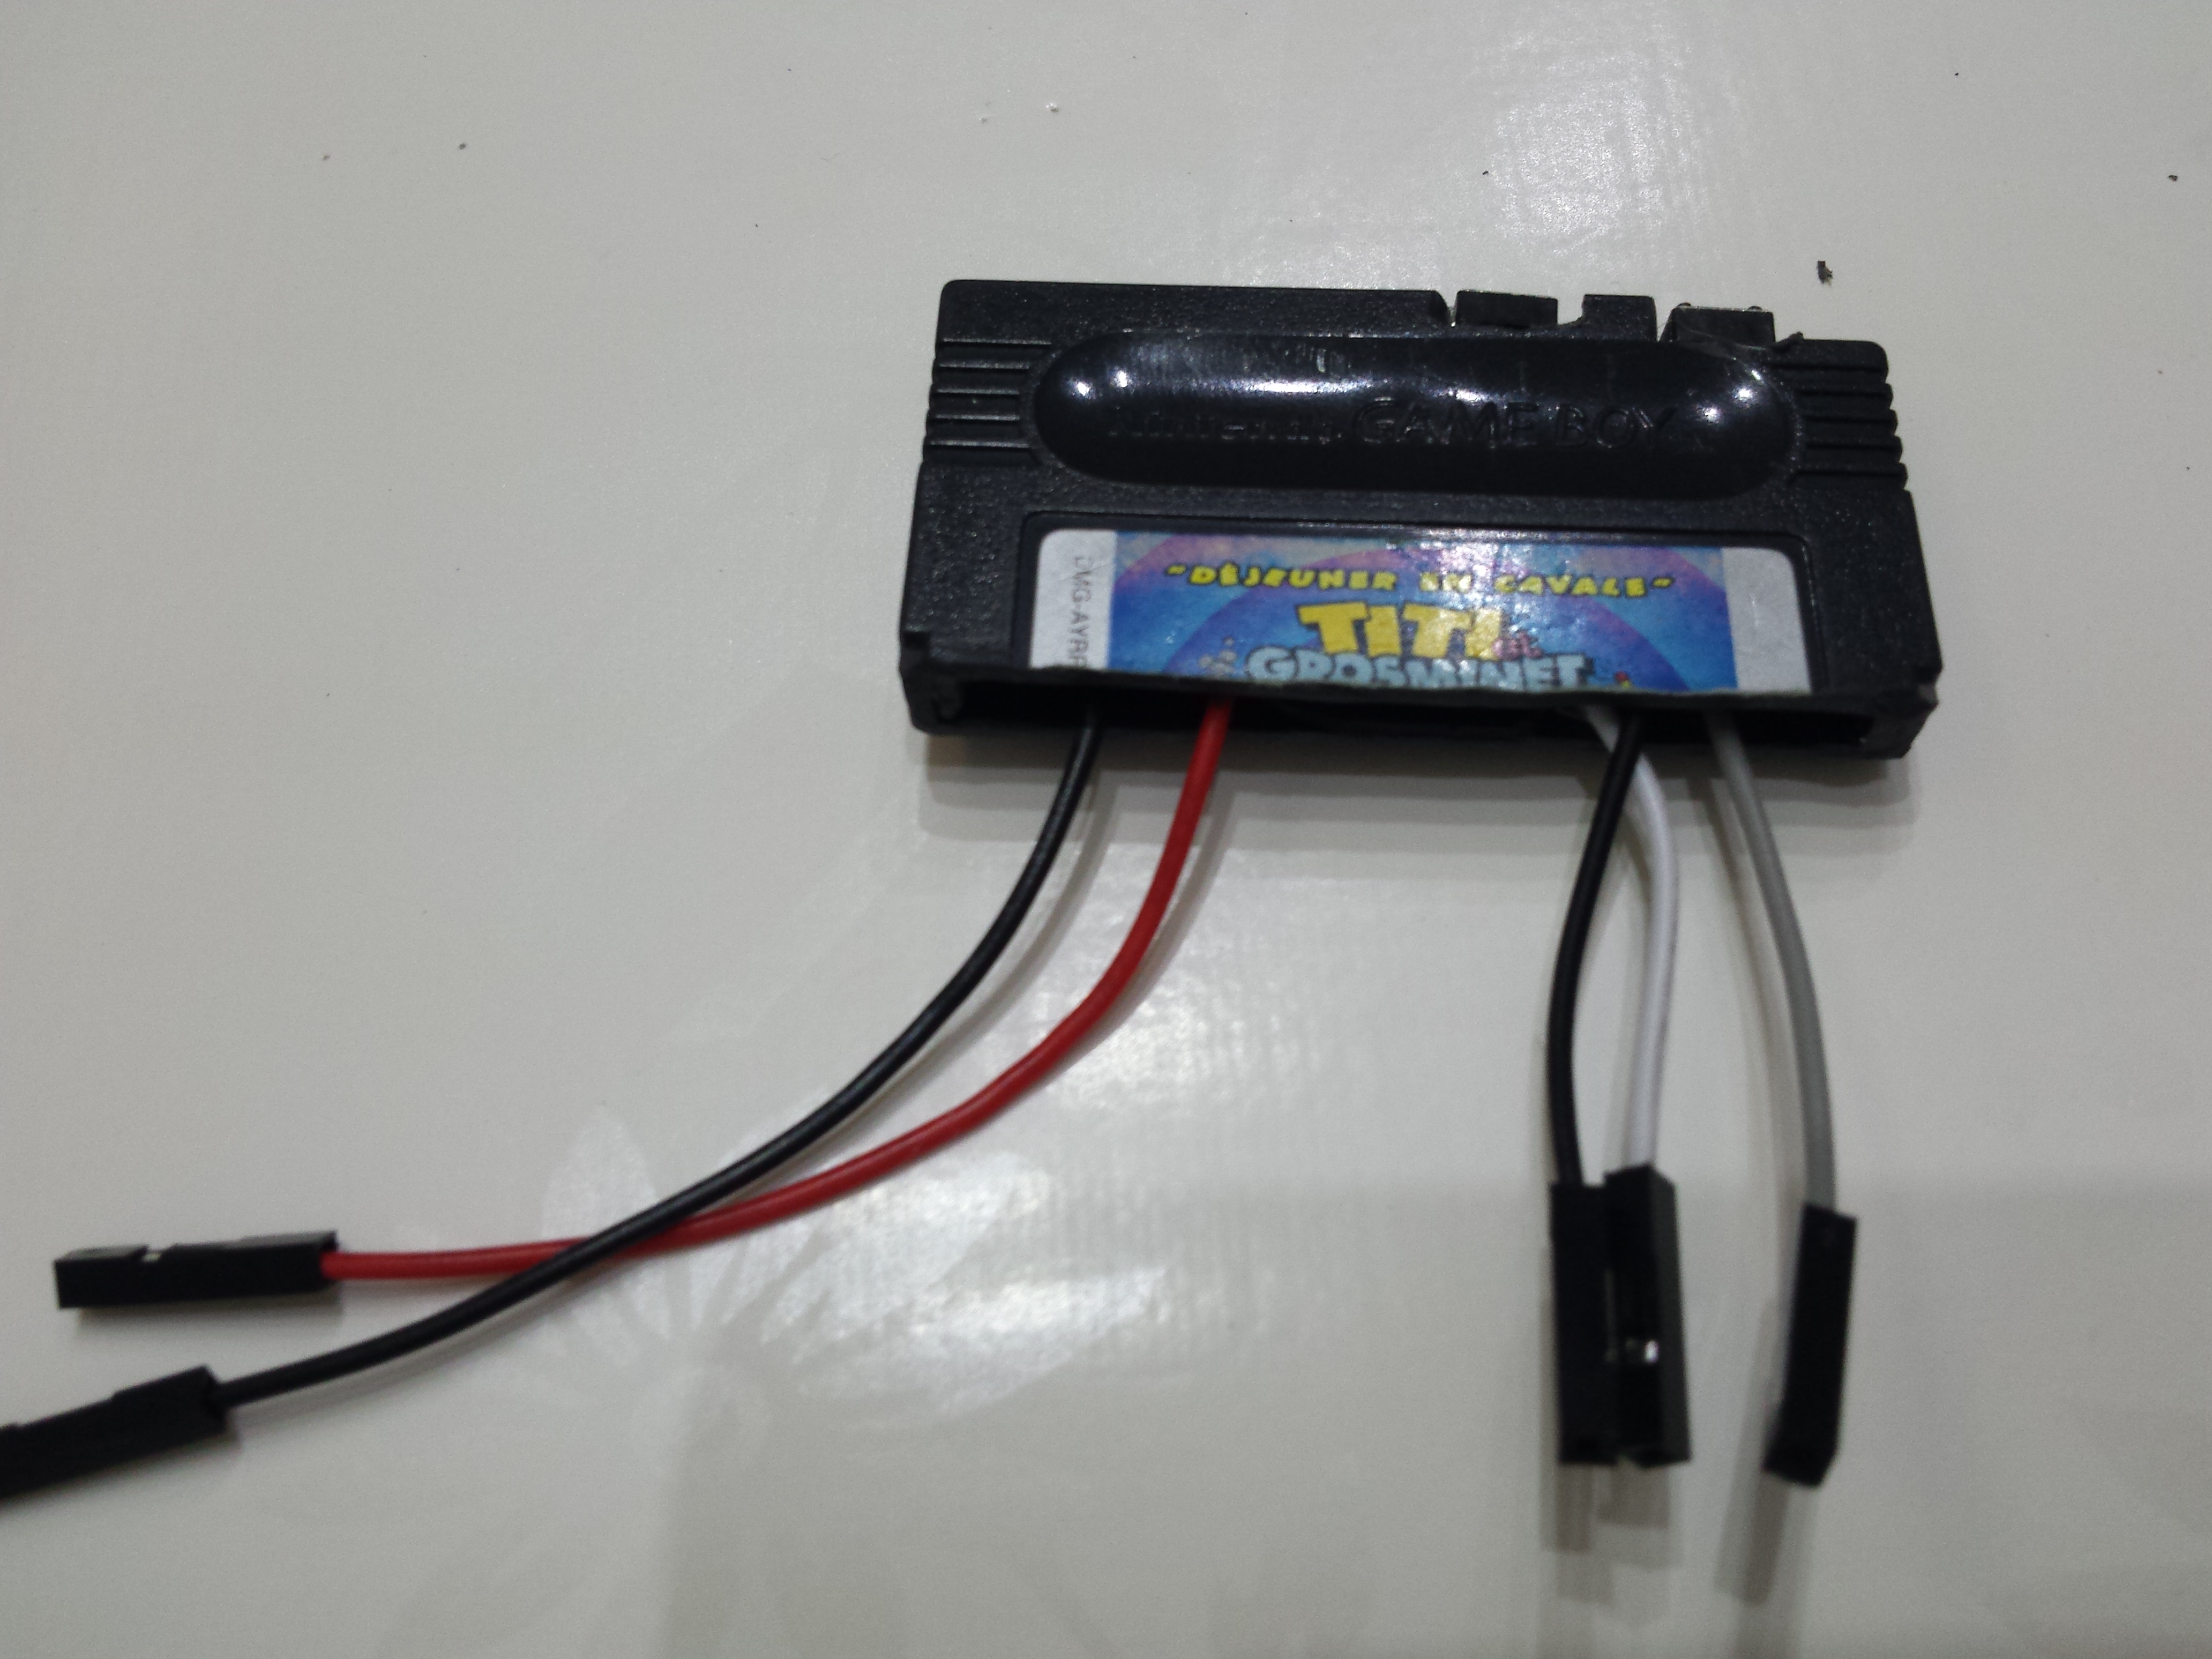
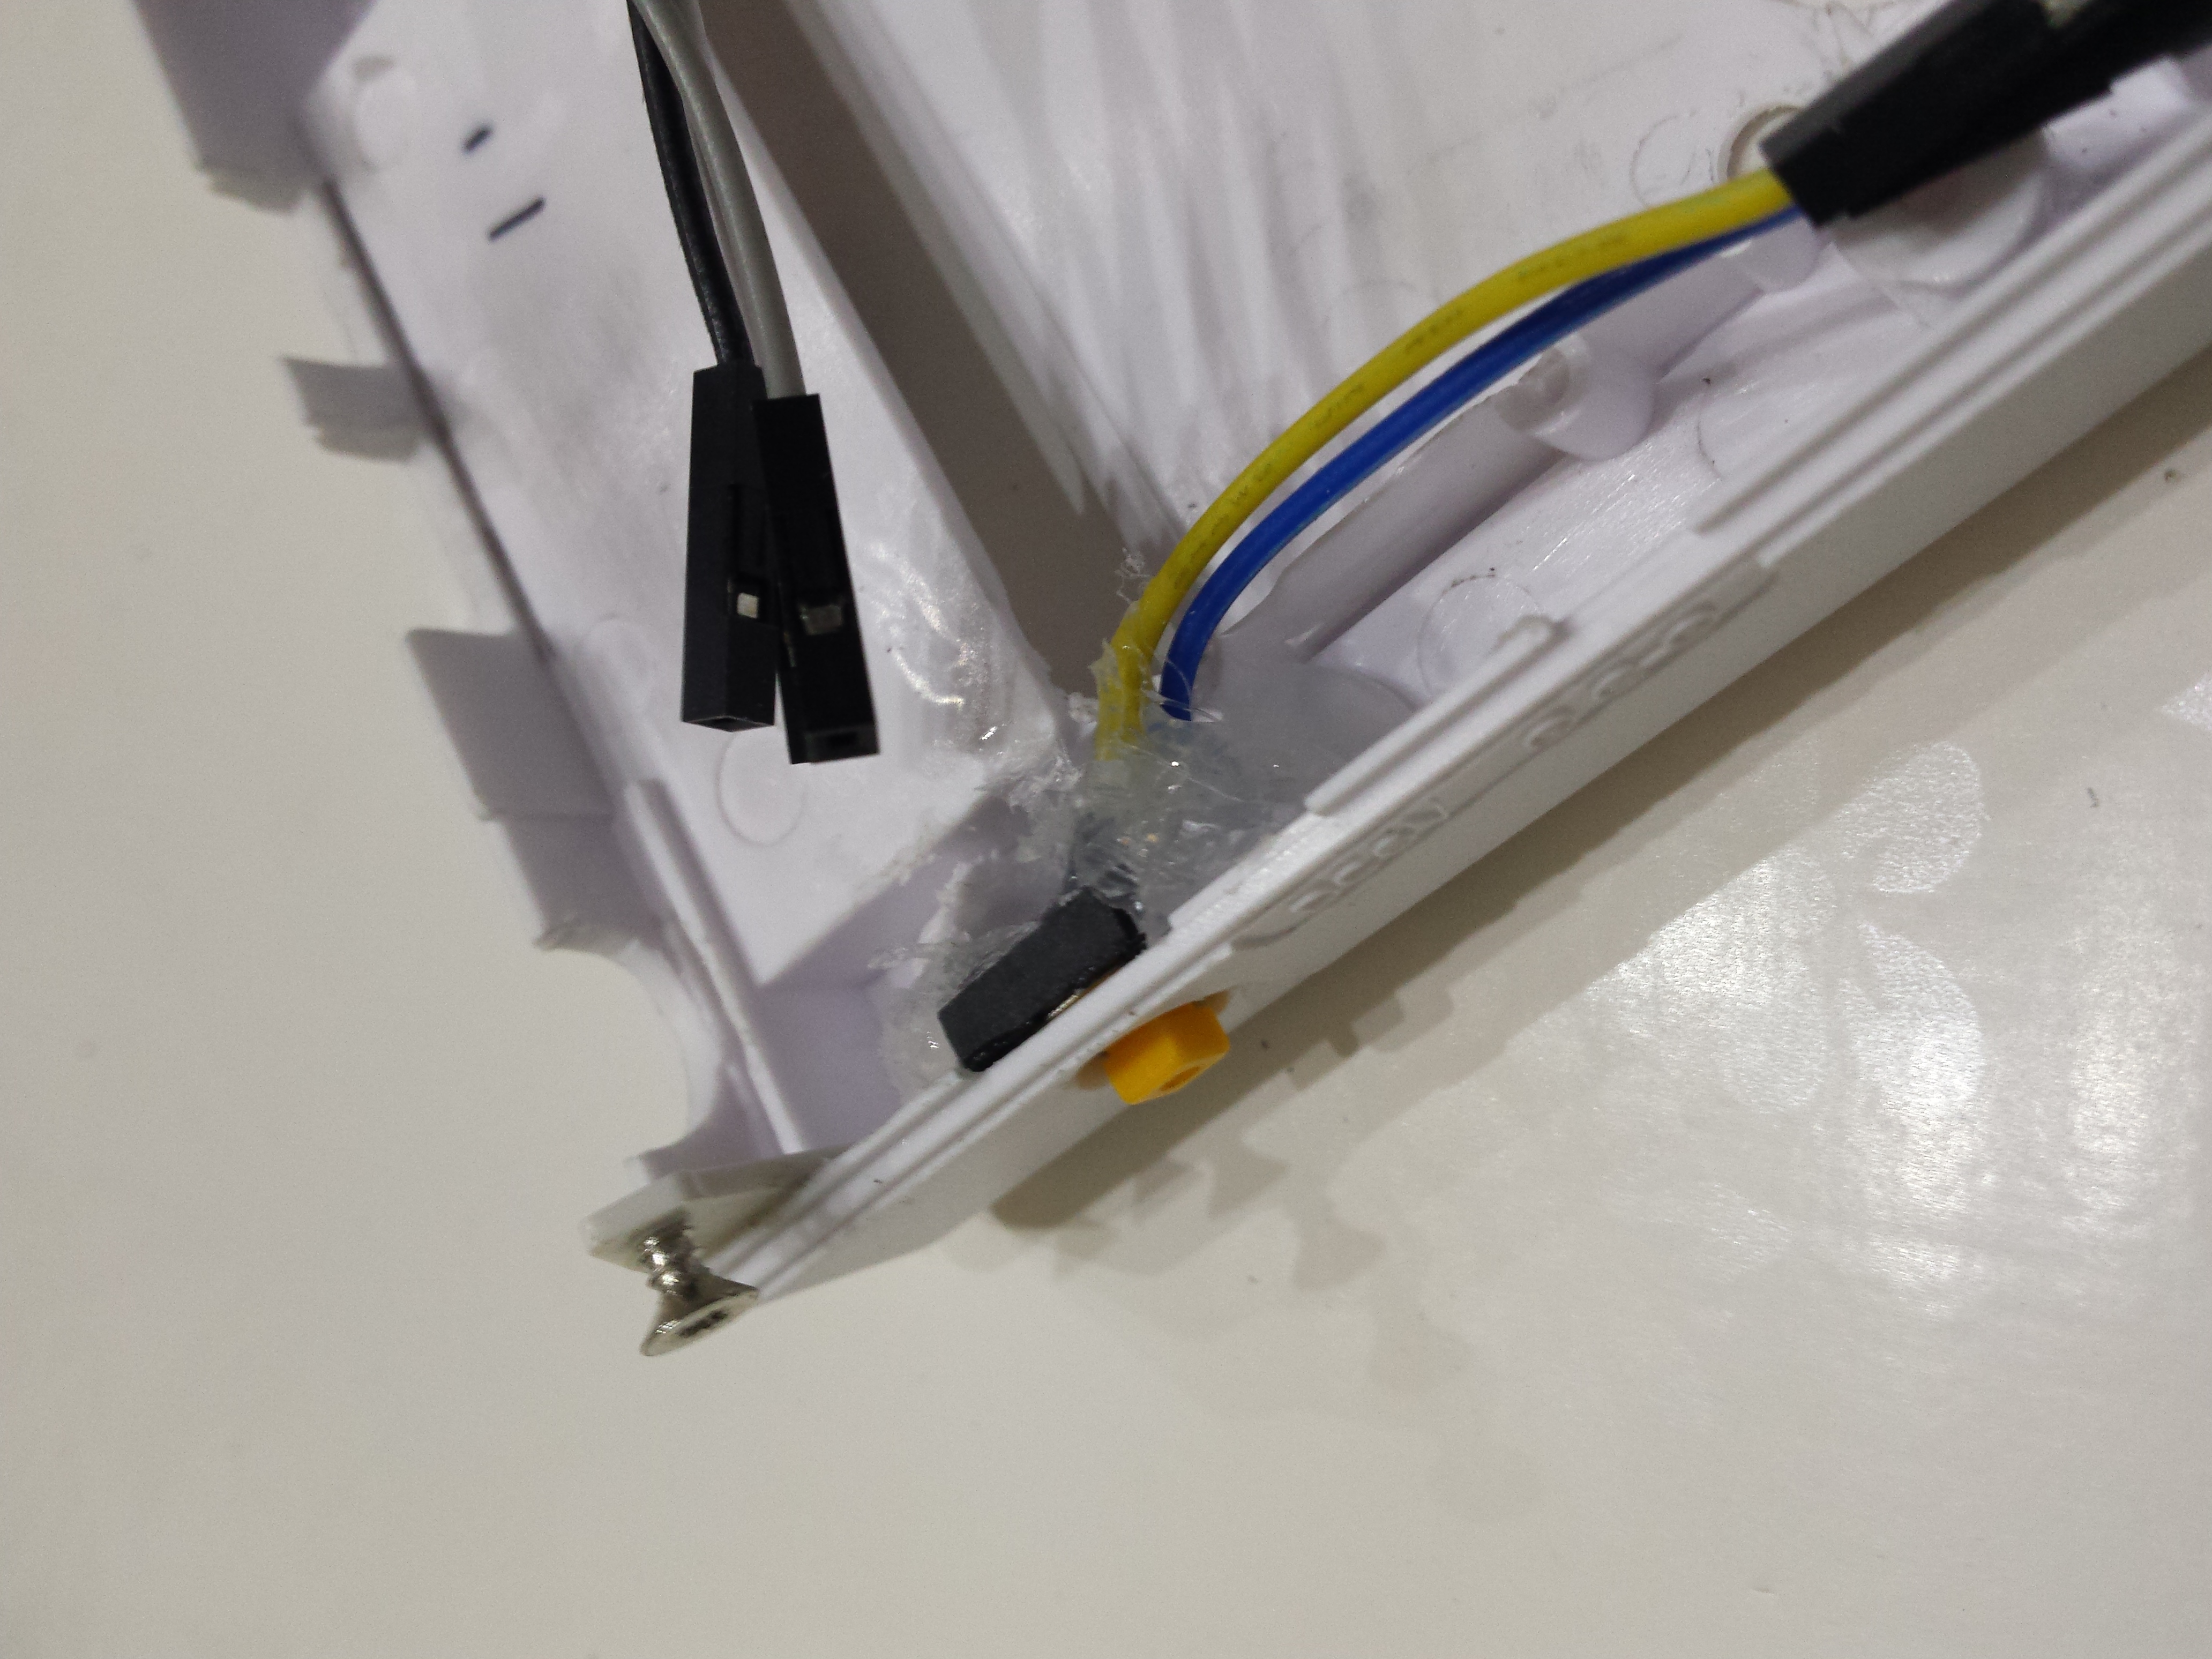
Game cartridge adaptation
The purpose was to use an (part of) original game cartdrige to fill the game hole on the Game Boy case. I used it to add two buttons (wifi on / wifi off) as well as the power/charging micro Usb connector.
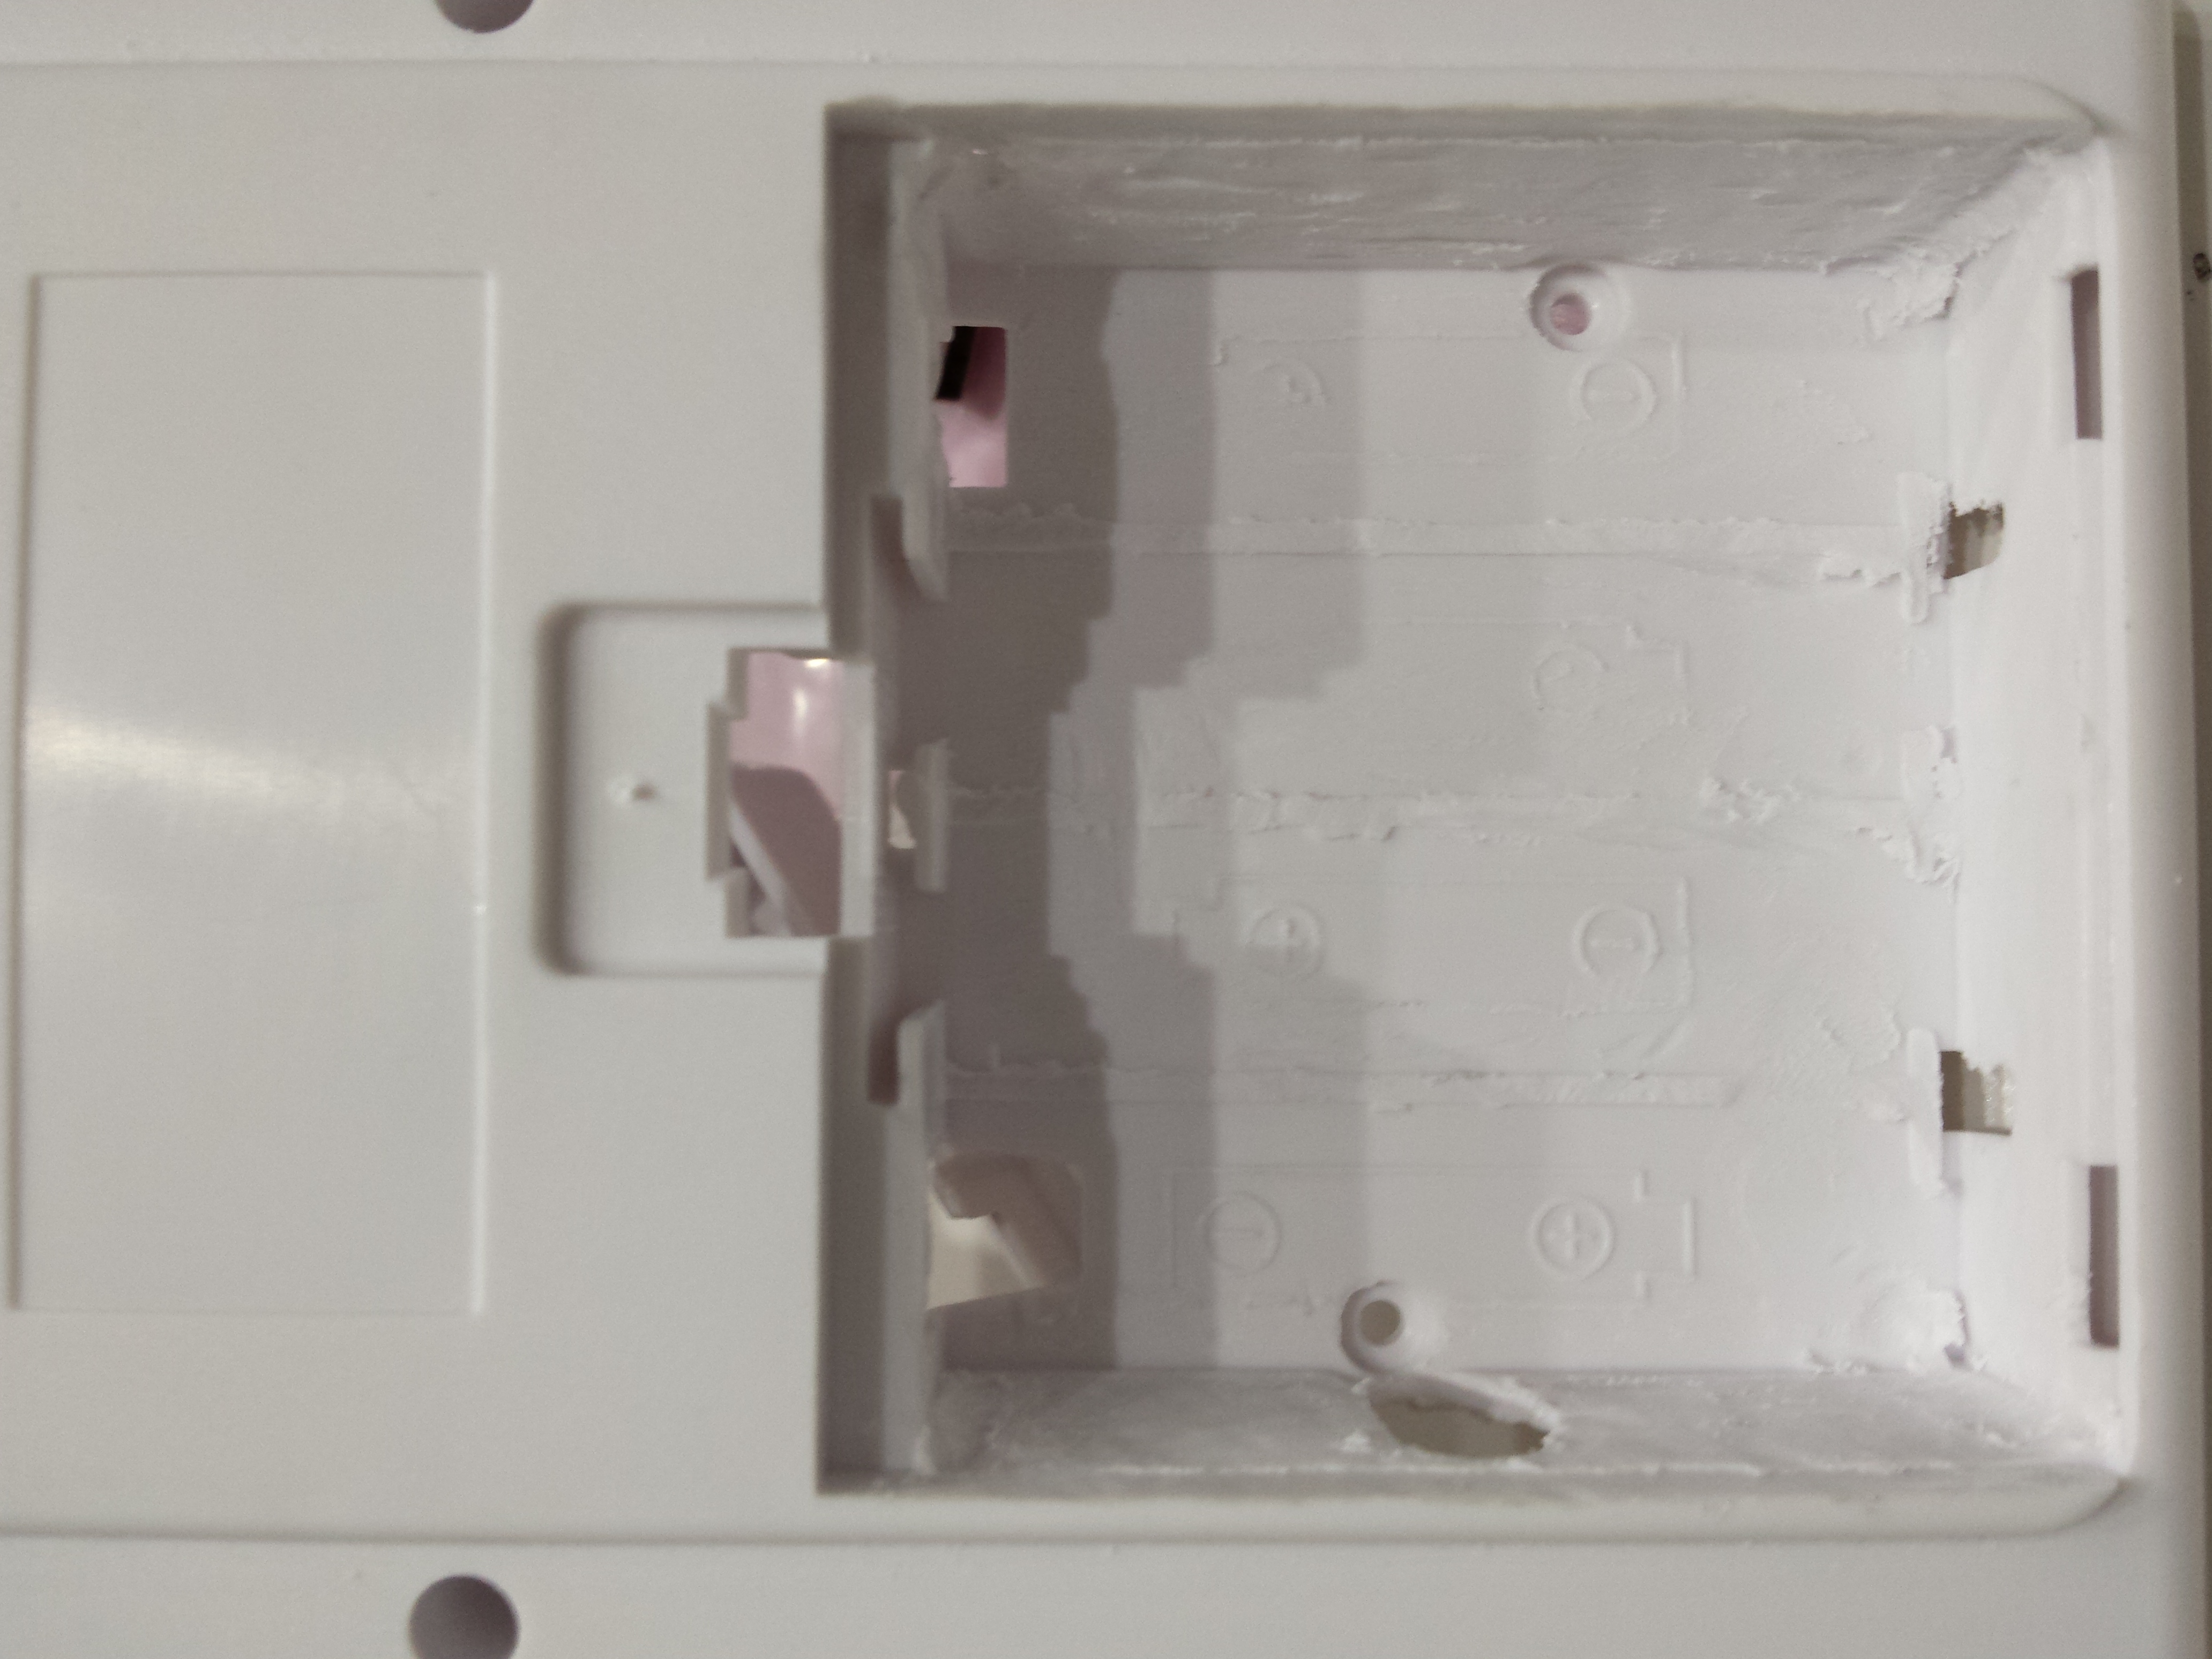
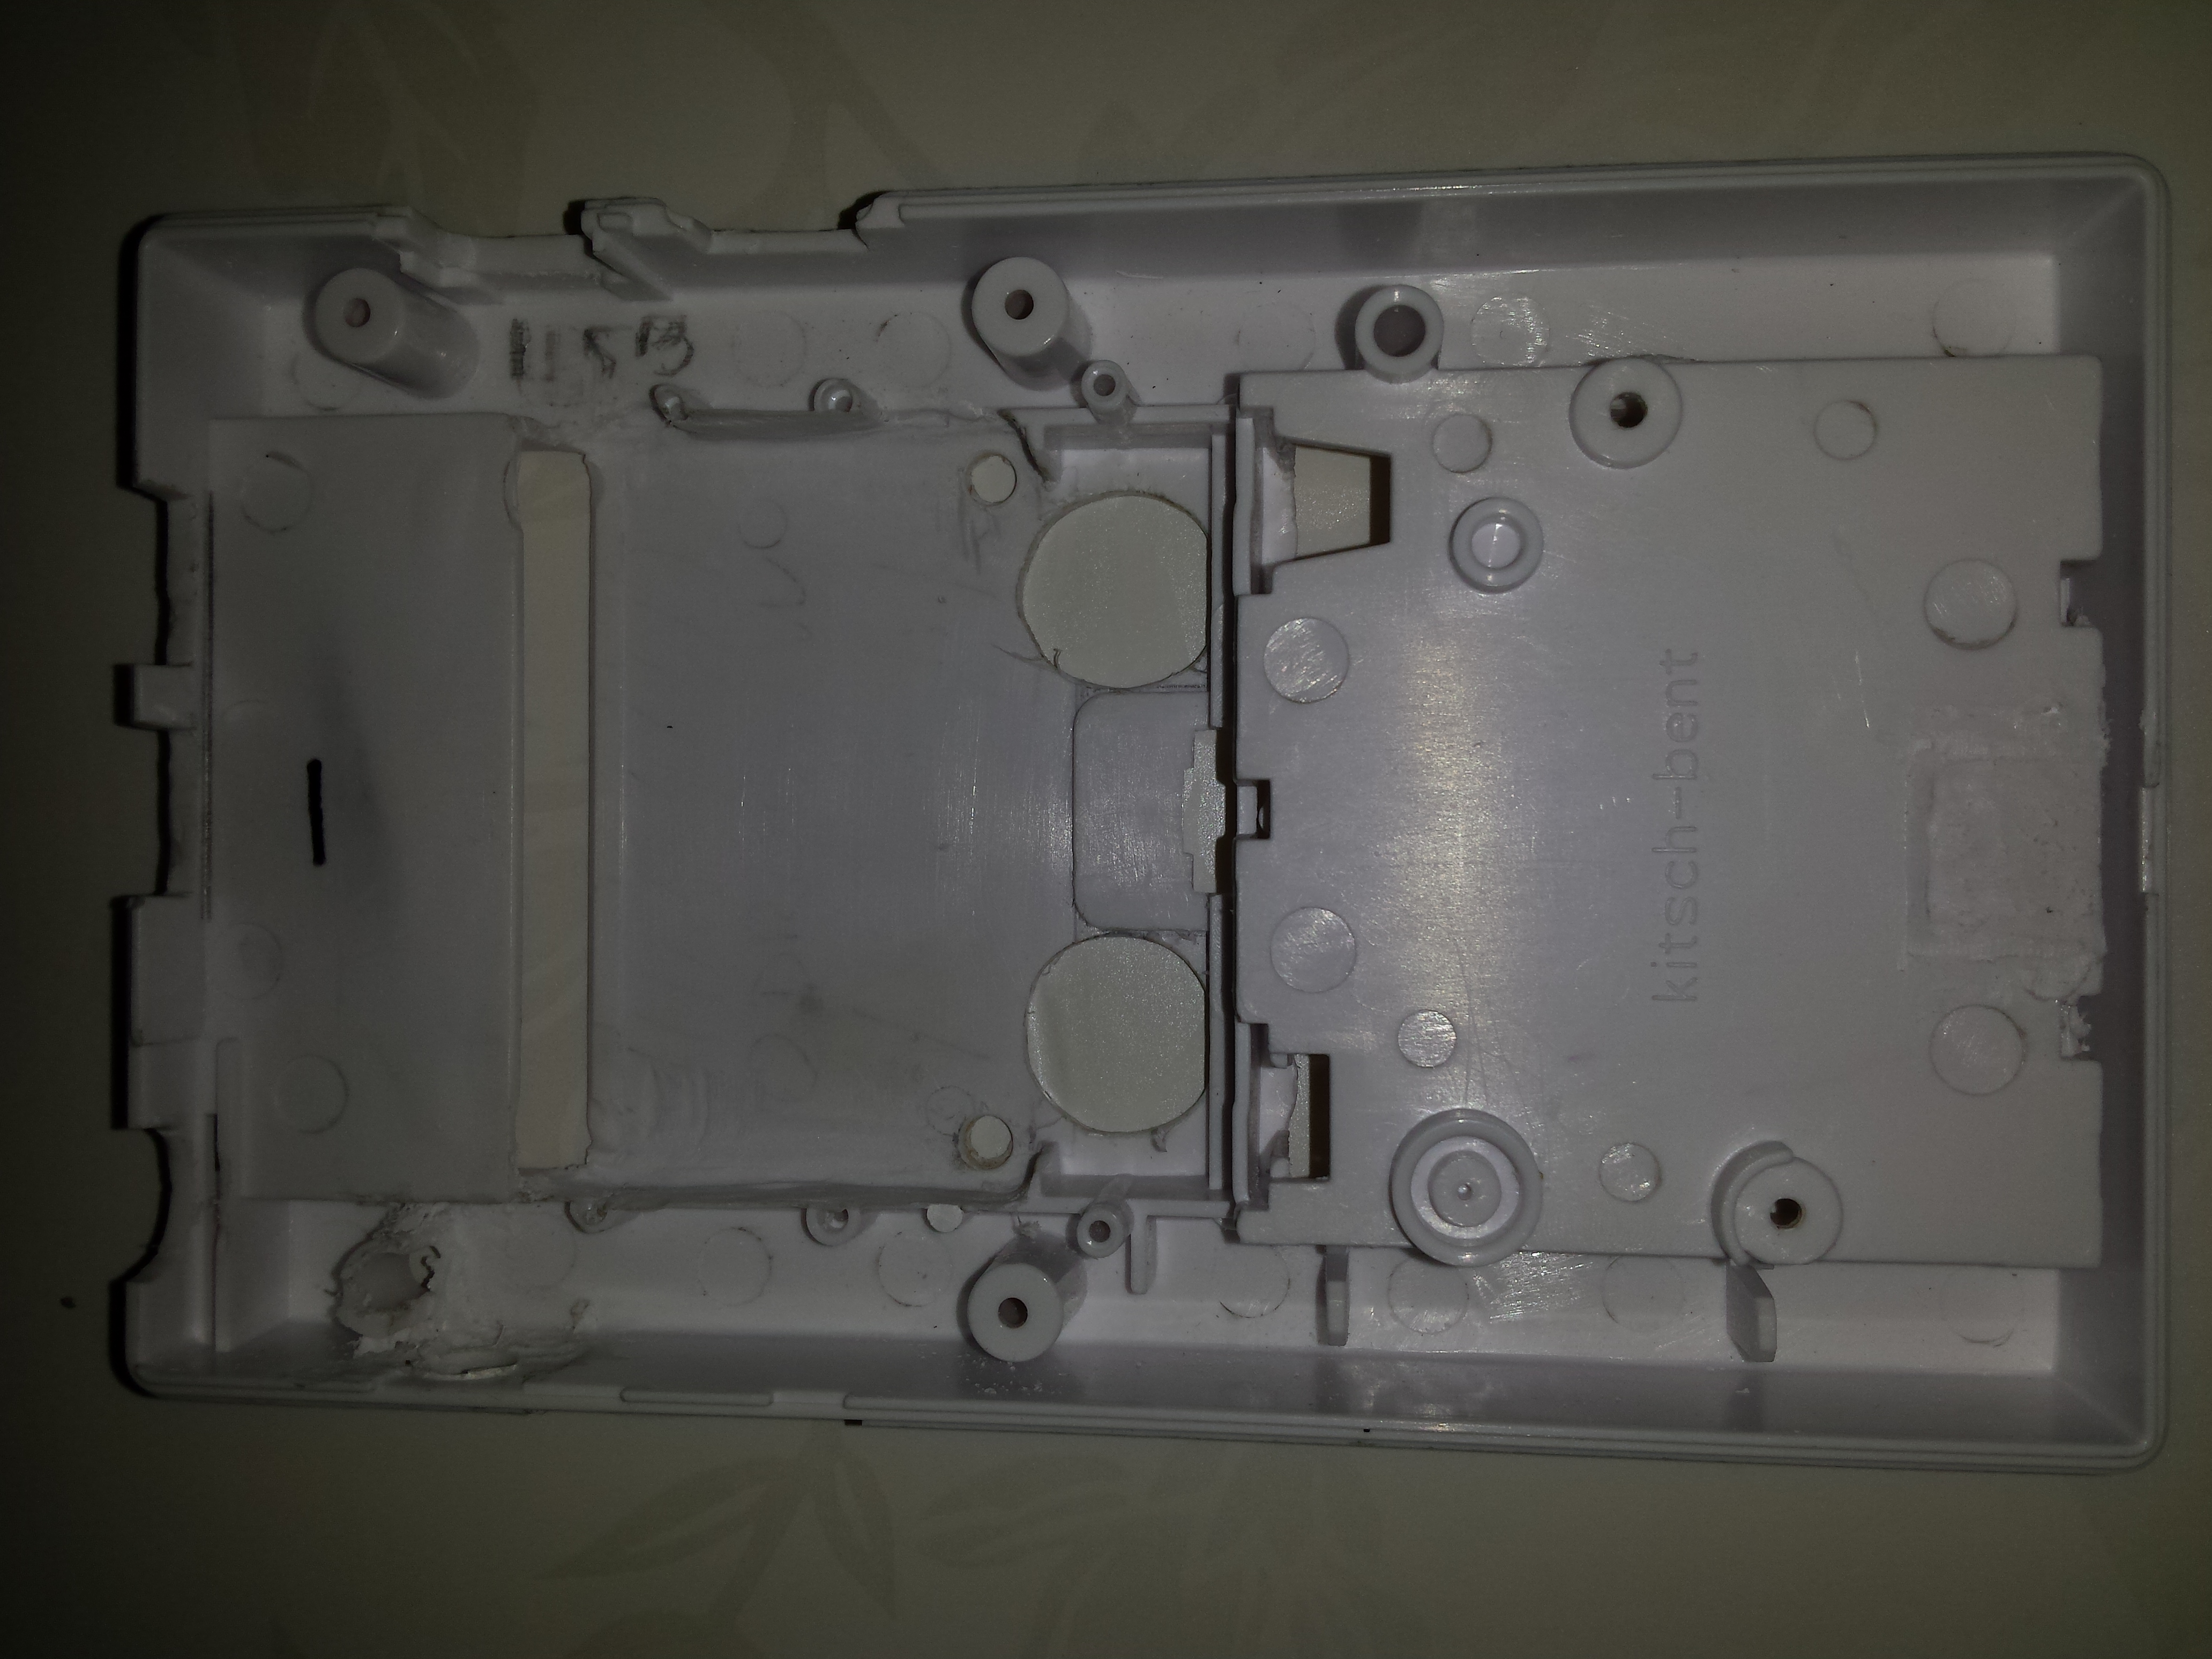
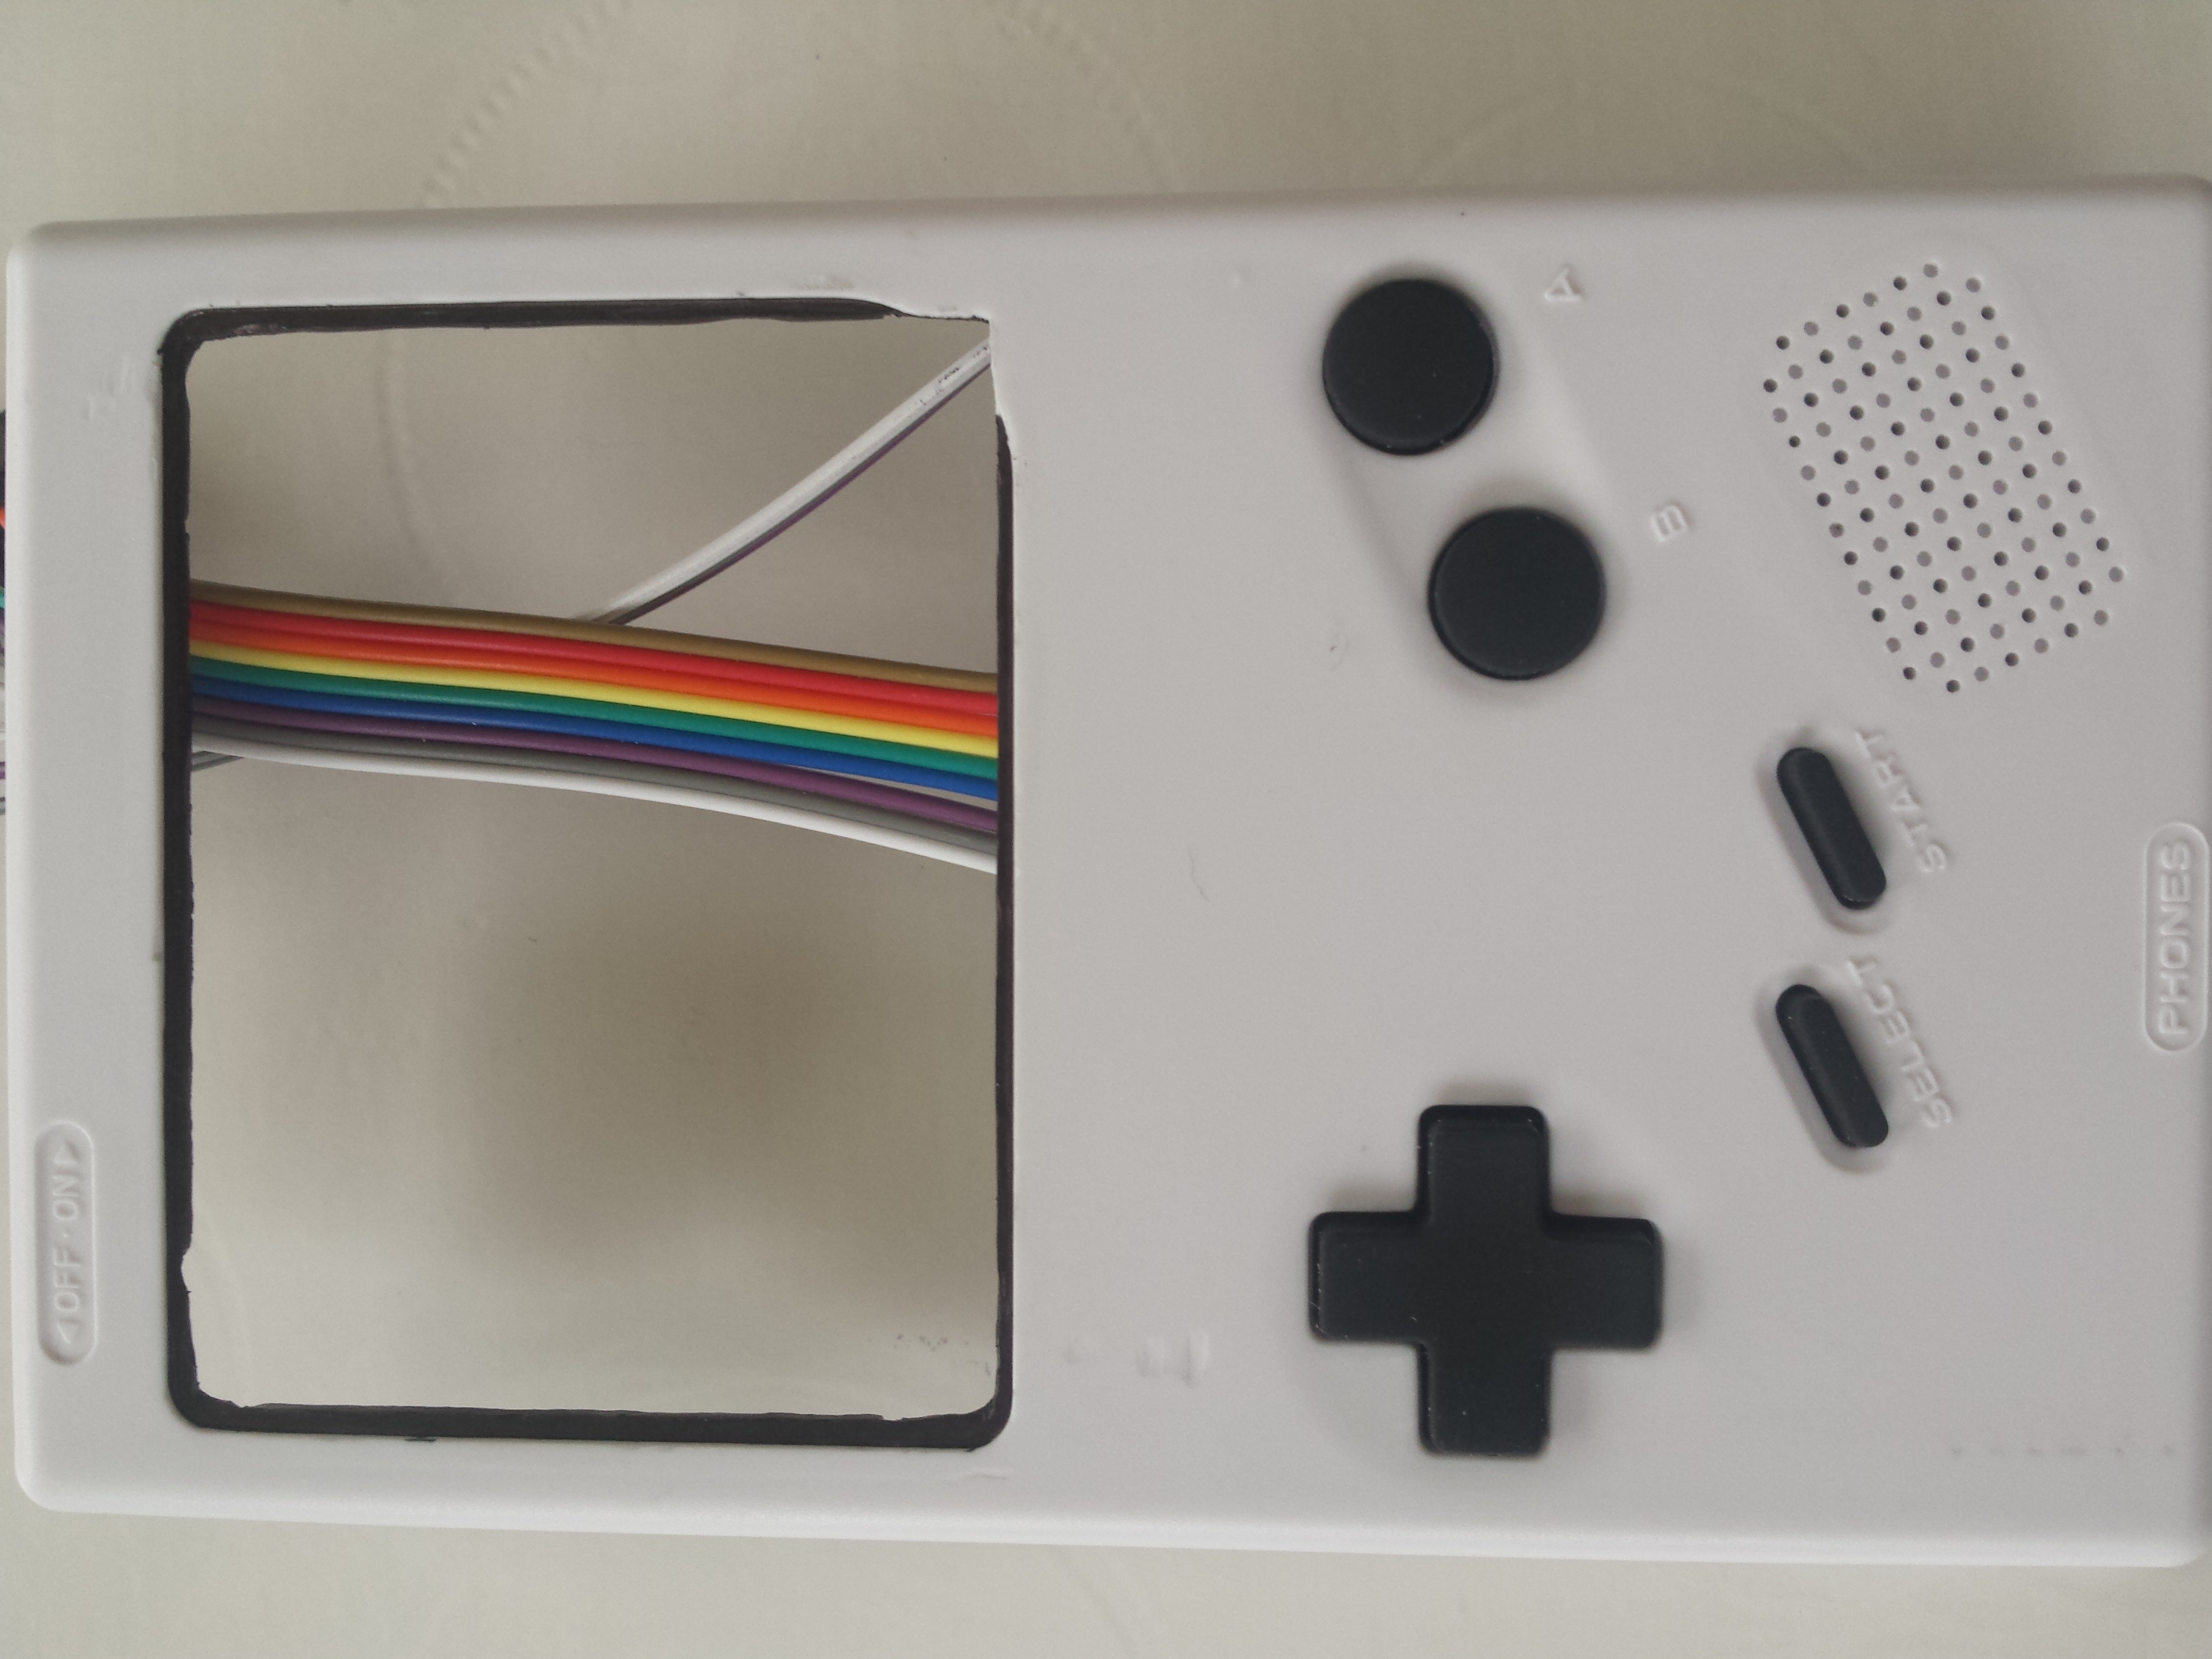
Case modifications
I Modified the Game Boy case with a Dremel in several ways : make room for batteries, holes for L/R buttons, switches mount, holes for leds (battery meter), various internal plastic removals, make the screen window bigger, colorize screen area borders in black, etc…

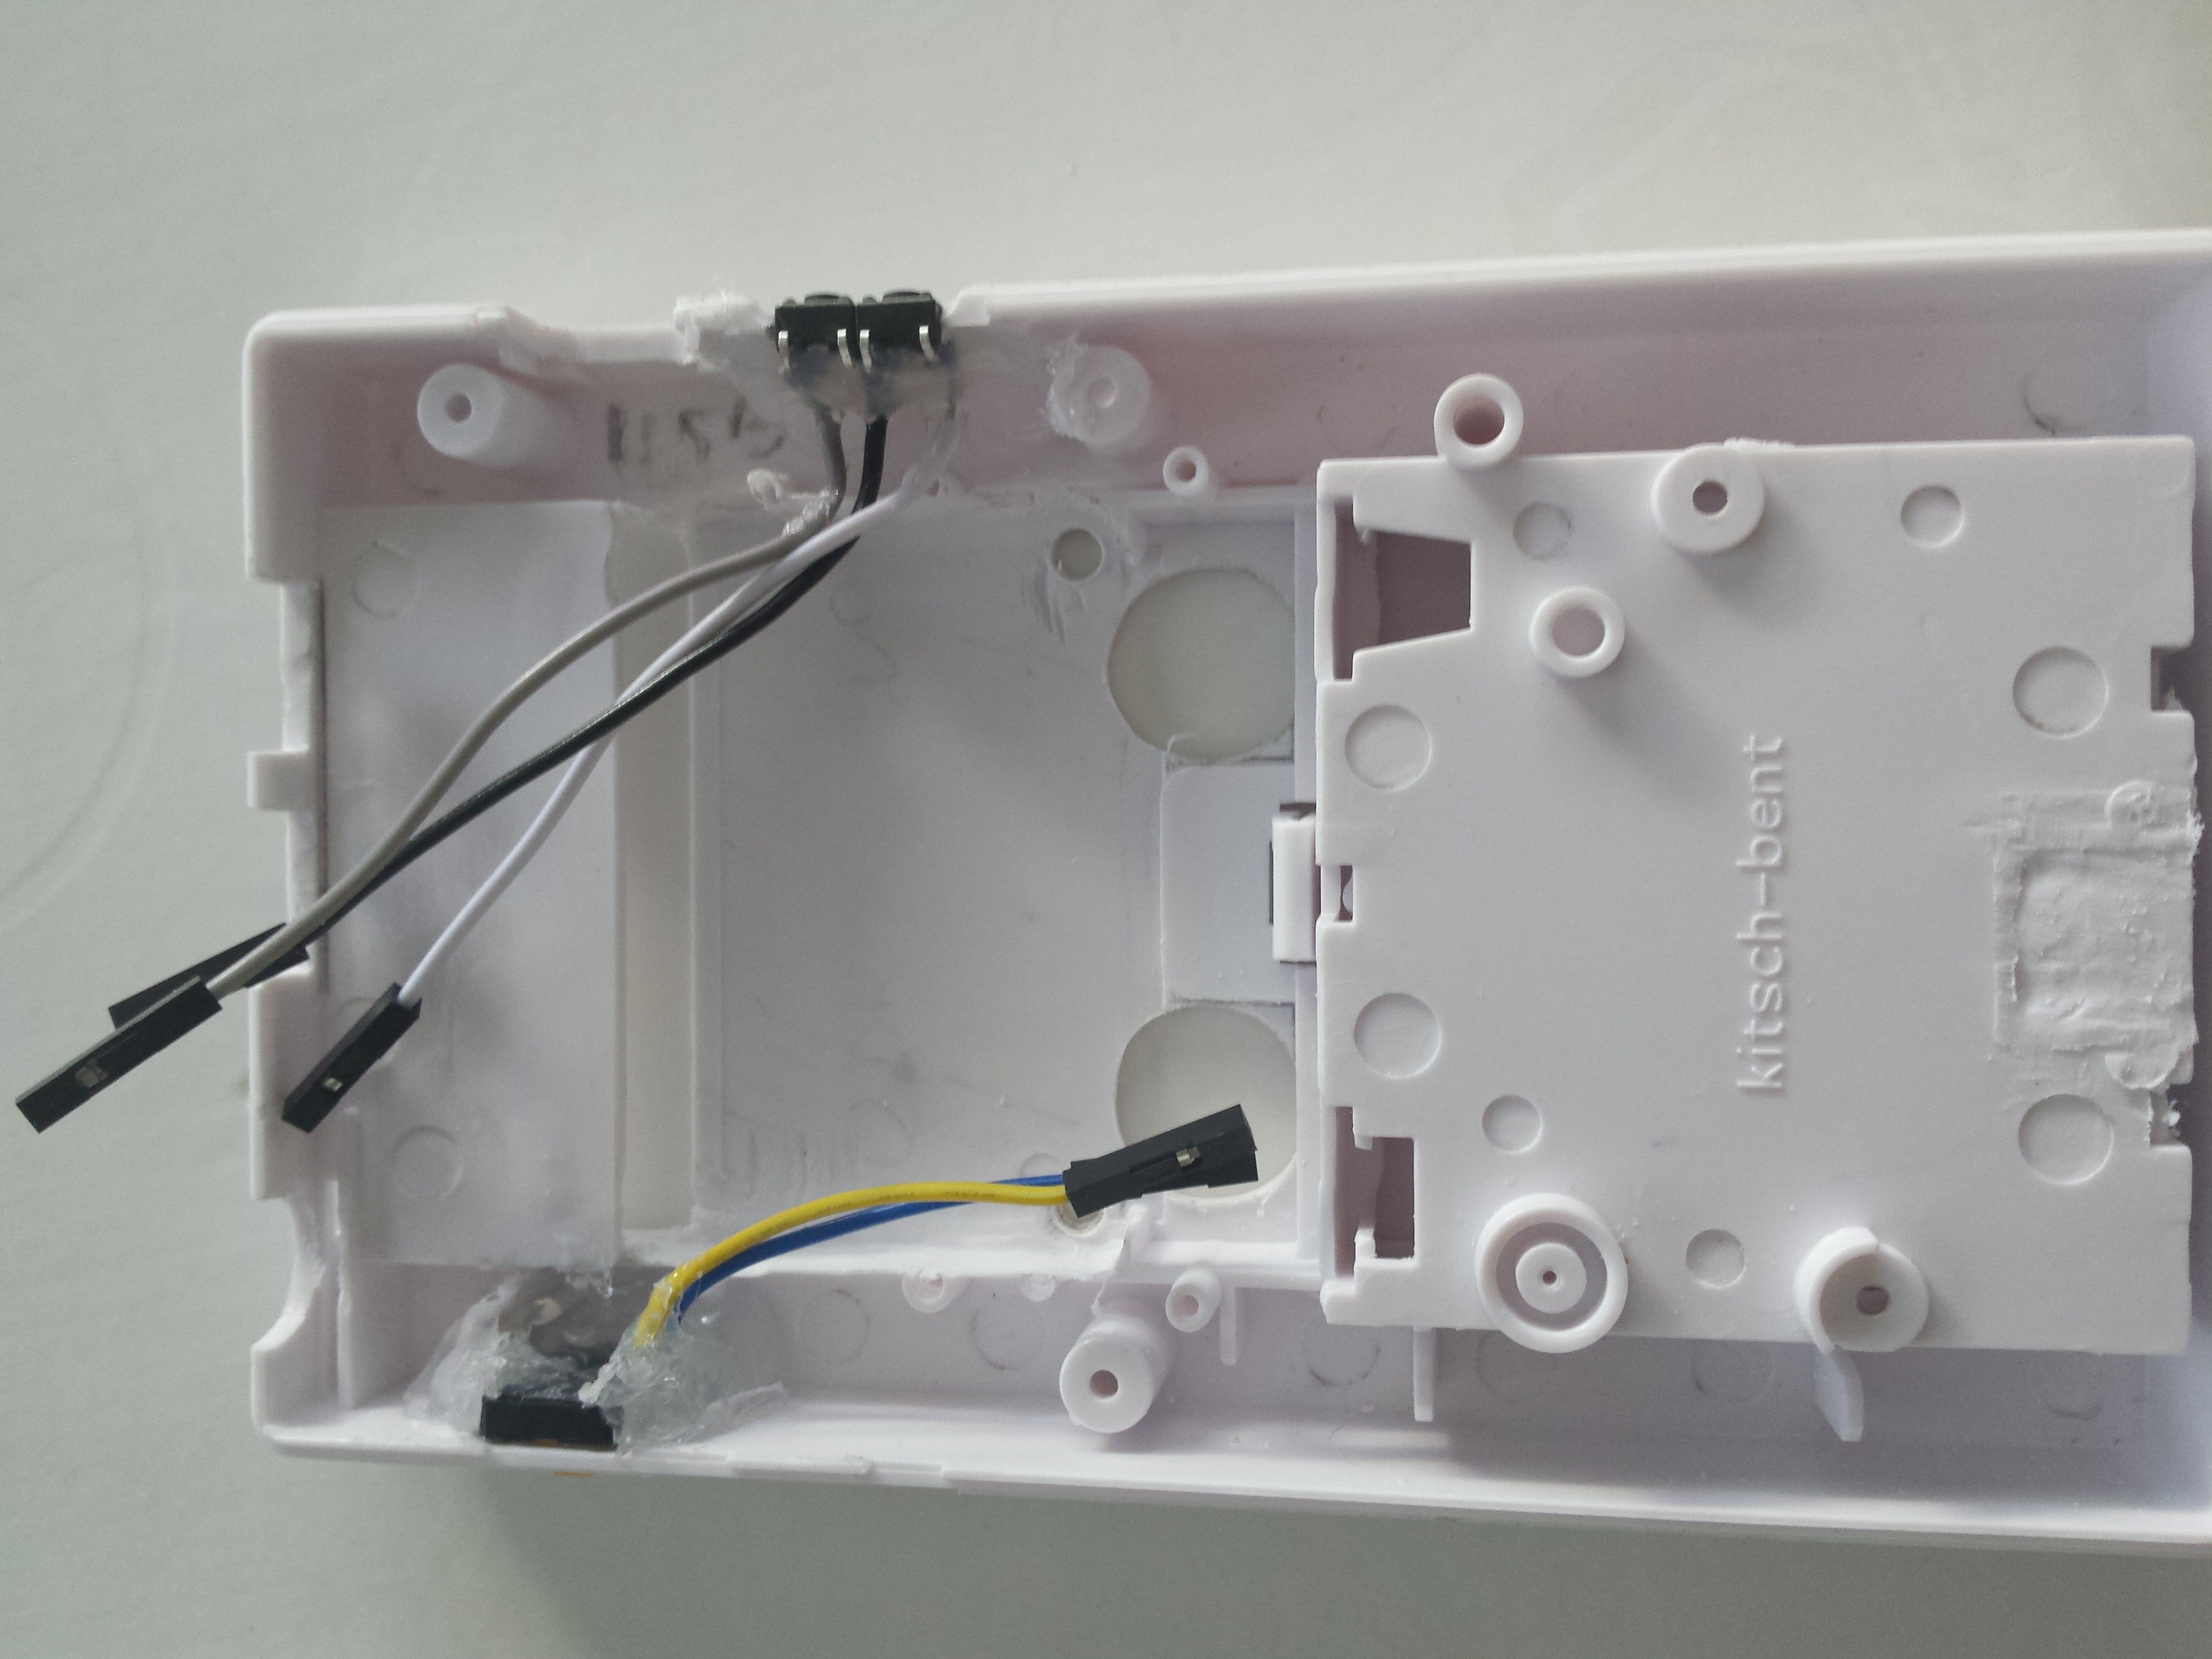
Mounting all together
I finaly wired and soldered all parts together (audio amplifier, speaker, batteries, leds, etc.)

Software
After all was mounted, I firstly installed a standard Raspbian image in order to test everything. But even with optimizations (disabling services, etc.), the booting delay was way to long for me. As an Archlinux fan, I replaced Rasbpian with Archlinux Arm…
Base Archlinux install on SDCard
The only way to install things on a bare Archlinux is to use Pacman (or Yaourt) and an internet connection. Unfortunately, wpa-supplicant is not installed by default and my Retro Boy has only a Wifi card. So the first step was to use chroot and Qemu + BinFmt to install and configure wpa-supplicant before booting on the real hardware.
I installed qemu on my x86 laptop and activated support for Arm binary execution (through qemu):
|
1 2 |
yaourt -Sy qemu-user-static binfmt-support sudo echo ':arm:M::\x7fELF\x01\x01\x01\x00\x00\x00\x00\x00\x00\x00\x00\x00\x02\x00\x28\x00:\xff\xff\xff\xff\xff\xff\xff\x00\xff\xff\xff\xff\xff\xff\xff\xff\xfe\xff\xff\xff:/usr/bin/qemu-arm-static:' > /proc/sys/fs/binfmt_misc/register |
Then, I chrooted to the sdcard (sdb2) as root:
|
1 2 3 4 5 6 7 8 9 10 11 |
mount /dev/sdb2 /mnt/root cd /mnt/root mount -t proc proc proc/ mount --rbind /sys sys/ mount --rbind /dev dev/ mount --rbind /run run/ mount /dev/sdb1 boot mkdir run/systemd/resolve cp /etc/resolv.conf run/systemd/resolve/resolv.conf chroot /mnt/root /bin/bash |
Being finally chrooted on a Arm based Archlinux, I could do some operations as if I were on the native Odroid-w : updating the whole system and installing wpa-supplicant
|
1 2 |
pacman -Syu pacman -S wpa_supplicant |
Finaly, I created a special module configuration file in /etc/etc/modprobe.d/ for the wifi driver (8192cu) to make it stable. Without that, the Wifi connection dropped frequently (the conf file is available on the download section at the end of this article)
|
1 |
options 8192cu rtw_power_mgnt=0 rtw_enusbss=1 rtw_ips_mode=1 |
It was then ready to boot on the real hardware to activate Wifi and start configuring everything…
Wifi Activation
I configured wpa_supplicant in /etc/wpa_supplicant conf (more details on archlinux wiki), then :
|
1 2 3 |
ip link set wlan0 up wpa_supplicant -c /etc/wpa_supplicant/wpa_supplicant.conf -Dwext -B -i wlan0 dhcpcd wlan0 |
In order to turn on or off wifi connection with the dedicated buttons (see usage of esekeyd below), I also created two small bash scripts: one to start and one to stop wifi connection
|
1 2 3 4 5 6 7 |
#!/bin/bash # Start Wifi connection modprobe 8192cu ip link set wlan0 up wpa_supplicant -Dwext -B -i wlan0 -c /etc/wpa_supplicant/wpa_supplicant.conf dhcpcd wlan0 |
|
1 2 3 4 5 6 7 |
#!/bin/bash # Stop wifi connection killall dhcpcd killall wpa_supplicant ip link set wlan0 down rmmod 8192cu |
Finaly, I disabled uneeded network related services :
|
1 2 3 4 |
systemctl disable dhcpcd.service systemctl disable netctl.service systemctl disable wicd.service systemctl enable NetworkManager |
Preparing for custom compilation of AUR packages
The first two step I did was to install Yaourt (https://archlinux.fr/yaourt) and configuring a cross-compilation environment (compiling only on the broadcom SoC is just an huge time consuming task). See http://archlinuxarm.org/developers/distcc-cross-compiling.
Then I created a dedicated user for makepkg (it does not run as root for obvious security reasons). I called it “pi” and added it in sudoers (/etc/sudoer, “pi ALL=(ALL) ALL”)
Before compiling, two more steps was required : tuning CCFLAGS for best possible performances and activating swap because 512 Mb is not always enought even when cross-compiling :
I used the following make flags in /etc/makepkg.conf (see GCC doc)
|
1 |
-march=armv6zk -mcpu=arm1176jzf-s -Ofast -fno-fast-math -mfloat-abi=hard -mfpu=vfp -pipe -fomit-frame-pointer -fstack-protector --param=ssp-buffer-size=4 |
Activation of swap and avoid /tmp to be mounted as tmpfs (I rebooted at this point):
|
1 2 3 4 5 |
systemctl mask tmp.mount dd if=/dev/zero of=/swapfile0 bs=1024 count=524288 mkswap /swapfile0 swapon /swapfile0 |
Installing and configuring emulators (retroarch)
I only installed emulators that run at fullspeed with my overclock settings and EmulationStation as frontend
|
1 2 3 |
yaourt -S retroarch-git-rpi yaourt -S libretro-gambatte-git libretro-handy-git libretro-gpsp-git libretro-fba-neogeo-git libretro-picodrive-git libretro-prboom-git libretro-fceumm-git libretro-pocketsnes-git libretro-mednafen-pce-fast-git yaourt -S emulationstation-git-unstable-rpi emulationstation-themes emulationstation-scraper-git |
The configurations files for Retroarch and EmulationStation are available in the download section at the end of this article.
Particular retroarch parameters I tuned (mostly for speed) was :
|
1 2 3 4 5 6 7 8 9 |
history_list_enable = "false" config_save_on_exit = "false" video_threaded = "false" audio_driver = "alsa" rewind_enable = "false" audio_latency = "256" video_refresh_rate = "59.940000" custom_viewport_width = "720" custom_viewport_height = "480" |
Note : EmulationStation‘s additional themes can be found at http://blog.nilsbyte.de/downloads/
One particular thing for prboom : it needs to find prboom.wad file in the same directory as where original Doom 1 or 2 Wad files are stored (a simple “ln -s /usr/share/libretro/libretro-prboom/prboom.wad” is ok)
Not working / slow tested engines
During my tests, I did not retain 3 engines that I originaly wanted.
pcsx-rearmed
in order to avoid dynamic linkage error, I changed the build() and package() function in PKGBUILD to the following
|
1 2 3 4 5 6 7 8 9 10 11 12 |
build() { export CFLAGS="-march=armv6zk -mcpu=arm1176jzf-s -Ofast -fno-fast-math -mfloat-abi=hard -mfpu=vfp -pipe -fomit-frame-pointer -fstack-protector --param=ssp-buff$ export CXXFLAGS=$CFLAGS cd "${_gitname}" ./configure --platform=libretro make } package() { install -Dm644 "${_gitname}/libretro.so" "${pkgdir}/usr/lib/libretro/libretro-pcsx-rearmed.so" install -Dm644 "pcsx_rearmed_libretro.info" "${pkgdir}/usr/lib/libretro/libretro-pcsx-rearmed.info" } |
It was running, but not full speed (some game like motoracer was around 55 Fps)… the Broadcom SoC of the Pi is definitely too slow, even with my highly overclocked settings.
eduke
To make it compiles, I had to edit the PKBUILD to add the arch “armv6h”, removed gtk2 and libgl dependencies (avoid useless package install as only sdl2 mode works with rpi) and then set additional parameters after the “make” call :
|
1 |
USE_OPENGL=0 POLYMER=0 NOASM=1 WITHOUT_GTK=1 LINKED_GTK=0 USE_LIBVPX=0 |
It compiles but… it does not work with composite output, only HDMI is supported (maybe some weird hard coded things)
uae4all
Original uae4all does not run fast enought on Raspberry Pi. A dedicated version exists here : http://fdarcel.free.fr), but it needed some operations to compile without errors:
|
1 2 3 |
yaourt -S guichan sdl_image libpng sdl sdl_ttf sdl_gfx wget http://fdarcel.free.fr/uae4all2-rpi-chips-0_5.bz2 tar -jxf uae4all2-rpi-chips-0_5.bz2 |
Then, in uae4all2 directory,
- I modified src/gui.ccp (function “void gui_handle_events (void)”) to customize controls
- I edited Makefile to change “g++-4.8” to “g++”
- compiled with : DISTCC_POTENTIAL_HOSTS=’localhost xxx.xxx.xxx.xxx’ pump make -j2 CC=”distcc gcc” CXX=”distcc g++” TARGET=pi1 INCLUDE_SERVER_ARGS=’–unsafe_absolute_includes’
Again, it ran, but not always at full speed and the experience was pretty bad without a mouse to change game disks…
GPIO Controls
The simplest way to add universal support to GPIO driven buttons, is to map them to keyboard keys. Adafruit provides a program called “retrogame” that does exactly that :
https://learn.adafruit.com/retro-gaming-with-raspberry-pi/buttons
https://github.com/adafruit/Adafruit-Retrogame
I changed key setup (see retrogame.c in download section at the end of this article). To compile it:
- I downloaded the odroid-w kernel from github, copied “Adafruit-Retrogame” in <kernel dir>/drivers
- updated make file to add in retrogame section right after the CC line : “arm-linux-gnueabihf-strip $@”
- I ran “make retrograme”
Mapping some buttons to custom OS actions
Running games with GPIO buttons was quite easy with Adafruit’s retrogame. But I wanted to use some buttons to do more OS based actions : turning on/off wifi and changing sound volume.
The solution I found is named esekeyd : it allows to map special keyboard keys to shell commands. As I already had set special keys mapping with “retrogame”, I just had to write a proper esekeyd.conf :
|
1 2 3 4 |
VOLUMEDOWN:(killall aplay; amixer set PCM 1dB- && aplay /root/Beep.wav) & VOLUMEUP:(killall aplay; amixer set PCM 1dB+ && aplay /root/Beep.wav) & HOME:startwifi.sh & MUTE:stopwifi.sh & |
I also edited /usr/lib/systemd/system/esekeyd.service to force input to the one created by retrogame (/dev/input/event3)
Finaly I added esekeyd service start command in /etc/rc.local in order to be sure that retrogame was loaded and correctly started before (see here for instructions to enable rc.local with systemd)
Display setting
Nothing special here. I used custom overscan settings to make use of every pixels and I used a 180° rotation as I mounted the screen upside down for a matter of internal space :
|
1 2 3 4 5 6 7 8 9 |
overscan_left=-14 overscan_right=-10 overscan_top=-20 overscan_bottom=-20 overscan_scale=1 display_rotate=2 disable_splash=1 disable_camera_led=1 |
Sound setting
As I’m using only one speaker together with a mono amplifier wired to one of the two audio channels, I configured a default route to make alsa merge both right and left audio channels to the left one.
As my ampli is a little bit too powerfull for the small speaker, I also limitted the output to 70%.
To do so, I created /etc/asound.conf (to reload the configuration, I issued a “systemctl restart alsa-restore”) :
|
1 2 3 4 5 6 7 8 9 10 |
pcm.!default makemono pcm.makemono { type route slave.pcm "hw:0" ttable { 0.0 0.7 # in-channel 0, out-channel 0, 70% volume 1.0 0.7 # in-channel 1, out-channel 0, 70% volume } } |
Finaly, i also forced audio to use the analog output (default if HDMI) in rc.local:
|
1 |
amixer cset numid=3 1 |
Battery indicator
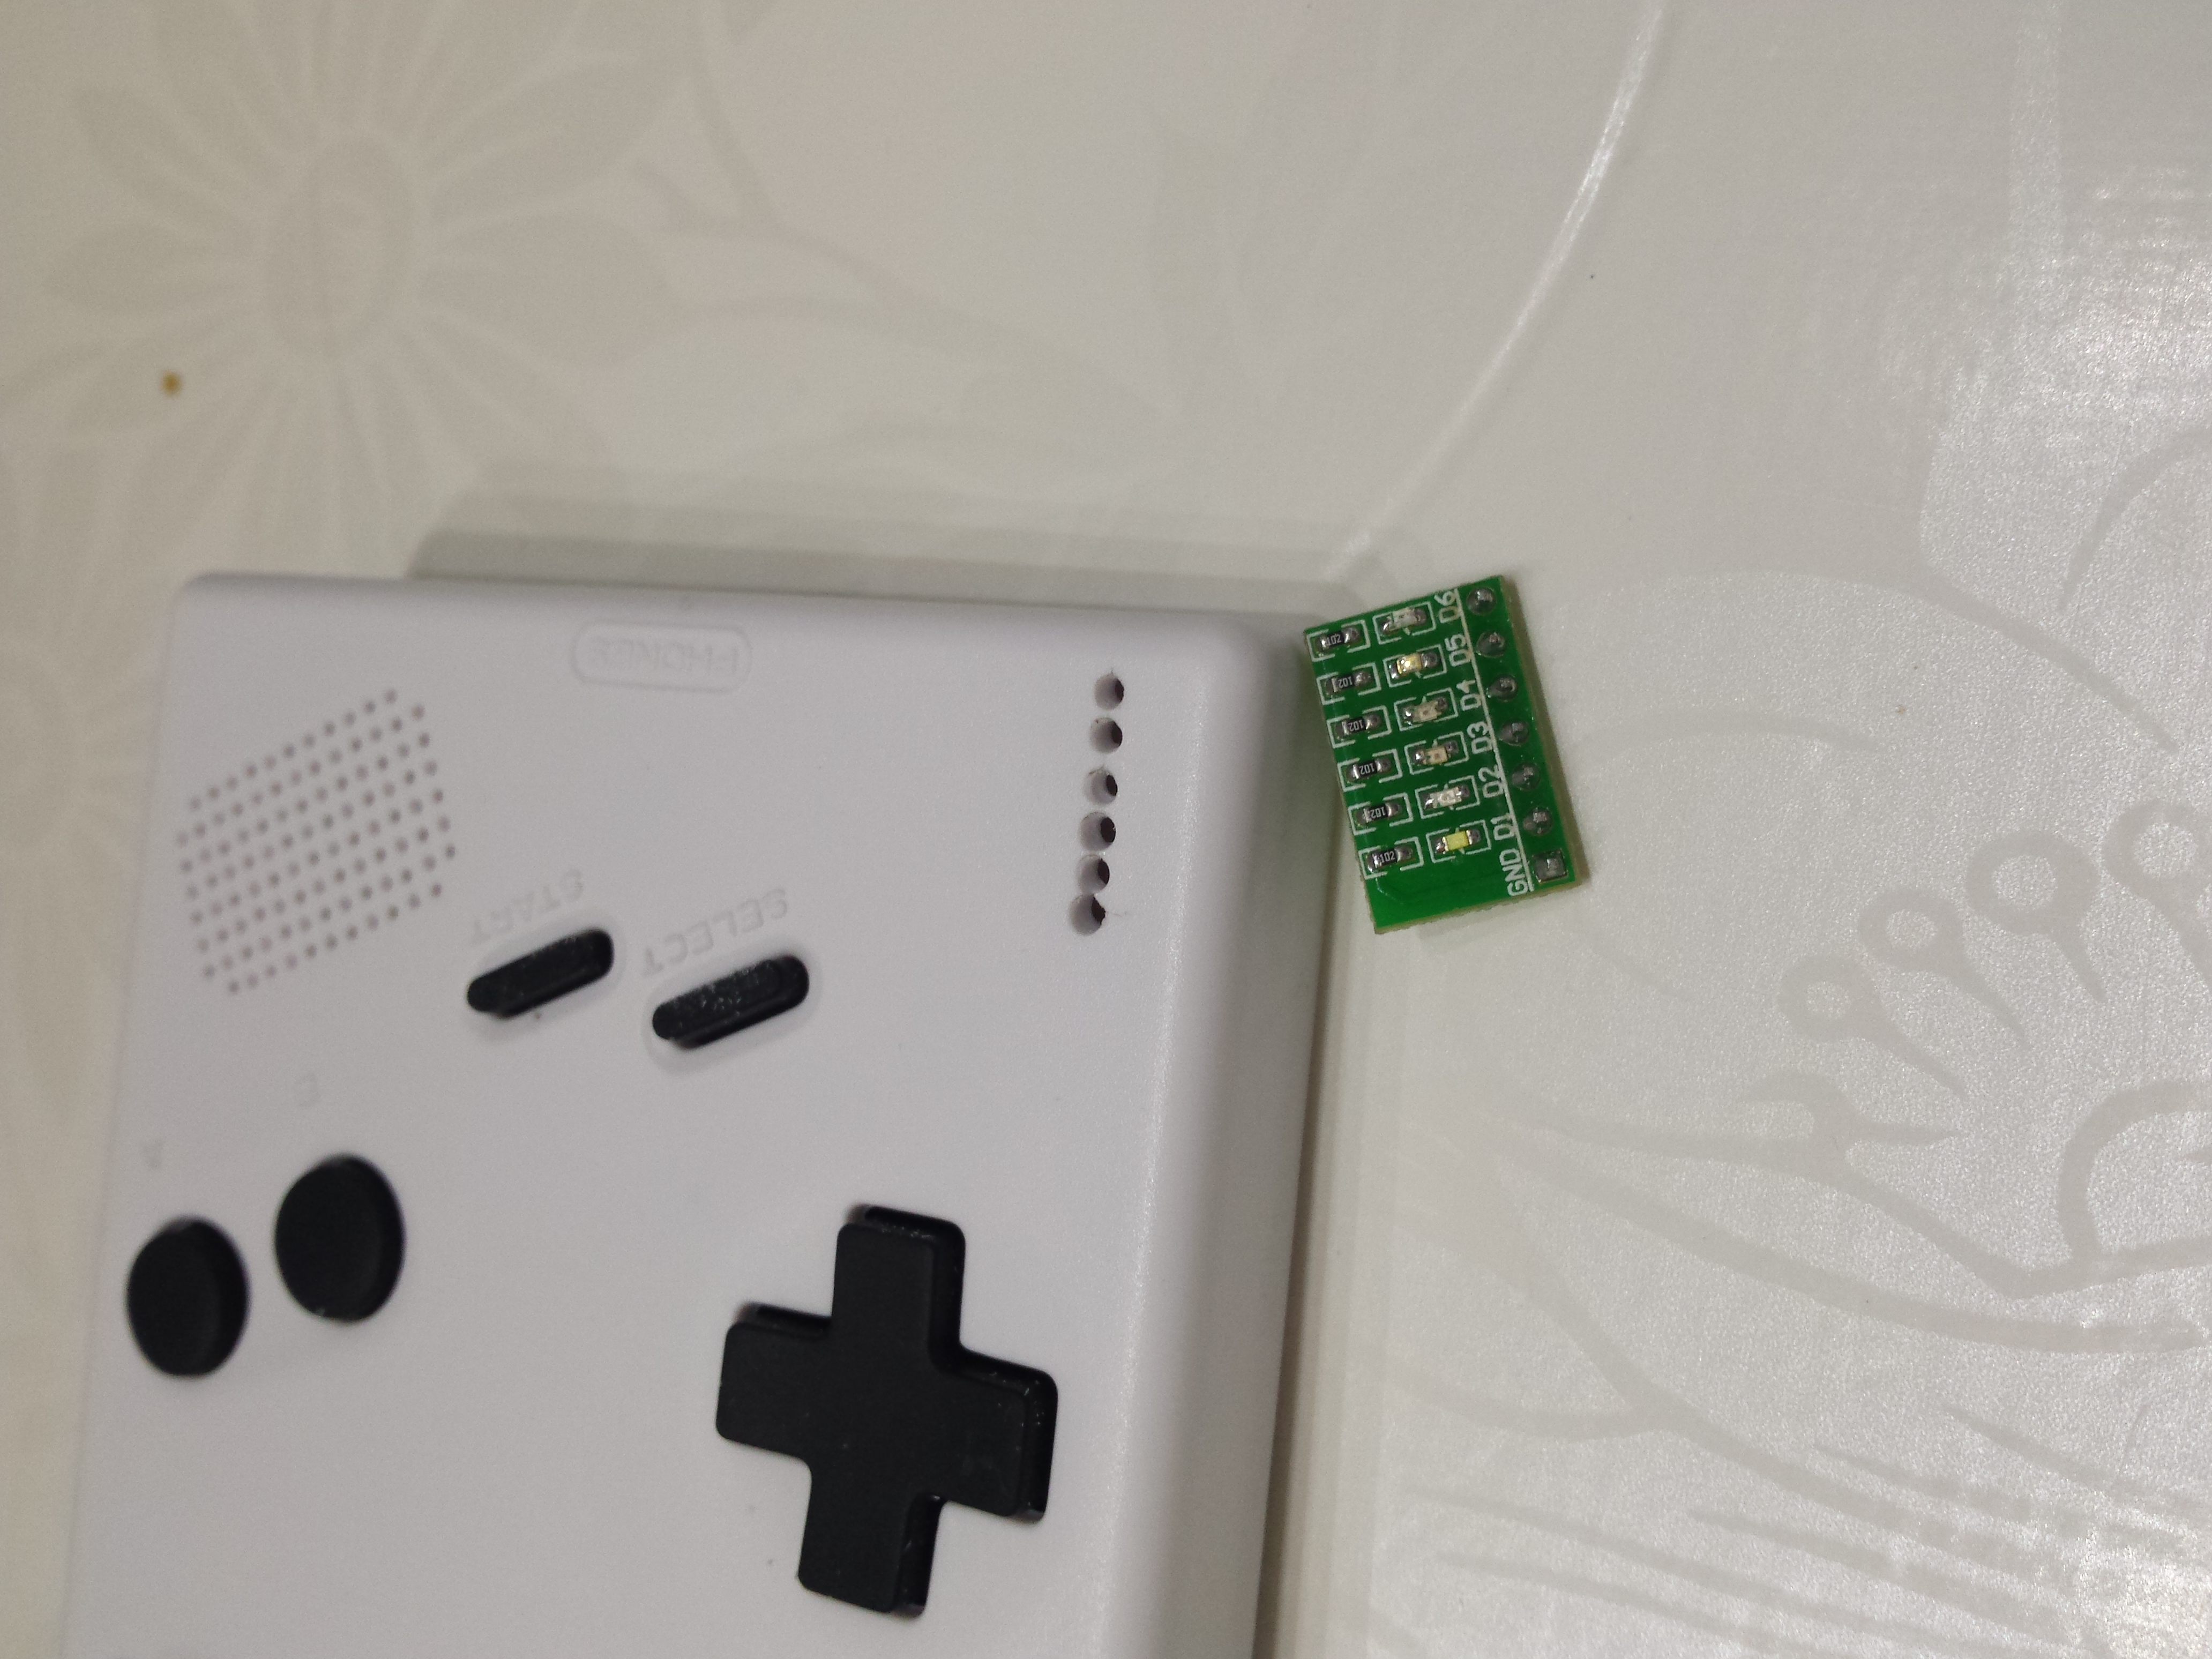
The battery indicator is based on the Odroid-w embeded PMIC controller (a Ricoh RC5T619). I wired a 6 leds breadboard to GPIO pins and used a bash script to update leds status every 2 minutes regarding the battery statuts as reported by the kernel.
I used the wiringpi library (which provides the gpio command). Example :
|
1 2 3 4 5 6 |
status=$(cat /sys/class/power_supply/battery/status) if [ "$status" == "Not charging" ]; then gpio write 0 1 gpio write 7 1 [...] |
Unfortunately, the PMIC driver seems to be a little bit buggy :
- The indicated capacity (/sys/class/power_supply/battery/capacity) is not accurate. I had to “calibrate” myself the indicator using /sys/class/power_supply/battery/voltage_now (which is also false regarding the real voltage I measured…).
- If the device is switched on with a power source plugged in, the PMIC does not return anything (that why i created a special case for the status “Not charging”)
The script I created (in /usr/bin/battery.sh) is available in the download section. I added it to rc.local. I also created another script to initialise GPIO ports for all leds at start (/usr/bin/init_battery.sh):
|
1 2 3 4 5 6 |
gpio mode 8 out gpio mode 9 out gpio mode 7 out gpio mode 0 out gpio mode 2 out gpio mode 3 out |
Overcloking / memory settings
I have to admit that I had been lucky with the SoC on my Odroid-w. Everything run smoothly, but I used quite aggressive overclocking settings compared to what is typically stable with a Raspberry-pi. Here is what I used (so far, it never crashed event after more that 2 hours of gaming) :
|
1 2 3 4 5 6 7 8 9 10 11 |
arm_freq=1050 sdram_freq=600 over_voltage=6 over_voltage_sdram=2 core_freq=500 gpu_freq=300 disable_pvt=1 init_emmc_clock=325000000 gpu_mem=192 |
The init_emmc_clock value allowed me to push SDCard speed from 18 to 23 Mb/s (using dd to benchmark).
Optimize / finalize
After that all was working correctly, I ended the install process with the following steps.
I disabled unwanted services / programs startup:
|
1 2 3 4 5 6 |
systemctl mask serial-getty@ttyAMA0.service systemctl mask remote-fs systemctl mask swap systemctl mask logrotate systemctl mask man-db systemctl mask shadow |
I Blacklisted some modules in /etc/modprobe/blacklist to disable ipv6 and wifi (I activate it on demand only, through hardware buttons) :
|
1 2 |
blacklist ipv6 blacklist 8192cu |
I disabled all kernel output at boot in cmdline.txt (boot a little bit faster) :
|
1 |
logo.nologo quiet loglevel=0 |
I set the performance governor at start (rc.local)
|
1 |
echo "performance" > /sys/devices/system/cpu/cpu0/cpufreq/scaling_governor |
I disabled tty1 to avoid false login attempts while pressing the “start” button which is mapped to “enter” key :
|
1 |
systemctl disable getty@tty1 |
Finaly, I used the EmulationStation’s scaper to enhance game listings.
The Result in video
Download section
8192cu.conf
asound.conf
battery.sh
Beep.wav
cmdline.txt
config.txt
es_input.cfg
es_settings.cfg
es_systems.cfg
esekeyd.conf
init_battery.sh
rc.local
retroarch.cfg
retrogame.c
startwifi.h
stopwifi.sh
Great post and your boot time is quite impressive also. With raspbian I get well over 1 minute. I might redo mine with archlinux 🙂
Thank-you. The ArchLinux base install is very lightweight, so its clearly a better bet for starting optimization ! Nevertheless, an even faster boot should be easily reachable with a buildroot based solution 😉
Pingback: GamOdroiD C0 : an Odroid based portable retrogaming