
Cloud at home with minimum toil – PXE / Proxmox / Saltstack / k3s
My home lab was 7 years old and it was time to replace it. It was based on five Odroid HC1 nodes and 1 Odroid N1 (which never reached the mass production stage, Hardkernel sent it to me as a gift for a debug party). 4 HC1 nodes were used for a Docker Swarm cluster and 1 was dedicated to Nginx as a reverse proxy / WAF / SSL offloader. Regarding the Odroid N1, it was used as a NAS and also as a saltstack master.
Everything has been replaced with a major upgrade: faster infrastructure, better power efficiency, GitOps approach, virtualized environments, Kubernetes cluster, improved Saltstack implementation and last but not least: everything can be built automaticaly from scratch using PXE and the help of custom scripts !
This is the (very long) story of my new homelab build…
Concept: the big picture
Before diving into all the details, I think it is important to understand what was goind through my mind, the concept I tried to implement (and hopefully succeeded in doing so).
I’m not saying that it is the best approach. After all, it’s a homelab,which, to me, means a way to learn, have fun, express creativity, and, of course, self-host some services.
Simplified GitOps approach
I did not use any CI/CD components, no branches (at least for now), but the bare minimum for Infrastructure as Code is in place:
- 100% “as code” infrastructure
- Git repository
- IaC frontend through Saltstack
- IaC backend implementation with Proxmox VE
Infrastructure overview
A homelab comes with certain constraints that sometimes prevent you from making the best technical choices. For me, the main concerns were:
- Money: Obviously, resources are limited and must be optimized based on what you want or need to achieve.
- Space: Hardware takes up room, can be noisy, etc.
- Power consumption: For hardware running 24/7, this can be a real game-changer for the annual electricity bill.
- Ease of replacement: How easily things can be replaced in case of failure, as I don’t have tons of free time!
Hardware
In this homelab revision, I chose x86 hardware over ARM. The Intel N100 is a powerhouse in terms of performance, efficiency, and price. Not to mention that it offers far greater expansion options than ARM SBCs, especially when it comes to RAM and virtualization support.
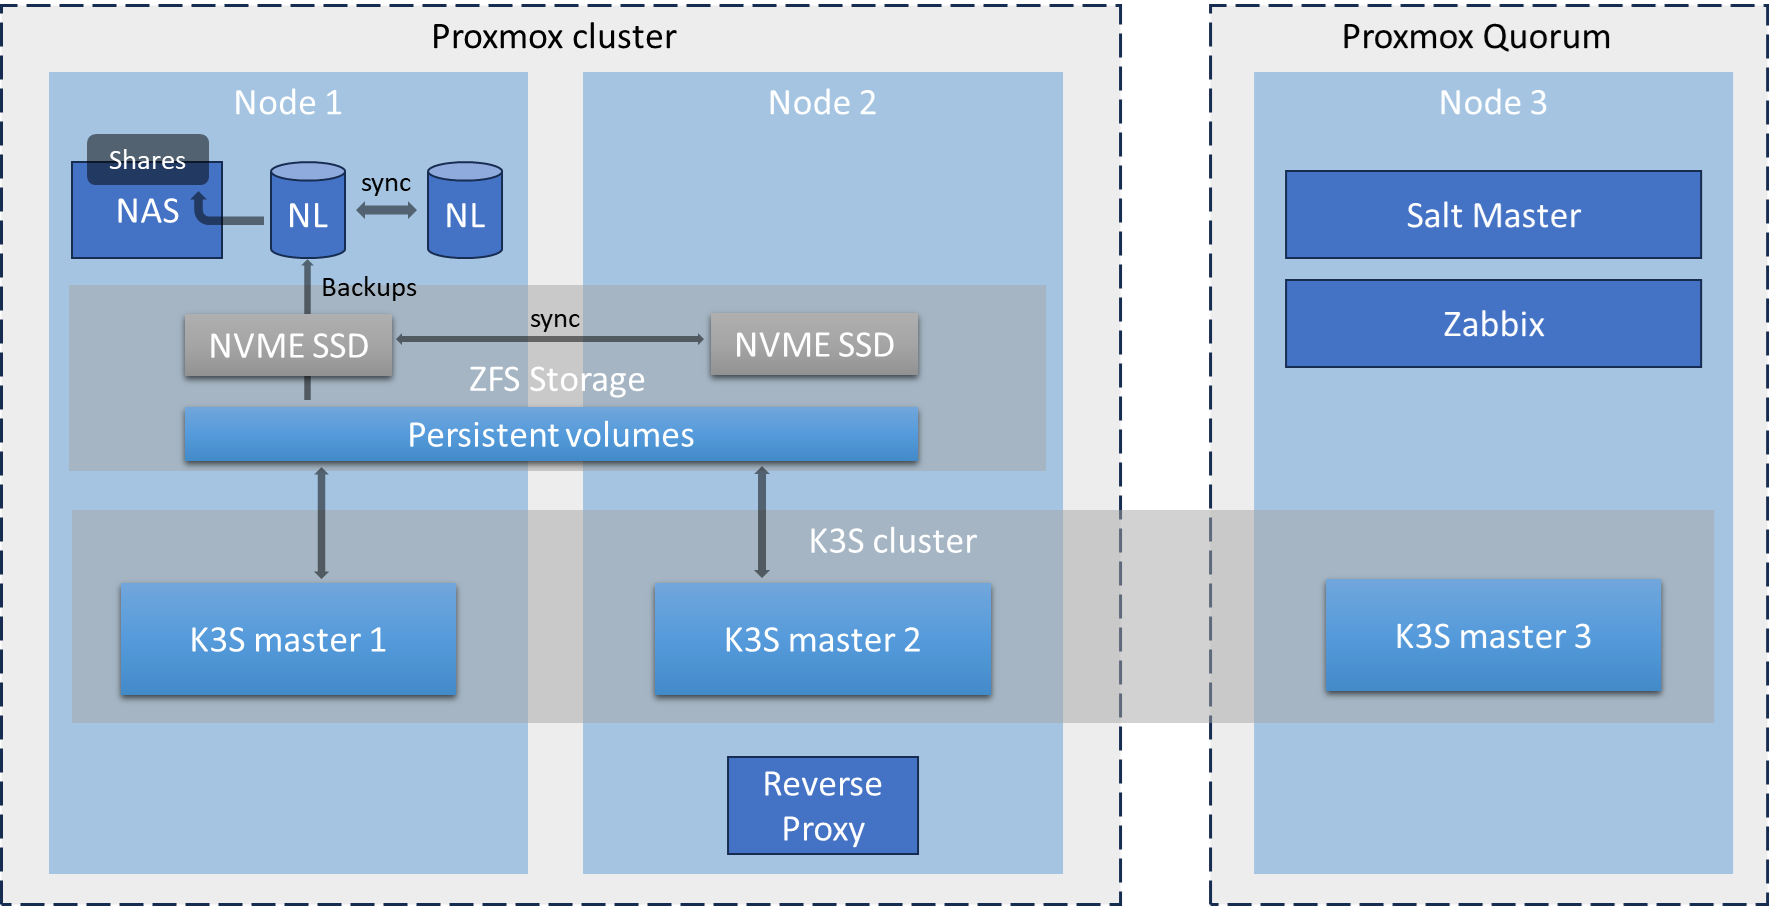
Devices
Basically, my “cloud@home” setup consists of two Intel N100 nodes and one N6000 (Liva Z3). Since I have a small, wall-mounted 19″ rack with a depth of 30 cm, I decided to build custom servers using rack enclosures.
Below is the list of components I used:
| Item | Quantity | Comments |
| Intertech 1.5U-1528L | 1 | Case for Node-1. A surprisingly good enclosure for the price: only 1.5U in height, with two externally accessible 3.5″ bays for SATA drives. It supports a Mini-ITX motherboard and has a depth of 27.8 cm. |
| Intertech IPC 1HU-K-125L | 1 | Case for Node-2. Similar to the previous one but with a 1U height and no externally accessible 3.5″ bay. |
| Fortron FSP250-50FEB | 2 | A 250W Flex ATX power supply with up to 85% efficiency—useful for a setup running 24/7. |
| ASUS Prime N100I-D D4-CSM | 2 | Mini-ITX motherboard with an integrated N100 processor. I found it to have a good balance of features and price. |
| 32Gb Kingston FURY Impact, DDR4 3200 SO-DIMM | 2 | Contrary to the official specs, the N100 is not limited to 16GB of RAM—it works perfectly with 32GB. |
| Kingston NV2 – 1Tb | 2 | Used for virtual machines and container storage. Offers good performance and capacity for the price. More than enough for my home lab. |
| SATA SSD kingston kc600 256Gb | 2 | Boot disks and /root storage for Proxmox on both Node-1 and Node-2. |
| Uni USB 3.0 to 2.5Gbps ethernet adatpter. | 4 | The ASUS motherboard has only a single gigabit NIC, which was too limiting for my needs. Adding two additional ports allows for bonding (LACP) plus a dedicated 2.5G node-to-node connection for the replication network and Corosync. I initially tried dual-port PCIe cards, but none worked properly (r8123, r8125, Intel 82571, and Intel i225-V). |
| JMB582 based SATA 3 M.2 controller with 2 ports (Key A + E) | 1 | Used to connect the two hard drives for the NAS VM. I could have used a PCIe card, but the only available slot was initially occupied by a network card… well, initially. |
| Seagate HDD 8Tb Sata 3 | 2 | Used with the JMB582 controller for NAS storage. |
| Liva Z3 – 128 Gb | 1 | Used as Node-3 for Proxmox quorum, Salt Master, Zabbix monitoring, and a third Kubernetes node (mainly to improve etcd cluster stability). |
| Kingston fury DD4 3200 8Gb | 2 | 16GB dual-channel RAM for the Liva Z3. |
| Patriot P400 Lite 250 Gb | 1 | Low-power PCIe M.2 SSD for the Liva Z3 |
Bios settings
I did some BIOS “tweaking” mostly to save power and to allow for PXE boot on all nodes (including wake-on-lan activation)
Asus Prime N100I-D

Here are the settings for the two N100 nodes:
- dvmt graphic memory set from 64 to 32 : no video memory needed for a headless server
- enabled sr-iov support for better offloading on NIC
- disabled all usb port but usb_3, usb_4, u32g1_e3 and u32g1_e4 which are the one mounted on the face and the one used for the etherner adapters.
- enabled network stack, ipv4 PXE and set PXE boot as first priority (can be done only after a reboot)
- set restore AC power loss to last state in case of power failure, so it will be powered back on
- enabed wake-on-lan (which is called “power on by pci-e”) so I could turn on my servers from pfsense easily
- disabled hdaudio, not needed, save power
- disabled wifi and bluetooth. Through, there are no such functionnalities installed
- disabled serial and parallel ports, save power
- enabled XMP as the memory I use support it. It might set timings to better ones, can’t hurt.
- Disable fast boot : server’s are not willing to reboot a lot and I prefer letting all hardware checks to be done when I reboot it
- enabled native aspm for power saving
Liva z3

- Power management / resume via PME : mandatory to allow wake-on-lan
- Disabled ACPI sleep state: I don’t need and don’t want it to be able to sleep as a 24/7 server
- Wireless function : disabled wifi and bluetooth, I do not need then and it can save power
- System agent configuration: set all memory values to mininum as it will be a headless machine, no need for GPU memory
- PCH configuration: disabled audio (not needed + power save), set restore AC power lost to power on
- Boot / network stack: enabled (wol), disabled quiet boot and set boot order to “usb, network, harddisk”
- disabled EUP else wake-on-lan won’t work
Photos
I took some photos during the “first” assembly process. There have been some change since I replaced the PCIe network cards by USB-3 adapters and finaly used 32Gb So-dimms.


Base infrastructure
Prepare for PXE boot
As described previously, I configured all 3 nodes to boot via Network / PXE by default and fallback to internal storage. The main goal is to be able to “factory reset” any server while rebooting (all “post-install” configuration is then done by Saltstack).
If I want to restart one node from scratch, I just enable pxeboot on my PFsense box, set the corresponding boot file and reboot the device. Once the install has finished, I disable pxeboot and the device fallback to the media on which the fresh install has been done.
In Pfsense, I installed the package “tftpd”. then I configured it via the menu “Services / TFTPD Server”:
- Enable it
- Restrict to ip adresses of vlan with PXE enabled devices
- Set to ipv4 only as I don’t use IPv6 for now
- Open udp port 69 in the corresponding vlan
- Download IPXE and and add files on the TFTP Server (http://boot.ipxe.org/undionly.kpxe and http://boot.ipxe.org/ipxe.efi). In my case, I used scp to copy files on my PFsense box.
- Add an autoxec.ipxe file that will be launched by ipxe
Bellow is the my autoxec.ipxe file:
|
1 2 3 4 5 6 7 8 9 |
#!ipxe dhcp set webserver tftp://aaa.bbb.ccc.dddd initrd ${webserver}/pve-8.2/initrd || echo "error loading initrd" kernel ${webserver}/pve-8.2/linux26 initrd=initrd ramdisk_size=16777216 rw proxmox-start-auto-installer || echo "error loading kernel" boot |
Note that calling “dhcp” in first place seems to be redundant as the Bios / EFI already got an ip address to load ipxe. But In fact, without calling “dhcp”, I had timeout while loading the (quite big) Proxmox initrd file…
Then I configured PFsense’s DHCP service to send required information for PXE boot to work:
- Uncheck ignore bootp queries
- set TFTP Server to the corresponding IP of the router (for each vlan on which tftpd should respond)
- Enable network booting
- Set the boot files : undionly.kpxe for BIOS and ipxe.efi for UEFI
In order to be able to control and customize any node on my network, each one has a specific “autoexec.ipxe” and “initrd” files that I just rename when I need to re-stage them.
I keep the default autoexec.ipxe with the “exit 1” command so by default, my servers boot to the next BIOS option. It is not mandatory but it makes the boot process faster when PXE is not enabled.
Now booting any node from my network is possible and simply controled via my PFSense box.
Proxmox nodes provisioning
PXE image creation
What I wanted was to boot any node from the Proxmox ISO in “auto install” mode as explained on the wiki page https://pve.proxmox.com/wiki/Automated_Installation. This implies to generate a custom ISO image with my own answers file, then to convert the ISO into a PXE bootable file with https://github.com/morph027/pve-iso-2-pxe.
I also needed to add some customizations to both install process and first boot.
What I added to the the install process are:
- Patch Proxmox to allow installing on an emmc disk (for the Liva z3)
- Add a custom network interfaces file to setup the network correctly (vlan, bond, etc.)
- Add a custom rc.local file to further customize after the installation process
During the first boot, I wanted to execute some actions so each node could be ready and fully configured with very few manual actions. This the purpose of the custom rc.local:
- Configure network interfaces with the file injected in the ISO image
- Configure /dev/sda to be fully dedicated to proxmox root (other storages are on nvme)
- Remove enterprise repository and enable the community one
- Remove subscription nag uppon login
- Install saltstack so nodes can be automaticaly configured after the first boot
- Create a zfs pool on the nvme disk
- Enable wake-on-lan
- Create a first LXE container on node-3 to host the salt-master
- Create the Proxmox cluster on node-1
Each node is fully configured at first boot either by rc.local file or by saltstack which runs highstate for any new node.
This leads me to the create two Github projects:
- A public “generic” one that allows to generate PXE image with automated Proxmox install and custom files : https://github.com/jit06/pve-auto-pxe
- A private “specific” one: which contains my own custom files and a small build system to create all needed files in a folder that can be mounted as “/config” for pve-auto-pxe.
Obviously, I cannot share the private repository as it contains some informations I don’t want to share, but basically this is what it does:
- Create a build folder with hostname sub folders in it
- If a hostname’s specific rc.local exists, merge it with the main rc.local
- Generate a finalized rc.local and autoexec.pxe files for all hosts
- Ask for, then inject root password in answer.toml files
- Ask for, and inject saltstack and git passwords for the Liva z3 node
This build script generates a kernel and initrd files that can be copied to the TFTP server on my Pfsense. The initrd file is 1.6Go in size and PFSense does not allow to copy such big file from the web interface. It has to be copied though ssh / scp.
Customized Proxmox images
The Proxmox ISO image customization is here to set up things that are more or less hardware related or needed right after a clean install. Everything else is set and / or tuned with saltstack.
As explained earlier, the initial configuration is done via a custom rc.local script injected in the Proxmox ISO image. All nodes have the same rc.local base plus a specific one.
Below is the common rc.local. It is executed only once as it is replaced by a new one via saltstack as soon as the salt-minion is connected.
|
1 2 3 4 5 6 7 8 9 10 11 12 13 14 15 16 17 18 19 20 21 22 23 24 25 26 27 28 29 30 31 32 33 34 35 36 37 38 39 40 41 42 43 44 45 46 47 48 49 50 51 52 53 54 55 56 57 58 59 60 61 62 63 64 65 66 67 68 69 70 71 72 73 74 75 76 77 78 79 80 81 82 83 84 85 86 87 88 89 90 91 92 93 94 |
#!/bin/sh -e # # rc.local # # This script is executed at the end of each multiuser runlevel. # any non 0 exit will be reported as failure by systemd # set new interfaces file if any if [ -f /etc/network/interfaces.install ]; then echo "found a network interfaces file to install" rm /etc/network/interfaces mv /etc/network/interfaces.install /etc/network/interfaces systemctl restart networking fi # /dev/sda is fully dedicated to pve root if [ -e /dev/pve/data ]; then echo "found /dev/pve/data LVM partition: remove it and extend /dev/pve/root" lvresize -l +100%FREE /dev/pve/root resize2fs /dev/mapper/pve-root sleep 10 fi # remove enterprise repo and enable the commnunity one's if [ -f /etc/apt/sources.list.d/pve-enterprise.list ]; then echo "Enterprise repository found: disable it and enable commnunity repo" rm /etc/apt/sources.list.d/pve-enterprise.list rm /etc/apt/sources.list.d/ceph.list echo "deb http://download.proxmox.com/debian/pve bookworm pve-no-subscription" >> /etc/apt/sources.list echo "Trigger update and full upgrade" apt update && apt -y full-upgrade fi # remove the subscription NAG uppon login if [ ! -f /usr/share/javascript/proxmox-widget-toolkit/proxmoxlib.js.bak ]; then echo "subscription NAG found, removing it" sed -Ezi.bak "s/(Ext.Msg.show\(\{\s+title: gettext\('No valid sub)/void\(\{ \/\/\1/g" /usr/share/javascript/proxmox-widget-toolkit/proxmoxlib.js systemctl restart pveproxy.service fi # install saltstack Onedir repo if [ ! -f /etc/apt/keyrings/salt-archive-keyring.pgp ]; then echo "Saltstack keyring not found, install it" wget --tries=3 --waitretry=3 --no-dns-cache --retry-on-host-error -O /etc/apt/keyrings/salt-archive-keyring.pgp https://packages.broadcom.com/artifactory/api/security/keypair/SaltProjectKey/public fi if [ ! -f /etc/apt/sources.list.d/salt.sources ]; then wget --tries=3 --waitretry=3 --no-dns-cache --retry-on-host-error -O /etc/apt/sources.list.d/salt.sources https://github.com/saltstack/salt-install-guide/releases/latest/download/salt.sources; apt update && apt -y install salt-minion mkdir -p /etc/salt/minion.d echo "master: saltmaster.local.lan" >> /etc/salt/minion.d/master.conf echo "startup_states: highstate" >> /etc/salt/minion.d/minion.conf systemctl enable --now salt-minion fi # create zfs volumes on first nvme disk if not exists if [ $(zpool list | grep zfs-storage | awk '{print $1}') = "zfs-storage" ]; then # do nothing echo "zfs-storage found" else echo "no zfs-storage pool found, creating it on /dev/nvme0n1" # erase partition table dd if=/dev/zero of=/dev/nvme0n1 bs=512 count=1 #create the pool zpool create -o autotrim=on -o ashift=12 zfs-storage /dev/nvme0n1 # disable access time and sync for better performnances zfs set atime=off zfs-storage zfs set sync=disabled zfs-storage # set compression zfs set compression=lz4 zfs-storage pvesm add zfspool storage -pool zfs-storage fi if [ -f /etc/default/grub.d/installer.cfg ]; then rm /etc/default/grub.d/installer.cfg update-grub fi # enable wake on lan on all physical interfaces nics=$(ip -pretty link show | \grep enp | awk '{print $2}' | cut -d':' -f 1) if [ -n "$nics" ]; then for interface in $nics do echo "Enable WOL for $interface" ethtool -s $interface wol g done fi |
As seen in the first lines, a dedicated /etc/network/interfaces.install is moved to replace the original one. This specific file is copied during the customization of the Proxmox ISO image. This file is very important because it set up the whole network. It is pretty similar on both node: a bridge dedicated to VM and LXC, and another bridge dedicated to the replication (corosync, zfs, etc.).
The interfaces file is like the following:
|
1 2 3 4 5 6 7 8 9 10 11 12 13 14 15 16 17 18 19 20 21 22 23 24 25 26 27 28 29 30 31 32 33 34 35 36 37 38 39 40 41 42 43 44 45 46 47 48 49 50 51 52 53 54 55 56 57 58 |
########################################################## # # Physical interfaces : only used though virtual networks # ########################################################## auto lo iface lo inet loopback # USB 2.5G nic wired to the other node auto enx00e04c68030c iface enx00e04c68030c inet manual # internal 1GB nic bonded with USB 2.5GB auto enp2s0 iface enp2s0 inet manual # 2nd USB NIC bonded with internal NIC auto enx00e04c680b32 iface enx00e04c680b32 inet manual ########################################################## # # link aggregations # ########################################################## # main bond to host all vlans auto bond0 iface bond0 inet manual hwaddress xx:xx:xx:xx:xx:xx bond-slaves enp2s0 enx00e04c680b32 bond-miimon 100 bond-xmit-hash-policy layer2+3 bond-mode 802.3ad # LACP ########################################################## # # bridges # ########################################################## # bridge to host all vlan + management (untagged vlan 40) auto vmbr0 iface vmbr0 inet dhcp bridge-ports bond0 bridge-stp off bridge-fd 0 bridge-vlan-aware yes bridge-vids 2-4094 # vlan are handled on VM network card bridge_ageing 0 # Network for replication on dedicated 2.5G NIC auto vmbr1 iface vmbr1 inet static address 10.0.0.2/24 bridge-ports enx00e04c680b32 bridge-stp off bridge-fd 0 |
The node-1 has a special treatment because it has NL drives for NAS storage. At this stage, the script assumes that NAS drives are already formated ( mkfs.ext4 -F -b 4096 /dev/sdx1) because in case of restaging, I dont want to risk any loss of data.
This first rc.local also creates the corosync cluster:
|
1 2 3 4 5 6 7 8 9 10 11 12 13 14 15 16 17 18 19 20 21 22 23 24 25 26 27 28 |
#### create cluster if it does not exists if [ ! -f /etc/pve/corosync.conf ]; then pvecm create cluster --link0 address=aaa.bbb.ccc.ddd echo "migration: secure,network=10.0.0.0/24" >> /etc/pve/datacenter.cfg fi #### add qdevice for corosync quorum if [ ! -f /sbin/corosync-qdevice ]; then apt -y install corosync-qdevice fi #### setup storages if [ -z "$(grep 'dir: vz' /etc/pve/storage.cfg)" ]; then # dedicated directory on zfs for iso and lxc templates zfs create zfs-storage/vz pvesm add dir vz --path /zfs-storage/vz --content 'vztmpl,iso,snippets' # no content allowed on system disk pvesm set local --content '' # NL drives for nas and backup mkdir -p /nas-storage /nas-mirror echo "LABEL=NAS-STORAGE /nas-storage ext4 nofail,nodev,nosuid,relatime,noexec,async 0 2" >> /etc/fstab echo "LABEL=NAS-MIRROR /nas-mirror ext4 nofail,noauto,nodev,nosuid,relatime,noexec,async 0 2" >> /etc/fstab systemctl daemon-reload mount /nas-storage pvesm add dir backup --path /nas-storage/backup --content 'backup' --nodes 'node-1' fi |
Finally, the node-3 has a special treatment too on its rc.local: as this is the host for saltstack master, a dedicated LXC is created to be able to initialize everything else when all nodes are ready, including PGP initilization needed to encrypt and decrypt secrets that are stored on my private saltstack git repository (more details on this subject later).
|
1 2 3 4 5 6 7 8 9 10 11 12 13 14 15 16 17 18 19 20 21 22 23 24 25 26 27 28 29 30 31 32 33 34 35 36 37 38 39 40 41 42 43 44 45 46 47 48 49 50 51 52 53 54 55 56 57 58 59 60 61 62 63 64 65 66 67 68 69 70 71 72 73 74 75 76 77 78 79 80 81 82 83 84 85 86 87 88 89 90 91 92 93 94 |
#### install corosync-qnetd package for external vote support on the cluster if [ ! -f /usr/bin/corosync-qnetd ]; then apt -y install corosync-qnetd fi if [ -z "$(grep 'dir: vz' /etc/pve/storage.cfg)" ]; then # only template and iso allowed on system disk pvesm set local --content 'vztmpl,iso' # zfs-storage host vm and lxc contents pvesm set storage --content 'images,rootdir' fi #### create saltstack lxc if not exists if [ "$(pct list | grep saltmaster | awk '{print $1}')" -eq 100 ]; then echo "found saltmaster lxc" else pveam update # download the needed template TEMPLATE=$(pveam available --section system | grep debian-12 | awk '{print $2}') pveam download local $TEMPLATE # create the container pct create 100 /var/lib/vz/template/cache/$TEMPLATE \ --cores 2 \ --memory 2048 \ --storage storage \ --description "saltstack master for home cloud" \ --hostname "saltmaster" \ --onboot 1 \ --ostype debian \ --password "SALTMASTER_ROOT_PWD" \ --swap 0 \ --features nesting=1 \ --net0 name=eth0,bridge=vmbr0,ip=dhcp,tag=xx sleep 2 pct start 100 # prepare and upgrade OS pct exec 100 -- bash -c "apt update && apt -y upgrade && apt -y install git gpg sudo" # install saltstack onedir repo pct exec 100 -- bash -c '\ wget --tries=3 --waitretry=3 --no-dns-cache --retry-on-host-error -O /etc/apt/keyrings/salt-archive-keyring-2023.gpg https://repo.saltproject.io/salt/py3/debian/12/amd64/SALT-PROJECT-GPG-PUBKEY-2023.gpg echo "deb [signed-by=/etc/apt/keyrings/salt-archive-keyring-2023.gpg arch=amd64] https://repo.saltproject.io/salt/py3/debian/12/amd64/latest bookworm main" | tee /etc/apt/sources.list.d/salt.list' # install needed packages pct exec 100 -- bash -c "apt update && apt -y install salt-master salt-minion" pct exec 100 -- bash -c "salt-pip install pyinotify croniter IPy" # clone the saltstack IAC git repo pct exec 100 -- bash -c "\ rm -Rf /srv/* git clone https://XXX:SALTMASTER_GIT_PWD/XXX/saltstack /srv" # configure saltmaster pct exec 100 -- bash -c '\ mkdir -p /etc/salt/master.d echo "cli_summary: True" >> /etc/salt/master.d/saltmaster.conf echo "auto_accept: True" >> /etc/salt/master.d/saltmaster.conf echo "state_output: changes" >> /etc/salt/master.d/saltmaster.conf systemctl enable --now salt-master' sleep 5 # configure saltminion pct exec 100 -- bash -c '\ mkdir -p /etc/salt/minion.d echo "master: saltmaster.local.lan" >> /etc/salt/minion.d/minion.conf echo "startup_states: highstate" >> /etc/salt/minion.d/minion.conf systemctl enable salt-minion' # configure gpg pct exec 100 -- bash -c 'echo "SALTMASTER_GPG_PUB" > /tmp/pubkey.asc' pct exec 100 -- bash -c 'echo "SALTMASTER_GPG_PRIV" > /tmp/privkey.secret.b64' pct exec 100 -- bash -c '\ mkdir -p /etc/salt/gpgkeys chmod 0700 /etc/salt/gpgkeys echo 'homedir /etc/salt/gpgkeys' >> /root/.gnupg base64 -d /tmp/privkey.secret.b64 > /tmp/privkey.secret gpg --homedir /etc/salt/gpgkeys --import /tmp/privkey.secret gpg --homedir /etc/salt/gpgkeys --import /tmp/pubkey.asc echo 'gpg_keydir: /etc/salt/gpgkeys' >/etc/salt/master.d/gpg-pillar.conf chown -R salt:salt /etc/gpgkeys rm /tmp/privkey.* rm /tmp/pubkey.*' pct reboot 100 # reload salt-minion to register correctly systemctl restart salt-minion fi |
Words in upper case like “SALTMASTER_ROOT_PWD” are injected by my custom build script during the ISO creation. As all rc.local files got deleted after the first connection to the saltmaster, I do not consider that as a big security concern.
The git repository used is a private one, which serves for GitOps via saltstack (more on that later).
The only remaining manual operations are listed below. After these actions, everything is set up and ready (including a fully functionnal k3s cluster with apps, again: more on that later):
- reboot all nodes to unsure that all configurations are taken into account
- adding node-2 to the cluster : it needs root password thus I can’t provide it in rc.local
1pvecm add node-1.local.lan --link0 address=aaa.bbb.ccc.ddd - add the qdevice on node-3 :
1pvecm qdevice setup aaa.bbb.ccc.ddd - apply saltstack map states (iac_backend.host-map.sls) : can’t do it before the cluster is created
- set saltmaster not to auto accept minions (auto_accept: false)
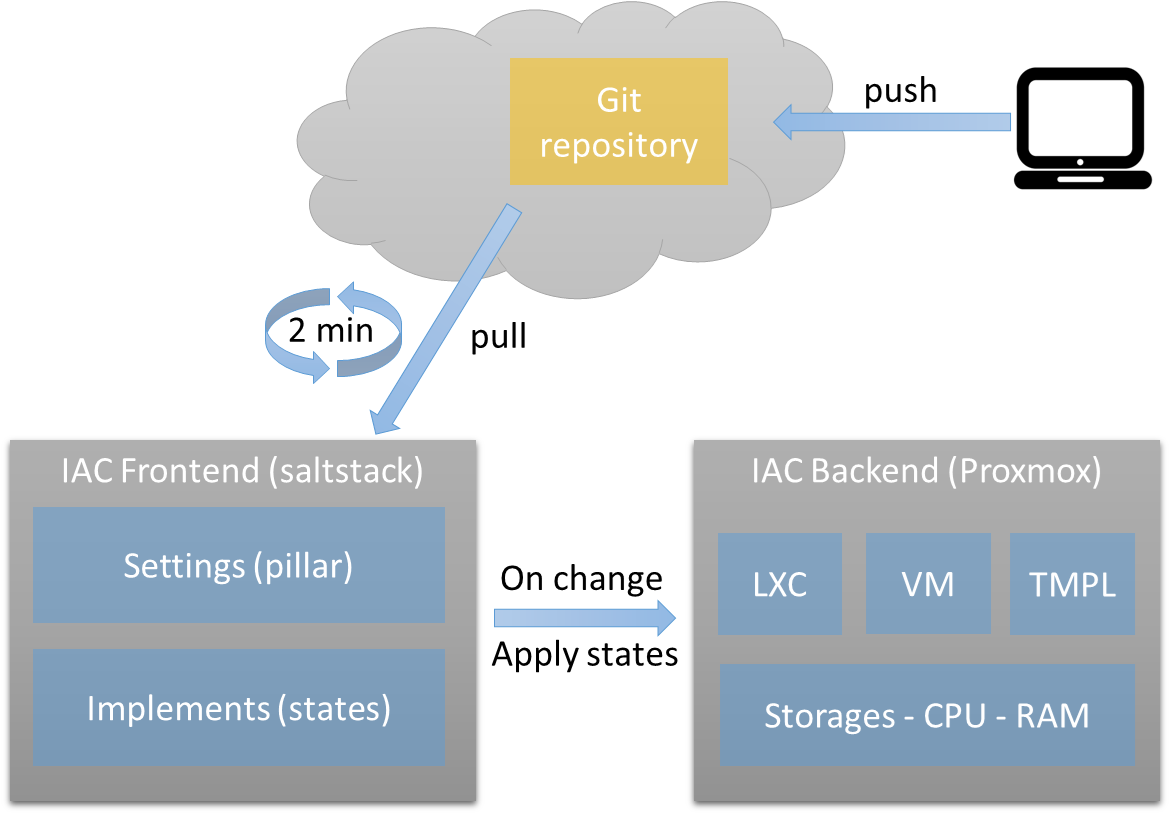
Saltstack + Git as IAC frontend
Concept
As seen previously, the salt master is an LXC container that is automatically configured during the very first boot of node-3 (the Liva Z3). This makes it fully reproducible, eliminating the need to rely on backups. The goal is to quickly set up a salt master from scratch and use it to configure everything else, including the salt master itself.
Basically, the concept is based on the following principles:
- A private Git repository contains all state and pillar definitions
- The repository is cloned regularly on the salt master LXC.
- Any file change in the cloned repository triggers a highstate application on all registered minions.
- Any new minion automatically applies a highstate upon registration.
- A highstate is periodically applied to all minions.
This way, SaltStack acts as an Infrastructure as Code (IaC) frontend via Git: any push triggers changes in the infrastructure, removing the need for manual shell commands or direct connections to any server—whether it is an LXC, a virtual machine, or a Proxmox node.
Additionally, any new server is automatically configured, allowing me to rebuild parts or even the entire infrastructure with a simple salt '*' state.apply command.
Implementation
To implement the GitOps approach, one possible solution could have been to use GitFS to host SaltStack’s files. However, since I do not plan to make changes directly on the salt master (which, in my opinion, is an anti-pattern), I adopted a KISS approach: : a simple scheduled git pull task combined with an inotify-based state to apply any modifications.
To achieve this, the salt master has a scheduled task that pulls the repository every 2 minutes and a reactor configuration together with an inotify beacon.
|
1 2 3 4 5 6 7 8 9 10 11 12 13 14 15 16 17 18 19 20 21 22 23 24 25 26 27 28 29 30 31 32 33 34 |
refresh_saltstack_repo: schedule.present: - function: state.apply - job_args: - iac_frontend.repository - cron: '*/2 * * * *' - enabled: True salt-master: file.managed: - names: - /etc/salt/master.d/reactor.conf: - source: salt://iac_frontend/files/reactor.conf service.running: - watch: - file: /etc/salt/master.d/reactor.conf salt_states_changed: beacon.present: - save: True - enable: True - interval: 2 - beacon_module: inotify - disable_during_state_run: False - files: /srv: mask: - create - moved_to recurse: True auto_add: True exclude: - /srv/salt/reactor |
The repository pull state is like the following (url and credentials are stored on pillar values, more on that later):
|
1 2 3 4 5 6 |
saltstack_repo: git.latest: - name: https://path_to_git/repo - target: /srv - https_user: user - https_pass: password |
The “reactor.conf” file defines a state to be executed on each detected change:
|
1 2 |
- 'salt/beacon/*/salt_states_changed/*': - salt://reactor/handle_changed_states.sls |
And here is the “handle_changed_states.sls” content which simply applies hightstate on all registered minions
|
1 2 3 4 |
apply_highstate: salt.state: - tgt: '*' - highstate: True |
As explained earlier, with such a simple mecanism, any push to the git repository triggers any infrastructure and configuration changes, no need to login into the saltmaster nor any server. Of course any error will also be deployed very fast : “with great power come great responsibilities” 🙂
Secured secrets
Even though my SaltStack repository is private, it is still hosted on external cloud servers. Since the entire architecture relies on secrets such as passwords or private keys, I needed to set up a secure way to store this kind of information.
My setup follows SaltStack’s approach, which consists of managing secrets with pillar values for the storage and GnuPG for encryption
As previously mentioned, the custom rc.local file of node-3, executed during the first boot, initializes the GnuPG environment and injects the key pair (which I store in a private local location).
Thus, the SaltMaster LXC contains everything needed to encrypt a new secret with a command like:
|
1 |
echo -n 'value to encrypt' | gpg --homedir /etc/salt/gpgkeys --trust-model always -ear <MY KEY-ID> |
The output is an encrypted string that can be used as saltstack pillar:
|
1 2 3 4 5 6 7 8 9 10 |
#!yaml|gpg standard_value: not encrypted encrypted_vlue: | -----BEGIN PGP MESSAGE----- PLb8RzQsA+XVp8SqaB/h2IsbSlwxC5auXxkJtQiZfeSJPVINAXIlT8F6KDRO5Aqe HaV2577PsEVRNeY9mMxPe0KVpuV3mPYL+2lpemEtwpJYDP1kByKMDiXt66sbyCNp v9lGMZI9ZnBsdGgLisZwDdaS0Vs+4MniIbw== -----END PGP MESSAGE----- |
Saltstack repository architecture
I tried to follow the best pratices : pillar contains variables and customized values while states are mostly generics and depend on pillar’s values.
Bellow is a commented overview of the saltstack directory structure. Each element is detailled later.
| level 1 | level 2 | comments |
|---|---|---|
| pillar | ||
| k3s | settings to deploy the k3s cluster | |
| maps | define all virtual machines and LXC specifications for all nodes | |
| services | settings for specific services like reverse proxy (nginx) | |
| users | defines users and groups that should exists or be deleted | |
| zabbix | settings dedicated to zabbix states | |
| git.sls | settings for my saltstack git repository | |
| iac_backend.sls | define sysctl values and custom scripts for all proxmox nodes | |
| kubeapps.sls | define applications that must be deployed in the k3s cluster | |
| mail.sls | settings for e-mail account and aliases for servers to be able to send e-mails | |
| top.sls | ||
| salt | ||
| iac_backend | dedicated to proxmox backend deployments | |
| iac_frontend | dedicated to saltstack and gitops | |
| kubeapps | states that deploy applications in k3s | |
| reactor | deploy reactor configuration, essentialy for the gitops approach | |
| services | deploy services as defined in states | |
| sysadmin | states dedicated to apply a standard configuration all servers, being LXC or VM | |
| users | ensure that users and groups exist or are absents | |
| top.sls |
Proxmox nodes as IAC_backend
Proxmox customization
I did some adjustements on Proxmox nodes either to “optimize” things for my modest hardware, to reduce power consumption or simply to install my custom scripts
The table below show the optimization related settings.
| What | How |
|---|---|
| Allow swap usage only when less than 1% free RAM. This preserve my SSD | set vm.swappiness to 1 |
| disable ipv6 as I don’t use it | set net.ipv6.conf.all.disable_ipv6 to 1 |
| Ensure there is at least 256Mb free in order to always be able to execute sysadmin tools (ssh, screen, netstate, etc.) | set vm.min_free_kbytes to 262144 |
| Better I/O multitasking performances by limitting the size of writebacks (ram cache to disk) | Tset vm.dirty_ratio to 20 |
These settings are applied through states and pillar values.
Pillar are defined like the follwing:
|
1 2 3 4 5 6 7 8 9 10 11 12 13 14 15 |
iac_backend: # custom scripts to install to /usr/loc/bin framework: - set_lxc.sh - set_vm.sh - set_templates.sh - set_common.sh - set_zfspv.sh # sysctl settings to set sysctl: vm.swappiness: 1 net.ipv6.conf.all.disable_ipv6: 1 vm.min_free_kbytes: 262144 vm.dirty_ratio: 20 |
And states applied to Promox nodes (more on udev rules in the next chapter):
|
1 2 3 4 5 6 7 8 9 10 11 12 13 14 15 16 17 18 19 20 21 22 23 24 25 26 27 28 29 30 31 32 33 34 35 36 37 38 39 40 41 42 43 44 45 46 47 48 49 50 51 52 53 54 55 56 57 58 59 60 61 62 |
############################################################## # Deploy framework to handle IAC on Proxmox: # - define cluster hosts in /etc/hosts # - install requiered packages # - set a new rc.local to remove the one used during first boot # - install all custom script used to manage operations # - tune some parameters for better performances # - deploy a set of udevrules for better power management ############################################################## proxmox-cluster-hosts: file.managed: - name: /etc/hosts - source: salt://iac_backend/files/hosts - user: root - group: root - mode: 644 proxmox_packages: pkg.installed: - pkgs: - libguestfs-tools proxmox-rc-local: file.managed: - name: /etc/rc.local - source: salt://iac_backend/files/rc.local - user: root - group: root - mode: 750 {% if salt['pillar.get']('iac_backend:framework', none) is not none %} proxmox_scripts: file.managed: - names: {% for file in pillar['iac_backend']['framework'] %} - /usr/local/bin/{{ file }}: - source: salt://iac_backend/files/{{ file }} - mode: 750 {%- endfor -%} {% endif %} {% if salt['pillar.get']('iac_backend:sysctl', none) is not none %} proxmox_sysctl_settings: sysctl.present: - names: {% for setting in pillar['iac_backend']['sysctl'] %} - {{ setting }}: - value: {{ pillar['iac_backend']['sysctl'][setting] }} {%- endfor -%} {% endif %} proxmox_udev: cmd.run: - name: udevadm control --reload-rules - onchanges: - file: proxmox_udev_rules proxmox_udev_rules: file.managed: - names: - /etc/udev/rules.d/99-powermgmt.rules: - source: salt://iac_backend/files/99-powermgmt.rules - mode: 640 |
Power consumption
One major advantage of my old ARM-based home lab solution was its low power consumption: it was around 60W, including my 24-port switch.
Switching to x86 required some BIOS tuning (see the beginning of this article), even with low-power CPUs. Unfortunately, I wasn’t able to achieve a huge reduction in power consumption. The initial power draw of the N100 nodes was about 19 watts. After applying BIOS tweaks and Linux adjustments, I managed to reduce it to 17.5W.
Here are my “low-power” udev rules, installed in /etc/udev/rules.d/99-powermgmt.rules :
|
1 2 3 4 5 6 7 8 9 10 |
ACTION=="add", SUBSYSTEM=="pci", ATTR{power/control}="auto" ACTION=="add", SUBSYSTEM=="ahci", ATTR{power/control}="auto" ACTION=="add", SUBSYSTEM=="scsi_host", KERNEL=="host*", ATTR{link_power_management_policy}="min_power" ACTION=="add", SUBSYSTEM=="usb", ATTR{power/autosuspend_delay_ms}="1000" ACTION=="add", SUBSYSTEM=="usb", ATTR{power/control}="auto" ACTION=="add", SUBSYSTEM=="scsi", ATTR{power/control}="auto" ACTION=="add", SUBSYSTEM=="acpi", ATTR{power/control}="auto" ACTION=="add", SUBSYSTEM=="block", ATTR{power/control}="auto" ACTION=="add", SUBSYSTEM=="workqueue", ATTR{power/control}="auto" ACTION=="add", SUBSYSTEM=="i2c", ATTR{power/control}="auto" |
With everything running, including the NL drives, ethernet switch, pfSense box, and rack cooling fans, I measured between 68W and 75W total. I found this reasonable: it’s a 25% increase in power consumption compared to my old ARM cluster, but with more than 25% performance gains. In the end, this translates to about 150 euros per year, which is much cheaper than a similar cloud service.
Desired state configuration
As mentioned earlier, I use Proxmox as my IAC backend. To have a system that allows defining LXC containers and virtual machines in a desired state configuration style, I had to write some scripts.
I should have used salt-cloud, but at the time of writing, the current Proxmox extension isn’t very useful: it lacks reliable error reporting and is not yet officially integrated.
Terraform or OpenTofu could have been good candidates, but they are too complex for a simple infrastructure like mine.
My approach is based on VMs, templates, and LXC definitions through pillar values, with deployment managed via states and custom scripts to handle both creation and modification.
I wrote four scripts for VM and LXC creation/update. Their outputs follow SaltStack’s stateful script requirements.
set_common.sh: Common tools and definitions for all scripts.
|
1 2 3 4 5 6 7 8 9 10 11 12 13 14 15 16 17 18 19 20 21 22 23 24 25 26 27 28 29 30 31 32 33 34 35 36 37 38 39 40 41 42 43 44 45 46 47 48 49 50 51 52 53 54 55 56 57 58 59 60 61 62 63 64 65 66 67 68 69 70 71 72 73 74 75 76 77 78 79 80 81 82 83 84 85 86 87 88 89 90 91 92 |
#!/bin/bash ### COMMON VALUES ########################### DEBIAN12_CMD_INSTALL_SALTMINION=('\ wget --tries=3 --waitretry=3 --no-dns-cache --retry-on-host-error -O /etc/apt/keyrings/salt-archive-keyring.pgp https://packages.broadcom.com/artifactory/api/security/keypair/SaltProjectKey/public; \ wget --tries=3 --waitretry=3 --no-dns-cache --retry-on-host-error -O /etc/apt/sources.list.d/salt.sources https://github.com/saltstack/salt-install-guide/releases/latest/download/salt.sources; \ apt -qq update > /dev/null' ) DEBIAN12_CMD_CONFIG_SALTMINION=('\ mkdir -p /etc/salt/minion.d; \ echo "master: saltmaster.local.lan" >> /etc/salt/minion.d/minion.conf; \ systemctl enable salt-minion' ) ### GLOBAL VARIABLES ########################### CHANGED="no" COMMENT="" REPORT="" SPECIAL_ARGS="" MANDATORY="" declare -A arguments declare -A specials ### FUNCTIONS ################################## # print a message that can be interpreted by saltstack cmd.script state # $1=exit code ExitMessage() { echo echo $REPORT echo "changed=$CHANGED comment='$COMMENT'" exit $1 } # populate the arguments array waiting for key=value pairs # $1 are key exceptions that are mapped in $specials array # $2...$x all argumnts to parse ParseParameters() { # read parameters and store them in a hashmap for arg in "$@" do # separate argumente name and value (expecting name=value) name=${arg%%=*} value=${arg#*=} # extract special parameter for future usage if [[ $SPECIAL_ARGS == *"$name"* ]]; then specials[$name]=$value else # drop description as it causes problem to pass it to cli commands (quotes) if [[ $name != 'description' ]]; then arguments[$name]=$value fi fi done } # check that mandatory parameters are set CheckMandatory() { for key in $MANDATORY do if [[ -z ${arguments[$key]} ]] && [[ -z ${specials[$key]} ]] ; then COMMENT="'$key' parameter is mandatory" ExitMessage 2 fi done } # parse a config output from proxmox cli command (qm config or pct config) # Call ConfigValue() function (defined in host script) for each parsed value. # # $1 = config string Parseconfig() { OIFS="$IFS" IFS=$'\n' for setting in $1 do name=${setting%%:*} value=${setting#*': '} ConfigValue "$name" "$value" done IFS="$OIFS" } |
set_lxc.sh: handle LXC creation and update
|
1 2 3 4 5 6 7 8 9 10 11 12 13 14 15 16 17 18 19 20 21 22 23 24 25 26 27 28 29 30 31 32 33 34 35 36 37 38 39 40 41 42 43 44 45 46 47 48 49 50 51 52 53 54 55 56 57 58 59 60 61 62 63 64 65 66 67 68 69 70 71 72 73 74 75 76 77 78 79 80 81 82 83 84 85 86 87 88 89 90 91 92 93 94 95 96 97 98 99 100 101 102 103 104 105 106 107 108 109 110 111 112 113 114 115 116 117 118 119 120 121 122 123 124 125 126 127 128 129 130 |
#!/bin/bash source /usr/local/bin/set_common.sh ### GLOBAL VARIABLES ########################### CREATE="" OSVER="" SPECIAL_ARGS="osver" MANDATORY="id" ### FUNCTIONS ################################## Help() { # Display Help echo echo "Unsure a proxmox container exists as defined." echo "Either create it, modify it or do nothing" echo echo "Syntax: $0 parameter1=value1 [paramter2=value2 [...] ]" echo "Parameters and values are passed directly to 'pct'commands." echo echo There is one special parameter for creation: echo " osver: defines the version of 'ostype'. E.g: 12, base_20240911" echo echo IMPORTANTS NOTES: echo - description parameter is always dropped echo - rootfs parameter is ignored if container esists echo } # compare given value and set new config if changed # $1 = name # $2 = value ConfigValue() { # call pct set if anything changed, but for rootfs setting if [[ ! -z ${arguments[$1]} ]] && [[ ${arguments[$1]} != $2 ]] && [[ $1 != "rootfs" ]] ; then pct set ${arguments['id']} --$1 "${arguments[$1]}" CHANGED="yes" REPORT="$REPORT $1='${arguments[$1]}'" fi if [[ $CHANGED == "yes" ]]; then COMMENT="Container ${arguments[id]} updated" else COMMENT="Container ${arguments[id]} already configured" fi } ### SCRIPT LOGIC ################################ # Display help if needed if [[ ($# -lt 1) || $1 == "help" ]] ; then Help exit 2 fi ParseParameters "$@" CheckMandatory # check if container exists if [[ "$(pct list | grep ${arguments['id']} | awk '{print $1}')" -eq ${arguments['id']} ]]; then Parseconfig "$(pct config ${arguments['id']})" # when container does not exists we create it else # to create a container, we need osver (e.g. 12) and ostype (e.g. debian) to find the required template (e.g. debian-12) if [[ -z ${specials['osver']} ]] || [[ -z ${arguments['ostype']} ]] ; then COMMENT="osver and ostype parameters are mandatory for non existing container" ExitMessage 2 fi # build 'pct create' arguments as well as saltstack report for cmd.script state for param in ${!arguments[@]} do if [[ $param != 'id' ]]; then CREATE="$CREATE --$param ${arguments[$param]}" REPORT="$REPORT $param='${arguments[$param]}'" fi done COMMENT="Container ${arguments['id']} created with" # get template filename or download it if not found TEMPLATE=$(pveam available --section system | grep "${arguments['ostype']}-${specials['osver']}" | awk '{print $2}') TEMPLATE_PATH="/var/lib/vz/template/cache" TEMPLATE_STORAGE_NAME="local" # define wether to use default local storage of zfs if available if [[ -d "/zfs-storage/vz" ]]; then TEMPLATE_PATH="/zfs-storage/vz/template/cache" TEMPLATE_STORAGE_NAME="vz" fi if [[ ! -f "$TEMPLATE_PATH/$TEMPLATE" ]]; then pveam download $TEMPLATE_STORAGE_NAME $TEMPLATE > /dev/null COMMENT="$COMMENT new template: $TEMPLATE" else COMMENT="$COMMENT existing template" fi # create container pct create ${arguments['id']} $TEMPLATE_PATH/$TEMPLATE $CREATE > /dev/null # if container has been created, install salt-minion (depending on OS) if [[ $? -eq 0 ]]; then CHANGED="yes" if [[ "${arguments['ostype']}-${specials['osver']}" == "debian-12" ]]; then # set salt-minion requirements pct exec ${arguments['id']} -- bash -c "${DEBIAN12_CMD_INSTALL_SALTMINION[@]}" # upgrade and install needed packages pct exec ${arguments['id']} -- bash -c "apt -yqq upgrade > /dev/null && apt -yqq install salt-minion > /dev/null" # configure saltminion pct exec ${arguments['id']} -- bash -c "${DEBIAN12_CMD_CONFIG_SALTMINION[@]}" # reboot container to make it ready pct reboot ${arguments['id']} COMMENT="$COMMENT. Salt-minion installed" fi else exit 1 fi fi # print saltstack readble message then exit with success ExitMessage 0 |
set_templates.sh: handle Proxmox VM templates
|
1 2 3 4 5 6 7 8 9 10 11 12 13 14 15 16 17 18 19 20 21 22 23 24 25 26 27 28 29 30 31 32 33 34 35 36 37 38 39 40 41 42 43 44 45 46 47 48 49 50 51 52 53 54 55 56 57 58 59 60 61 62 63 64 65 66 67 68 69 70 71 72 73 74 75 76 77 78 79 80 81 82 83 84 85 86 87 88 89 90 91 |
#!/bin/bash source /usr/local/bin/set_common.sh ### GLOBAL VARIABLES ########################### MANDATORY="id name image" ### FUNCTIONS ################################## Help() { # Display Help echo echo "Unsure a VM Template is present." echo "Either create it or do nothing" echo echo "Syntax: $0 id=<template id> name=<template name> image=<http link to cloudinit image> [ param=value ]" echo "Where param=value can be any "qm set" / "wm create" attributes" echo echo "NOTE: Created template will have guest-agent and salt-minion installed" echo } ### SCRIPT LOGIC ################################ # Display help if needed if [[ ($# -lt 3) || $1 == "help" ]] ; then Help exit 2 fi ParseParameters "$@" CheckMandatory cd /root # check if template exists if [[ "$(qm list | grep ${arguments['id']} | awk '{print $1}')" -eq ${arguments['id']} ]]; then COMMENT="Image with ID ${arguments['id']} already exists" ExitMessage 0 fi # download image wget --tries=3 --waitretry=3 --no-dns-cache --retry-on-host-error -nv -c -O "temp.img" ${arguments['image']} if [[ ! $? -eq 0 ]]; then COMMENT="Unable to download image ${arguments['image']}" ExitMessage 1 else COMMENT="New template created with ID ${arguments['id']} (${arguments['name']})" fi # install saltstack on supported images if [[ ${arguments['image']} == *"debian-12"* ]]; then virt-customize -a temp.img --run-command "${DEBIAN12_CMD_INSTALL_SALTMINION[@]}" virt-customize -a temp.img --install salt-minion if [[ ! $? -eq 0 ]]; then COMMENT="Unable to install salt-minion on debian-12 image" ExitMessage 1 fi virt-customize -a temp.img --run-command "salt-pip install croniter" virt-customize -a temp.img --run-command "${DEBIAN12_CMD_CONFIG_SALTMINION[@]}" COMMENT="$COMMENT. Salt-minion installed" fi # install guest agent virt-customize -a temp.img --install qemu-guest-agent virt-customize -a temp.img --run-command 'systemctl enable qemu-guest-agent' if [[ ! $? -eq 0 ]]; then COMMENT="Unable to install qemu-guest-agent" ExitMessage 1 fi # generate the template qm create ${arguments['id']} --memory 2048 --core 2 --name ${arguments['name']} --net0 virtio,bridge=vmbr0 qm importdisk ${arguments['id']} temp.img storage > /dev/null qm set ${arguments['id']} --scsihw virtio-scsi-pci \ --scsi0 storage:vm-${arguments['id']}-disk-0 \ --ide2 storage:cloudinit \ --boot c --bootdisk scsi0 \ --serial0 socket --vga serial0 \ --agent enabled=1 qm template ${arguments['id']} rm /root/temp.img CHANGED="yes" ExitMessage 0 |
set_vm.sh: handle virtual machines creation and update
|
1 2 3 4 5 6 7 8 9 10 11 12 13 14 15 16 17 18 19 20 21 22 23 24 25 26 27 28 29 30 31 32 33 34 35 36 37 38 39 40 41 42 43 44 45 46 47 48 49 50 51 52 53 54 55 56 57 58 59 60 61 62 63 64 65 66 67 68 69 70 71 72 73 74 75 76 77 78 79 80 81 82 83 84 85 86 87 88 89 90 91 92 93 94 95 96 97 98 99 100 |
#!/bin/bash source /usr/local/bin/set_common.sh ### GLOBAL VARIABLES ########################### SPECIAL_ARGS="sshkey id name template start" MANDATORY="id name template" ### FUNCTIONS ################################## Help() { # Display Help echo echo "Unsure a proxmox VM exists as defined." echo "Either create it, modify it or do nothing" echo echo "Syntax: $0 id=<id> name=<name> template=<id> [start=<0 | 1>] parameter1=value1 [paramter2=value2 [...] ]" echo "Parameters and values are passed directly to 'qm' commands." echo echo "IMPORTANTS NOTES:" echo " - description parameter is always dropped" echo " - sshkey is ignored and always defaulted to ~/.ssh/id_rsa.pub" echo } # compare given value and set new config if changed # $1 = name # $2 = value ConfigValue() { # call pct set if anything changed, but for rootfs setting if [[ ! -z ${arguments[$1]} ]] && [[ ${arguments[$1]} != $2 ]] ; then # special handling for scsi0: only size is changeable if [[ $1 == "scsi0" ]]; then disksize=$(echo "${arguments[$1]}" | \grep -oP '(?<=size\=).*(?=G)') qm resize ${specials['id']} scsi0 "${disksize}G" else qm set ${specials['id']} --$1 "${arguments[$1]}" fi CHANGED="yes" REPORT="$REPORT $1='${arguments[$1]}'" fi if [[ $CHANGED == "yes" ]]; then COMMENT="VM ${specials[id]} updated" else COMMENT="VM ${specials[id]} already configured" fi } ### SCRIPT LOGIC ################################ # Display help if needed if [[ ($# -lt 3) || $1 == "help" ]] ; then Help exit 2 fi ParseParameters "$@" CheckMandatory # check if vm exists if [[ "$(qm list | grep ${specials['id']} | awk '{print $1}')" -eq ${specials['id']} ]]; then Parseconfig "$(qm config ${specials['id']})" else # clone template qm clone ${specials['template']} ${specials['id']} --name ${specials['name']} if [[ ! $? -eq 0 ]]; then COMMENT="Error cloning template" ExitMessage 1 fi CHANGED="yes" # set ssh key qm set ${specials['id']} --sshkey ~/.ssh/id_rsa.pub # apply all setings from argumemts for param in ${!arguments[@]} do if [[ $param == "scsi0" ]]; then disksize=$(echo "${arguments[$param]}" | \grep -oP '(?<=size\=).*(?=G)') qm resize ${specials['id']} scsi0 "${disksize}G" else qm set ${specials['id']} --$param ${arguments[$param]} fi REPORT="$REPORT $param='${arguments[$param]}'" done if [[ ! -z ${specials['start']} ]] && [[ ${specials['start']} -eq 1 ]] ; then qm start ${specials['id']} if [[ $? -eq 0 ]]; then COMMENT="$COMMENT. VM started" else COMMENT="$COMMENT. Error trying to start the VM" fi fi fi # print saltstack readble message then exit with success ExitMessage 0 |
Below is how I defined templates, LXC and VM as pillar values to create and/or update them:
|
1 2 3 4 5 6 7 8 9 10 11 12 13 14 15 16 17 18 19 20 21 22 23 24 25 26 27 28 29 30 31 32 33 34 35 36 37 38 39 40 41 42 43 44 45 |
templates: tpl-debian-12: > id=9200 name=debian-12 image=https://cloud.debian.org/images/cloud/bookworm/latest/debian-12-generic-amd64.qcow2 map: lxc-goldorak: password: | -----BEGIN PGP MESSAGE----- [...] -----END PGP MESSAGE----- settings: > id=300 hostname=goldorak cores=2 memory=1024 rootfs=storage:6 net0=name=eth0,bridge=vmbr0,ip=dhcp,tag=2,type=veth ostype=debian osver=12 onboot=1 swap=0 features=nesting=1 start=1 vm-k3s-master-1: password: | -----BEGIN PGP MESSAGE----- [...] -----END PGP MESSAGE----- settings: > id=1200 name=k3s-master-1 template=9200 cores=4 scsi0=storage:base-9200-disk-0/vm-1200-disk-0,size=20G memory=12288 net0=model=virtio,bridge=vmbr0,tag=3 ipconfig0=ip=dhcp searchdomain=local.lan onboot=1 start=1 |
Now, the part of the states that handle these pillar values:
|
1 2 3 4 5 6 7 8 9 10 11 12 13 14 15 16 17 18 19 20 21 22 23 24 25 26 27 28 29 30 31 32 33 34 35 36 37 |
# handle VM templates {% if pillar.get('templates', none) is not none %} {% for id in pillar['templates'] %} {{ id }}: cmd.script: - name: /usr/local/bin/set_templates.sh - stateful: True - require: - file: proxmox_scripts - pkg: proxmox_packages - args: {{ pillar['templates'][id] }} {% endfor %} {% endif %} # handle VM and LXC creations and updates {% if pillar.get('map', none) is not none %} {% for id in pillar['map'] %} {% if id.startswith('lxc') %} {% set password='password=' %} {% set name='set_lxc.sh' %} {% elif id.startswith('vm') %} {% set password='cipassword=' %} {% set name='set_vm.sh' %} {% endif %} {% set password=password~pillar['map'][id]['password'] %} {{ id }}: cmd.script: - name: /usr/local/bin/{{ name }} - stateful: True - require: - file: proxmox_scripts - pkg: proxmox_packages - args: > {{ password }} {{ pillar['map'][id]['settings'] }} {% endfor %} {% endif %} |
User management
My user management needs are pretty basic: system accounts and Samba shares. A simpler alternative to LDAP for my home lab is using states and minion values to handle all operations (create, modify, delete) and synchronize them across all hosts.
Example of user definitions in the pillar:
|
1 2 3 4 5 6 7 8 9 10 11 12 13 14 15 16 17 18 19 20 21 22 23 24 25 26 27 28 29 30 31 |
#!yaml|gpg # if defined AND set to true, this setting is used to trigger # samba password handling. Else, only system password are set pdbedit: True revokedusers: - debian users: test: fullname: full test uid: 1000 shell: /bin/bash ssh-keys: - ssh-ed25519 [...] test@my_computer groups: - adm - plugdev - sudo - staff - my_group password: | -----BEGIN PGP MESSAGE----- [...] -----END PGP MESSAGE----- groups: my_group: gid: 1003 |
States to handle users on all nodes:
|
1 2 3 4 5 6 7 8 9 10 11 12 13 14 15 16 17 18 19 20 21 22 23 24 25 26 27 28 29 30 31 32 33 34 35 36 37 38 39 40 41 42 43 44 45 46 47 48 49 50 51 52 53 54 55 56 57 58 59 60 61 62 63 64 65 66 67 68 69 70 71 72 73 74 75 76 77 78 79 80 81 82 83 84 85 86 87 88 89 90 91 92 93 94 |
############################################################## # Handle users on all managed hosts # - Remove users present in 'revokedusers' pillar (including ssh key) # - Add groups present in 'groups' pillar # - Add users present in 'users' pillar (including ssh key) # - Handle samba passwords if needed ('pdbedit' pillar) ############################################################## # delete users and groups that have been revoked # unsure user is no more referenced {% if pillar.get('revokedusers', none) is not none %} {% for user in pillar['revokedusers'] %} {{user}}: user.absent: [] group.absent: [] # unsure user ssh key is no more used by root {% if salt['pillar.get']('revokedusers:ssh-keys', none) is not none %} {{user}}_root_key: ssh_auth.absent: - user: root - names: {% for key in pillar['revokedusers']['ssh-keys'] %} - {{ key }} {% endfor %} # unsure user ssh key is no more used for this user {{user}}_key: ssh_auth.absent: - user: {{user}} - names: {% for key in pillar['revokedusers']['ssh-keys'] %} - {{ key }} {% endfor %} {% endif %} {% endfor %} {% endif %} # set groups that must be defined {% if pillar.get('groups', none) is not none %} {% for group in pillar['groups'] %} {{ group }}: group.present: - gid: {{ pillar['groups'][group]['gid'] }} {% endfor %} {% endif %} # Set users that must be defined {% if pillar.get('users', none) is not none %} {% for user in pillar['users'] %} {{ user }}: group.present: - gid: {{ pillar['users'][user]['uid'] }} user.present: - fullname: {{ pillar['users'][user]['fullname'] }} - uid: {{ pillar['users'][user]['uid'] }} - gid: {{ pillar['users'][user]['uid'] }} - shell: {{ pillar['users'][user]['shell'] }} - password: {{ pillar['users'][user]['password'] }} - hash_password: True {% if salt['pillar.get']('users:' + user + ':groups', none) is not none -%} - groups: {% for group in pillar['users'][user]['groups'] -%} - {{ group }} {% endfor %} {% endif %} {% if pillar.get('pdbedit', none) is not none %} pdbedit.managed: - password: {{ pillar['users'][user]['password'] }} {% endif %} {% if salt['pillar.get']('users:' + user + ':ssh-keys', none) is not none -%} {{user}}_root_key: ssh_auth.present: - user: root - names: {% for key in pillar['users'][user]['ssh-keys'] -%} - {{ key }} {% endfor %} {{user}}_key: ssh_auth.present: - user: {{user}} - names: {% for key in pillar['users'][user]['ssh-keys'] -%} - {{ key }} {% endfor %} {% endif %} {% endfor %} {% endif %} |
Zabbix as monitoring solution
I chose Zabbix to monitor all components of my home cloud. I found it easy to set up, yet very powerful, with many useful monitors by default.
I created a single state for the installation process, both for the server and all agents, depending on pillar values. I also had to write a small script to handle PostgreSQL database creation.
Example of pillar values:
|
1 2 3 4 5 6 7 8 9 10 11 12 13 14 15 |
#!yaml|gpg zabbix-common: server: 'monitor.local.lan' repo: ' https://repo.zabbix.com/zabbix/7.0/debian/pool/main/z/zabbix-release/zabbix-release_latest+debian12_all.deb' zabbix-server: db_name: 'zabbix' db_user: 'zabbix' db_script: '/usr/share/zabbix-sql-scripts/postgresql/server.sql.gz' db_password: | -----BEGIN PGP MESSAGE----- [...] -----END PGP MESSAGE----- |
States that install Zabbix:
|
1 2 3 4 5 6 7 8 9 10 11 12 13 14 15 16 17 18 19 20 21 22 23 24 25 26 27 28 29 30 31 32 33 34 35 36 37 38 39 40 41 42 43 44 45 46 47 48 49 50 51 52 53 54 55 56 57 58 59 60 61 62 63 64 65 66 67 68 69 70 71 72 73 74 75 76 77 78 79 80 81 82 83 84 85 86 87 88 89 90 91 92 93 94 95 96 97 98 99 100 101 102 103 104 105 106 107 108 109 110 111 112 113 114 115 116 117 118 119 120 121 122 123 124 125 126 127 128 129 130 131 132 133 134 135 136 137 138 139 140 141 142 143 144 145 146 147 148 149 150 151 152 153 154 155 156 157 158 159 160 161 162 163 164 165 166 167 168 169 170 171 172 173 174 175 176 177 178 179 |
############################################################## # Deploy Zabbix server or agent regarding zabbix-* pillars. # ALL: # - install the repo # - ensure all required services are running # # SERVER: # - Init PostgreSQL database # - install all needed packages # - customize configuration files with db, user and password values # - set nginx to use servername defined in 'server' pillar and to listen to port 80 # # AGENT: # - Deploy customized configuration files with server fqdn (or 127.0.0.1 on zabbix server) # ############################################################## # zabbix repository zabbix-repo-install: cmd.run: - name: "wget -O /tmp/zabbix-release.deb {{ pillar['zabbix-common']['repo'] }} && dpkg -i /tmp/zabbix-release.deb && apt-get update" - unless: 'dpkg -l | grep zabbix-release' # zabbix server {% if pillar.get('zabbix-server', none) is not none %} zabbix-set-locale: file.line: - name: /etc/locale.gen - match: 'en_US.UTF-8 UTF-8' - mode: replace - content: 'en_US.UTF-8 UTF-8' cmd.run: - name: locale-gen zabbix-set-default-locale: file.line: - name: /etc/default/locale - match: 'LANG=' - mode: replace - content: 'LANG=en_US.UTF-8' zabbix-set_pgsql: file.managed: - name: /usr/local/bin/set_pgsql.sh - source: salt://services/files/set_pgsql.sh - user: root - group: root - mode: 750 zabbix-server-install: pkg.installed: - pkgs: - zabbix-server-pgsql - zabbix-frontend-php - php8.2-pgsql - zabbix-nginx-conf - zabbix-sql-scripts - postgresql-all - require: - cmd: zabbix-repo-install zabbix-postgresql: service.running: - name: postgresql - enable: True - require: - pkg: zabbix-server-install zabbix-db-user-creation: cmd.script: - name: /usr/local/bin/set_pgsql.sh - stateful: True - require: - file: zabbix-set_pgsql - pkg: zabbix-server-install - args: {{ pillar['zabbix-server']['db_name'] }} {{ pillar['zabbix-server']['db_user'] }} {{ pillar['zabbix-server']['db_password'] }} {{ pillar['zabbix-server']['db_script'] }} /etc/zabbix/zabbix_server.conf: file.managed: - source: salt://services/files/zabbix_server.conf - template: jinja - context: DBPassword: {{ pillar['zabbix-server']['db_password'] }} DBName: {{ pillar['zabbix-server']['db_name'] }} DBUser: {{ pillar['zabbix-server']['db_user'] }} - require: - pkg: zabbix-server-install /etc/zabbix/web/zabbix.conf.php: file.managed: - source: salt://services/files/zabbix.conf.php - template: jinja - context: DBPassword: {{ pillar['zabbix-server']['db_password'] }} DBName: {{ pillar['zabbix-server']['db_name'] }} DBUser: {{ pillar['zabbix-server']['db_user'] }} - user: www-data - group: www-data - mode: 600 - require: - pkg: zabbix-server-install zabbix-nginx.conf-port: file.line: - name: /etc/zabbix/nginx.conf - match: '8080' - mode: replace - content: 'listen 80;' - require: - pkg: zabbix-server-install zabbix-nginx.conf-host: file.line: - name: /etc/zabbix/nginx.conf - match: 'example.com' - mode: replace - content: 'server_name {{ pillar['zabbix-common']['server'] }};' - require: - pkg: zabbix-server-install zabbix-nginx-default-config: file.absent: - name: /etc/nginx/sites-enabled/default - require: - pkg: zabbix-server-install zabbix-server: service.running: - enable: True - require: - pkg: zabbix-server-install zabbix-server-nginx: service.running: - name: nginx - enable: True - require: - pkg: zabbix-server-install zabbix-server-php: service.running: - name: php8.2-fpm - enable: True - require: - pkg: zabbix-server-install {% endif %} # zabbix agent {% if pillar.get('zabbix-common', none) is not none %} zabbix-agent-install: pkg.installed: - pkgs: - zabbix-agent2 - require: - cmd: zabbix-repo-install /etc/zabbix/zabbix_agent2.conf: file.managed: - source: salt://services/files/zabbix_agent2.conf - template: jinja - context: {% if pillar.get('zabbix-server', none) is none %} server: {{ pillar['zabbix-common']['server'] }} {% else %} server: 127.0.0.1 {% endif %} - require: - pkg: zabbix-agent-install zabbix-agent2: service.running: - enable: True - require: - file: /etc/zabbix/zabbix_agent2.conf - watch: - file: /etc/zabbix/zabbix_agent2.conf {% endif %} |
As you can see, these state definitions rely on some external files.
zabbix.conf.php : jinja template for zabbix configuration
|
1 2 3 4 5 6 7 8 9 10 11 12 13 14 15 16 17 18 19 20 21 22 23 24 25 26 27 28 29 30 31 32 33 34 35 36 37 |
<?php // Zabbix GUI configuration file. $DB['TYPE'] = 'POSTGRESQL'; $DB['SERVER'] = 'localhost'; $DB['PORT'] = '0'; $DB['DATABASE'] = '{{ DBName }}'; $DB['USER'] = '{{ DBUser }}'; $DB['PASSWORD'] = '{{ DBPassword }}'; // Schema name. Used for PostgreSQL. $DB['SCHEMA'] = ''; // Used for TLS connection. $DB['ENCRYPTION'] = true; $DB['KEY_FILE'] = ''; $DB['CERT_FILE'] = ''; $DB['CA_FILE'] = ''; $DB['VERIFY_HOST'] = false; $DB['CIPHER_LIST'] = ''; // Vault configuration. Used if database credentials are stored in Vault secrets manager. $DB['VAULT'] = ''; $DB['VAULT_URL'] = ''; $DB['VAULT_PREFIX'] = ''; $DB['VAULT_DB_PATH'] = ''; $DB['VAULT_TOKEN'] = ''; $DB['VAULT_CERT_FILE'] = ''; $DB['VAULT_KEY_FILE'] = ''; // Uncomment to bypass local caching of credentials. // $DB['VAULT_CACHE'] = true; // Uncomment and set to desired values to override Zabbix hostname/IP and port. // $ZBX_SERVER = ''; // $ZBX_SERVER_PORT = ''; $ZBX_SERVER_NAME = '{{ grains['host'] }}'; |
zabbix_server.conf: jinja template for Zabbix server configuration
|
1 2 3 4 5 6 7 8 9 10 11 12 13 |
LogFile=/var/log/zabbix/zabbix_server.log PidFile=/run/zabbix/zabbix_server.pid SocketDir=/run/zabbix DBName={{ DBName }} DBUser={{ DBUser }} DBPassword={{ DBPassword }} SNMPTrapperFile=/var/log/snmptrap/snmptrap.log Timeout=20 FpingLocation=/usr/bin/fping Fping6Location=/usr/bin/fping6 LogSlowQueries=3000 StatsAllowedIP=127.0.0.1 EnableGlobalScripts=0 |
zabbix_agent2.conf: jinja template for all Zabbix agents configuration. Note that there is a subtle settings here. If the host use kubernetes persistent volumes (detected with ‘k3s-labels:pv’), all vfs triggers are disabled. I did that because else, Zabbix agent would have mounted the persistent volumes on all nodes at the same same, which would creates corruption on the filesystem (more on persistent volumes later).
|
1 2 3 4 5 6 7 8 9 |
Server={{ server }} ServerActive={{ server }} Hostname={{ grains['host'] }} LogFile=/var/log/zabbix/zabbix_agent2.log PidFile=/run/zabbix/zabbix_agent2.pid PluginSocket=/run/zabbix/zabbix_agent2.sock {% if salt.pillar.get('k3s-labels:pv', none) == 'enabled' -%} DenyKey=vfs.*[*] {% endif %} |
Here is the custom script that handle PostgreSQL database. It it compliant with saltstack’s stateful script requirements:
|
1 2 3 4 5 6 7 8 9 10 11 12 13 14 15 16 17 18 19 20 21 22 23 24 25 26 27 28 29 30 31 32 33 34 35 36 37 38 39 40 41 42 43 44 45 46 47 48 49 50 51 52 53 54 55 56 57 58 59 60 61 62 63 64 65 66 67 68 69 70 71 72 73 74 75 76 77 78 79 80 81 82 83 84 85 |
#!/bin/bash ### GLOBAL VARIABLES ########################### CHANGED="no" COMMENT="" DBNAME="" USER="" PASSWD="" ### FUNCTIONS ################################## Help() { # Display Help echo echo "Unsure a PostgreSQL DB and user exists" echo "Either create it, modify it or do nothing" echo echo "Syntax: $0 <dbname> <user> <password> [sql_script.gz]" echo echo "IMPORTANTS NOTES:" echo " Mind that any givn password can be shown in process list for a short time and can also be storedin bash history" echo } # print a message that can be interpreted by saltstack cmd.script state # $1=exit code ExitMessage() { echo echo "changed=$CHANGED comment='$COMMENT'" exit $1 } ### SCRIPT LOGIC ################################ # check if a record exists in given table return 1 if found # $1: table # $2: field to use for earching (where) # $3: record to search Pg_Record_exists() { table="$1" field="$2" record="$3" sudo -u postgres psql -tc "SELECT 1 FROM $table WHERE $field = '$record'" } # Display help if needed if [[ ($# -lt 3) || $1 == "help" ]] ; then Help exit 2 fi DBNAME="$1" USER="$2" PASSWD="$3" if [[ "$(Pg_Record_exists pg_roles rolname $USER | awk '{print $1}')" -eq 1 ]]; then COMMENT="User $USER already exists." else sudo -u postgres psql -c "CREATE ROLE $USER LOGIN PASSWORD '$PASSWD';" CHANGED="yes" COMMENT="User $USER created." fi if [[ "$(Pg_Record_exists pg_database datname $DBNAME | awk '{print $1}')" -eq 1 ]]; then COMMENT="$COMMENT Database $DBNAME already exists." else sudo -u postgres psql -c "CREATE DATABASE $DBNAME OWNER $USER LOCALE 'en_US.UTF-8' ENCODING UTF8;" CHANGED="yes" COMMENT="$COMMENT Database $DBNAME created." # if an sql script path has been given, try to execute it on the created db if [[ $# -eq 4 ]]; then zcat "$4" | sudo -u $USER psql -q $DBNAME if [[ $? -eq 0 ]]; then COMMENT="$COMMENT given SQL script executed" else COMMENT="$COMMENT failed to execute given SQL script" fi fi fi ExitMessage 0 |
Some tips I noted about Zabbix:
- The default system locale must be set for the Zabbix configuration process to work.
- On the Zabbix server, the agent config file must use the local IP address (server=127.0.0.1). The FQDN does not work (but it works perfectly fine on all other agents…).
- Don’t forget to open the following ports: 10050 (server to agents) and 10051 (agents to server).
I wanted to automatically add all managed hosts to the server right after agent installations using saltext-zabbix, but at the time of writing, it wasn’t working with the current SaltStack version.
I had to add all hosts manually… All in all, Zabbix is probably the least automated part of my homelab. Even the database restore and configuration deployment are manual. I probably need to work on that, but I found Zabbix not to be at a “cloud-ready” level yet (no “as code” configuration).
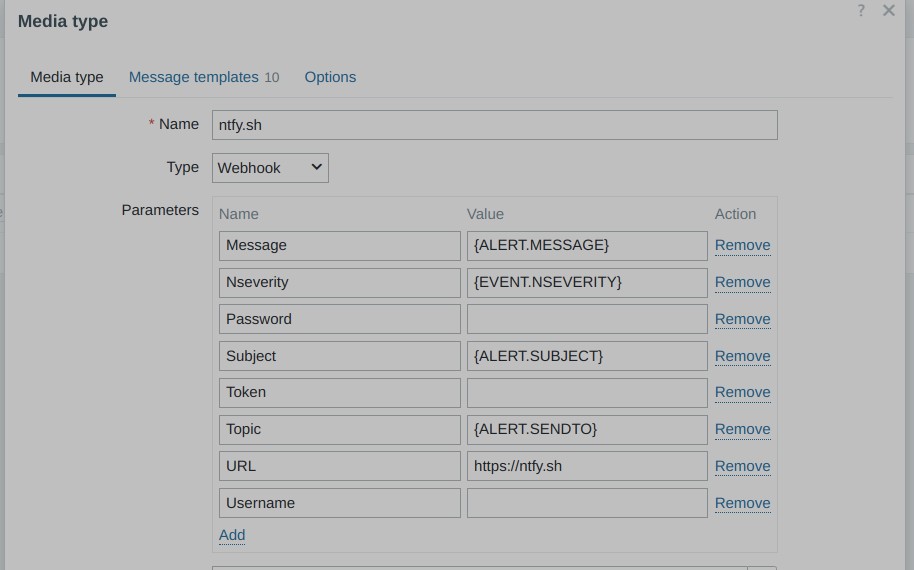
Ntfy as notification solution
A good monitoring solution is of limited use without a reliable notification mechanism. This is where ntfy comes into play.
Ntfy is a simple, free way to send and receive notifications on your smartphone. The usage is straightforward: just push a string via HTTP to a dedicated channel, and you can instantly receive the string on your smartphone.
Of course, the default free and cloud-based approach has limited security protection, but it meets the requirements for a home lab.
To pair it with Zabbix, a specific “mediatype” must be imported. You can find this in the following GitHub repository: torgrimt/zabbix-ntfy: Mediatype to add support for ntfy.sh services.
However, I found that the configuration of Ntfy’s mediatype in Zabbix is not well explained:
| Field | Comment |
|---|---|
| URL | Must contain the URL to the Ntfy server without “http://” or “https://”. For example, “ntfy.sh” is valid, but “https://ntfy.sh” is not valid. |
| Password, Token and Username | These fields must be empty if not needed. By “empty,” I mean nothing—remove even the macro reference if not used (even if the macro is empty). |
| Topic | Must contain the topic you want to use on the Ntfy server without any “/” character. |
Backup strategy
Because most things are defined “as code” and based on a desired state approach, my backup needs are lightweight and very targeted: “live” data.
I actually have three types of “live” data to back up:
- User files, hosted on a NAS (more on that later).
- Zabbix database: I haven’t yet found an elegant way to back up and restore automatically via states. For now, I do a simple “pg_dump” from time to time (I’m mostly interested in backing up the configuration more than data history).
- Kubernetes persistent volumes: This is what I will detail below.
My goal was to follow a KISS approach to make it easy to recover data in any circumstance. I mean “agnostic”: even if I had to change the infrastructure logic, hardware, containers, hypervisor, operating system, etc.
To achieve this, I based my implementation on ZFS volumes (prefixed by “pv_” for “Persistent Volumes”):
- Any “pv” is a ZFS volume created on all Proxmox nodes and mounted on all Kubernetes nodes.
- “pv” volumes are synchronized using “pvesync” at the hypervisor level.
- All “pv” volumes are backed up from node-1 (which has NL disks) by simply mounting them in read-only mode and creating a tar.gz archive.
- I keep 7 rolling backups for each volume.
More details on how these persistent volumes are handled are in the K3s chapter below.
Regarding the synchronization of ZFS volumes, “pvesync” works with a master/slave logic. In other words, it doesn’t handle bi-directional synchronization. This can be a problem because Kubernetes pods can freely move from one node to another. So, it’s necessary to determine which host holds the “master” ZFS volume in order to initiate synchronization accordingly.
After some research, I found that the best way to determine the “master” volume from the hypervisor was by checking the “bytes written” property of the ZFS volume. I based the selection of the “master” volume on the node where the ZFS volume has the highest “bytes written” value.
Here is the script. It determines the master node and then launches the synchronization if needed:
|
1 2 3 4 5 6 7 8 9 10 11 12 13 14 15 16 17 18 19 20 21 22 23 24 25 26 27 28 29 30 31 32 33 34 35 36 37 38 39 40 41 42 43 44 45 46 47 48 49 50 51 52 53 54 55 56 57 58 59 60 61 62 63 64 65 66 67 68 69 70 71 72 73 74 75 76 77 78 79 80 81 82 83 84 85 86 87 88 89 90 91 92 93 94 95 96 97 98 99 100 101 102 103 104 105 106 107 108 109 |
#!/bin/bash source /usr/local/bin/set_common.sh ### GLOBAL VARIABLES ########################### VOLUME_PREFIX="pv_" declare -A PV ### FUNCTIONS ################################## Help() { # Display Help echo echo "Syncronize all zfs volume that begin with '$VOLUME_PREFIX' with all given hosts" echo "All hosts are scanned and the source of each volume is determined by checking bytes written." echo echo "The host on which a volume has the highest number of written bytes is considered as the source." echo "All others hosts will be considered as destinations on which data must be updated" echo "If not change has been made on the volume, no operation is done" echo echo "This command depends on pve-zsync, it must be present and no check is done for that" echo echo "for each found volumes, the output will be:" echo "datetime volume written source_host status". echo "" echo "examples". echo "2024-11-09T19:01:02,506680931+01:00 zfs-storage/pv_myvolume 10.0.0.1=674537 / 10.0.0.1=7656 / => 10.0.0.1 OK". echo "2024-11-09T19:01:02,506680931+01:00 zfs-storage/pv_myvolume 10.0.0.1=0 / 10.0.0.2=0 no_change OK". echo echo "status can be: OK, ERROR or SKIPPED (if source is not localhost)" echo echo "Syntax: $0 <host1> <host2> [host3 [...]]" echo } # $1 = zfs volume # $2 = prefix GetZFSSnapshots() { prefix="$2" $prefix zfs list -H -t snapshot -o name -s creation | \grep "$1" } ### SCRIPT LOGIC ################################ # Display help if needed if [[ ($# -lt 2) || $1 == "help" ]] ; then Help exit 2 fi # scan all zfs volume used as pv for pv_path in $(zfs list -H | \grep pv_ | awk '{print $1}') do echo -n "$(date -Ins) $pv_path " lastWrittenValue=0 sourceHost="" # get amount of written bytes on all servers and set source host regarding the highest bytes written value for current_host in "$@" do # if not localhost, call command throught ssh prefix="" if [[ $(hostname --all-ip-addresses || hostname -I) != *"$current_host"* ]]; then prefix="ssh $current_host" fi # if this current scanned host has more written bytes for this volume, consider it as source written=$($prefix zfs get -H -p written $pv_path | awk '{print $3}') if [[ $written -gt $lastWrittenValue ]]; then sourceHost=$current_host fi echo -n "$current_host=$written / " lastWrittenValue=$written PV[$current_host]=$written done # if source host has not been determined, it means that no bytes have been written since the previous sync if [[ -z "${sourceHost}" ]]; then echo "=> no_change OK" continue else #echo -n "${PV[$sourceHost]} $sourceHost" echo -n "=> $sourceHost " fi # sync to all sources if sourceHost is localhost if [[ $(hostname --all-ip-addresses || hostname -I) == *"$sourceHost"* ]]; then for current_host in "$@" do if [[ $current_host != $sourceHost ]]; then # Synchronise from source to destination pve-zsync sync --source $pv_path --dest $current_host:$(dirname $pv_path) --maxsnap 5 if [[ $? -eq 0 ]]; then echo " OK" else echo " ERROR" fi fi done else echo " SKIPPED" fi done exit 0 |
This script runs every 5 minutes on each defined “pvhost” pillars (see bellow), which is acceptable for me as I have very few write operations on my containers. The probability of losing data because a pod might have been moved just after a write operation but before the next synchronization is very low. Through, I still have the opportunity to go as low as a sync every minute.
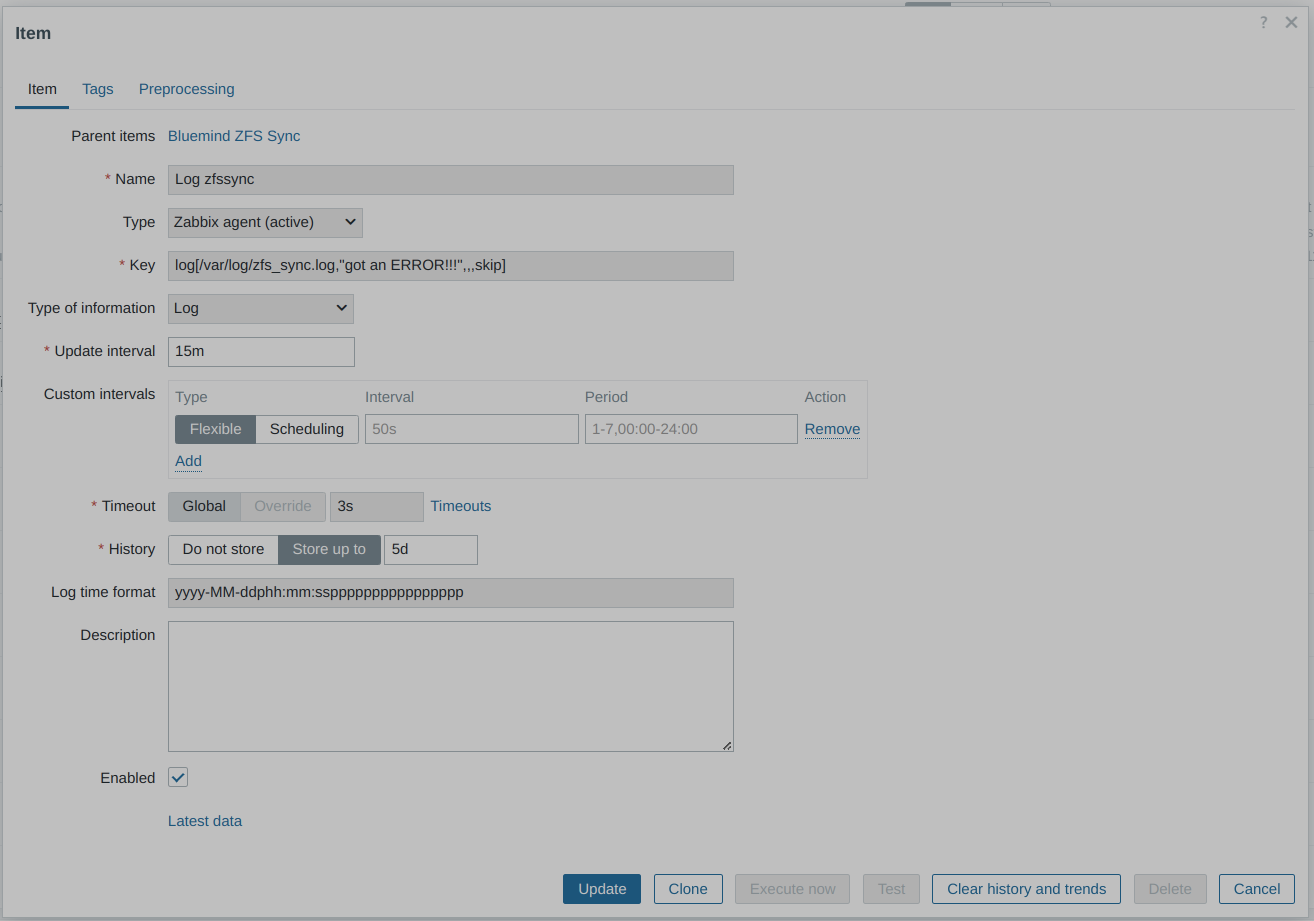
Even though it works very well, such a mechanism must be properly monitored to quickly detect any errors (e.g., network failure). Each call of the script logs the results in a file ( /var/log/zfs_sync.log).
I created a dedicated Zabbix item and trigger to be sure I’m alerted by Ntfy in case of error:
After several months in production, I’ve never lost anything and haven’t experienced any filesystem corruption (I use ext4 on top of ZFS volumes). However, I did encounter some errors—not due to the mechanism itself, but because of the USB network adapter dedicated to the replication network on one of the nodes. This adapter is sometimes reset by the kernel.
Last but not least, persistent volumes are automatically created by states and defined in pillar values. I created another script to handle their creation. This script also takes care of automatically restoring any backup during the creation process. So, again, if I deleted everything, SaltStack will recreate all volumes with their latest available data.
Here is how I define a persistent volume in pillar:
|
1 2 3 4 5 6 7 8 9 10 11 12 13 14 15 16 17 18 19 20 21 22 23 24 25 26 27 28 29 30 31 32 33 34 35 36 37 38 39 40 41 42 43 44 45 46 47 48 49 50 51 52 53 54 |
############################################################## # Define zfs volumes to be used as persistents volumes in k3s # size is in Gb # scsiid must be unique for each volume ############################################################## pvdef: mariadb: zfsmountpoint: zfs-storage size: 4 fstype: ext4 scsiid: 1 ############################################################## # Define zfs volumes to be used as persistents volumes in k3s # size is in Gb # scsiid must be unique for each volume ############################################################## pvdef: mariadb: zfsmountpoint: zfs-storage size: 4 fstype: ext4 scsiid: 1 mariadbbackup: zfsmountpoint: zfs-storage size: 1 fstype: ext4 scsiid: 5 ############################################################## # list of hosts ip addresses on which all persistents volumes # must be synchronized through pve-zsync using zfs_sync.sh # ipaddr: ip address used for zfs to send / receive sync data # cronsync: cronexpression at which the host execute zfs_sync.sh # # WARNING: be sure that no host launch the sync at the same time ! # ############################################################## pvhosts: hulk-1: ipaddr: 10.0.0.1 cronsync: '0-59/10 * * * *' hulk-2: ipaddr: 10.0.0.2 cronsync: '5-59/10 * * * *' ############################################################## # list of persistants volumes and their Virtual Machine # attachement (ID) ############################################################## pvmap: mariadb: 1200 mariadbbackup: 1200 |
How states handle the creation:
|
1 2 3 4 5 6 7 8 9 10 11 12 13 14 15 16 17 18 19 20 21 22 23 24 25 26 27 28 |
# handle k3s persistent volumes creation {% if pillar.get('pvmap', none) is not none %} {% for app in pillar['pvmap'] %} pv_{{ app }}_{{ grains['host'] }}: cmd.script: - name: /usr/local/bin/set_zfspv.sh - stateful: True - args: > zfsmountpoint={{ pillar['pvdef'][app]['zfsmountpoint'] }} appname={{ app }} size={{ pillar['pvdef'][app]['size'] }} fstype={{ pillar['pvdef'][app]['fstype'] }} vmid={{ pillar['pvmap'][app] }} scsiid={{ pillar['pvdef'][app]['scsiid'] }} # try to restore a backup if persistent volume has just been created {% if pillar.get('has_nas_storage', false) is true %} pv_{{ app }}_{{ grains['host'] }}_restore: cmd.run: - names: - /usr/local/bin/nas.sh restore {{ pillar['pvdef'][app]['zfsmountpoint'] }} pv_{{ app }} - /usr/local/bin/zfs_sync.sh {% for pvhost in pillar['pvhosts'] %}{{ pvhost }} {% endfor %} >> /var/log/zfs_sync.log - onchanges: - cmd: pv_{{ app }}_{{ grains['host'] }} {% endif %} {% endfor %} {% endif %} |
How the states ensure ZFS persistent volumes are synchronized:
|
1 2 3 4 5 6 7 8 9 10 11 12 13 14 15 16 17 18 19 20 21 22 23 24 25 26 27 |
{% if pillar.get('pvhosts', none) is not none %} {% set currentlocalhost = grains['localhost'] %} iac_zfssync_packages: pkg.installed: - pkgs: - pve-zsync iac_zfssync_cmd: file.managed: - names: - /usr/local/bin/zfs_sync.sh: - source: salt://iac_backend/files/zfs_sync.sh - mode: 750 - /etc/logrotate.d/zfs_sync: - source: salt://iac_backend/files/zfs_sync.logrotate - mode: 644 iac_zfssync_cronjob: schedule.present: - function: cmd.run - job_args: - '/usr/local/bin/zfs_sync.sh {% for pvhost in pillar['pvhosts'] %}{{ pillar['pvhosts'][pvhost]['ipaddr'] }} {% endfor %} >> /var/log/zfs_sync.log' - maxrunning: 1 - cron: '{{ pillar['pvhosts'][currentlocalhost]['cronsync'] }}' {% endif %} |
The script beneath the states (/usr/local/bin/set_zfspv.sh, which is statefull compliant):
|
1 2 3 4 5 6 7 8 9 10 11 12 13 14 15 16 17 18 19 20 21 22 23 24 25 26 27 28 29 30 31 32 33 34 35 36 37 38 39 40 41 42 43 44 45 46 47 48 49 50 51 52 53 54 55 56 57 58 59 60 61 62 63 64 65 66 67 68 69 70 71 72 73 74 75 76 77 78 79 80 81 82 83 84 85 86 87 88 89 90 91 92 93 94 95 96 97 98 99 100 101 102 103 104 105 106 107 |
#!/bin/bash source /usr/local/bin/set_common.sh ### GLOBAL VARIABLES ########################### VOLUME_PREFIX="pv_" MANDATORY="zfsmountpoint appname size fstype vmid scsiid" ### FUNCTIONS ################################## Help() { # Display Help echo echo "Unsure a ZFS volume for kubernetes PV exists and is provided to guest VM" echo "Either create and provide it, or do nothing" echo echo "Syntax: $0 parameter1=value1 paramter2=value2 ..." echo echo "where valid parameters are (all are mandatory):" echo " zfsmountpoint: root zfs mountpoint on which to create the volume" echo " appname: name of the application in kubernetes (eg. mariadb)" echo " size: size of the volume (eg. 8 for 8 Gigabytes)" echo " fstype: filesystem to use to format the partition (eg. ext4)" echo " vmid: VMID of the VM to which the volume must be added" echo " scsiid: SCSI disk number to use on guest VM (eg. 1 for scsi1) " echo } ### SCRIPT LOGIC ################################ # Display help if needed if [[ ($# -lt 6) || $1 == "help" ]] ; then Help exit 2 fi ParseParameters "$@" CheckMandatory ZFSVolumePath="${arguments['zfsmountpoint']}/${VOLUME_PREFIX}${arguments['appname']}" ZFSBlockDevice="/dev/zvol/$ZFSVolumePath" ZFSBlockDevicePart1="${ZFSBlockDevice}-part1" MkfsCMD="mkfs.${arguments['fstype']}" ProductName="${VOLUME_PREFIX}${arguments['appname']}" # create volume, partition and format it if not exists if [[ ! -b "$ZFSBlockDevice" ]]; then # Create ZFS volume zfs create -V ${arguments['size']}G $ZFSVolumePath if [[ ! $? -eq 0 ]]; then CHANGED="no" COMMENT="Error creating zfs volume $ZFSVolumePath" ExitMessage 1 fi # create one partition the volume while [ ! -b "$ZFSBlockDevice" ]; do sleep 1 done parted "$ZFSBlockDevice" -- mklabel msdos parted -a minimal "$ZFSBlockDevice" -s -- mkpart primary 0 -1 if [[ ! $? -eq 0 ]]; then CHANGED="no" COMMENT="Error creating partition on zfs volume ${VOLUME_PREFIX}${arguments['appname']}" ExitMessage 1 fi # format the new partition when it appears while [ ! -b "$ZFSBlockDevicePart1" ]; do sleep 1 done sleep 2 # still need to wait a bit for the part to settle $MkfsCMD "$ZFSBlockDevicePart1" if [[ ! $? -eq 0 ]]; then CHANGED="no" COMMENT="Error with $MkfsCMD $ZFSBlockDevicePart1" ExitMessage 1 fi CHANGED="yes" COMMENT="$ZFSVolumePath created." else CHANGED="no" COMMENT="$ZFSVolumePath already exists." fi # add volume as disk to the guest VM if [[ "$(qm config ${arguments['vmid']} | grep ${arguments['appname']})" != *"${arguments['appname']},"* ]]; then qm set ${arguments['vmid']} --scsi${arguments['scsiid']} $ZFSBlockDevice,ssd=1,product="$ProductName" if [[ ! $? -eq 0 ]]; then CHANGED="no" COMMENT="Error adding $ZFSBlockDevice as scsi${arguments['scsiid']} on VM ${arguments['vmid']}" ExitMessage 1 fi CHANGED="yes" COMMENT="$COMMENT Disk scsi${arguments['scsiid']} added to VM ${arguments['vmid']}" else CHANGED="no" COMMENT="$COMMENT Guest ${arguments['vmid']} already use it" fi # print saltstack readble message then exit with success ExitMessage 0 |
You can also see a call to a script named “/usr/local/bin/nas.sh”, it will be detailled later.
Automatic updates
As of writing, all my LXC and virtual machines are based on Debian 12. Thus I deployed unnattended upgrade on all of hosts via a simple state, based on the official documentation:
|
1 2 3 4 5 6 7 8 9 10 11 12 13 14 15 |
autoupdate_packages_debian: pkg.installed: - pkgs: - unattended-upgrades - apt-listchanges /etc/apt/apt.conf.d/52unattended-upgrades-local: file.managed: - source: salt://sysadmin/files/52unattended-upgrades-local - mode: 640 /etc/apt/apt.conf.d/02periodic: file.managed: - source: salt://sysadmin/files/apt_conf_02periodic - mode: 640 |
However, I choosed not to apply automated upgrade on Proxmox nodes as it may cause serious issues due to breaking changes (eg. change in network cards names).
Real life use cases
NAS
As explained previously, one of the nodes (node-1) has two 8-terabyte hard drives. The main purpose is to build a NAS, primarily to offer Samba shares that host music, movies, office files, backups, etc.
One disk is “live,” and the other is used solely as a mirror/backup. The mirror disk is switched off most of the time and is even removed when I leave home for more than two days.
The mirroring is handled on the hypervisor side with the help of a custom script. This script also manages ZFS persistent volume backups and restores, and it can generate email reports.
|
1 2 3 4 5 6 7 8 9 10 11 12 13 14 15 16 17 18 19 20 21 22 23 24 25 26 27 28 29 30 31 32 33 34 35 36 37 38 39 40 41 42 43 44 45 46 47 48 49 50 51 52 53 54 55 56 57 58 59 60 61 62 63 64 65 66 67 68 69 70 71 72 73 74 75 76 77 78 79 80 81 82 83 84 85 86 87 88 89 90 91 92 93 94 95 96 97 98 99 100 101 102 103 104 105 106 107 108 109 110 111 112 113 114 115 116 117 118 119 120 121 122 123 124 125 126 127 128 129 130 131 132 133 134 135 136 137 138 139 140 141 142 143 144 145 146 147 148 149 150 151 152 153 154 155 156 157 158 159 160 161 162 163 164 165 166 167 168 169 170 171 172 173 174 175 176 177 178 179 180 181 182 183 184 185 186 187 188 189 190 191 192 193 194 195 196 197 198 199 200 201 202 203 204 205 206 207 208 209 210 211 212 213 214 215 216 217 218 219 220 221 222 223 |
#!/bin/bash ### GLOBAL VARIABLES ########################### LOG_TMP_FILE="/tmp/nas_last_sync.log" SYNC_SOURCE="/nas-storage" SYNC_DEST="/nas-mirror" BACKUP_DIR="$SYNC_SOURCE/backup" DATE_FORMAT="/bin/date +%d.%m.%Y-%H:%M:%S" SUBJECT_SYNC="NAS Sync result" SUBJECT_REPORT="NAS storage report" SUBJECT_BACKUP="NAS zfs pv_* backup" SUBJECT_RESTORE="NAS zfs pv_* restore" MIRROR_DISK_LABEL="NAS-MIRROR" VOL_TO_RESTORE="" ZFS_POOL="" BACKUP_NB=4 NL=$'\n' ### FUNCTIONS ################################## Help() { # Display Help echo echo "Perform NAS operations on NL disks" echo echo "Syntax: $0 <command>" echo "where command can be" echo "- sync: launch disks synchdonisation" echo "- report: build usage report and send it" echo "- backup: backup all zfs pv_* volumes to $BACKUP_DIR" echo "- restore <zfs pool> <vol>: restore content of vol from $BACKUP_DIR" echo "- help: display this message" echo } # send a email to sysadmin # $1 = subject # $2 = content (string or file) mailadmin() { if [ -f "$2" ]; then mail -s "$1" root < "$2" else echo "$2" | mail -s "$1" root fi } # umount, send mail then exit with given code # $1 = exit code # $2 = path to umount # $3 = subject # $4 = content (string or file) mailandexit() { if [[ ! -z "$2" ]];then umount -q $2 fi mailadmin "$3" "$4" exit $1 } # snychornize nas-storage to nas-mirror if disk is present Sync() { if [ -e /dev/disk/by-label/$MIRROR_DISK_LABEL ] ; then mount -v $SYNC_DEST > "$LOG_TMP_FILE" 2>&1 echo "---------------------------------------------------------" >> "$LOG_TMP_FILE" rsync -a -v --delete-after $SYNC_SOURCE/ $SYNC_DEST/ | awk '{ print "['$($DATE_FORMAT)'] " $0 }' >> "$LOG_TMP_FILE" 2>&1 echo "---------------------------------------------------------" >> "$LOG_TMP_FILE" umount -v $SYNC_DEST >> "$LOG_TMP_FILE" 2>&1 mailadmin "$SUBJECT_SYNC" "$LOG_TMP_FILE" fi } # generate a simple usage report of nas storage Report() { message="$(df -h $SYNC_SOURCE)" message="$message$NL --------------------------------------------------------------$NL" for dir in $(ls $SYNC_SOURCE) do message="$message $(du -h -d 1 $SYNC_SOURCE/$dir)$NL$NL" done mailadmin "$SUBJECT_REPORT" "$message" } # backup all zfs pv_* vol backup_zfspv() { message="ZFS pv_* backup:$NL" message="$message --------------------------------------------------------------$NL" for pv_path in $(zfs list -H | \grep pv_ | awk '{print $1}') do mountpath="/dev/zvol/${pv_path}-part1" base="$(basename $pv_path)" filename="$base-$(date -I).tar.gz" message="$message $filename " # do nothing if backup destination already exists if [[ -f "$BACKUP_DIR/$filename" ]]; then message="$message INFO: file already exists $NL" continue fi # mount the source to backup mkdir -p /media/$pv_path mount -o ro $mountpath /media/$pv_path if [[ ! $? -eq 0 ]]; then message="$message ERROR: could not mount $mountpath $NL" continue fi # if volume is empty, do nothing if [[ $(ls /media/$pv_path | wc -l) -lt 2 ]] then message="$message INFO: empty source, nothing done $NL" umount /media/$pv_path continue fi # do the backup cd /media/$pv_path tar -czf "$BACKUP_DIR/$filename" * if [[ ! $? -eq 0 ]]; then message="$message ERROR: creating tar.gz archive on $BACKUP_DIR $NL" umount /media/$pv_path continue fi # report size message="$message$(du -h "$BACKUP_DIR/$filename" | awk '{print $1}') $NL" cd .. umount /media/$pv_path if [[ $? -eq 0 ]]; then rmdir /media/$pv_path fi # if there are more backup files than BACKUP_NB, delete the oldest if [[ $(ls $BACKUP_DIR/$base* | wc -l) -gt $BACKUP_NB ]] then file_to_delete=$(ls $BACKUP_DIR/$base* | sort | head -1) rm $file_to_delete fi done mailadmin "$SUBJECT_BACKUP" "$message" } # restore a given zfs volume restore_zfspv() { if [[ -z "$VOL_TO_RESTORE" || -z "$ZFS_POOL" ]]; then Help exit 0 fi message="Restore $VOL_TO_RESTORE:$NL" message="$message --------------------------------------------------------------$NL" # get lastest backup if any file_to_restore=$(ls $BACKUP_DIR/$VOL_TO_RESTORE* 2>/dev/null | sort -r | head -1) if [[ ! -f $file_to_restore ]]; then message="$message INFO: no backup found in $BACKUP_DIR" mailandexit 0 "" "$SUBJECT_RESTORE" "$message" fi # mount vol to restore mountpath="/dev/zvol/${ZFS_POOL}/${VOL_TO_RESTORE}-part1" mkdir -p /media/$VOL_TO_RESTORE mount $mountpath /media/$VOL_TO_RESTORE if [[ ! $? -eq 0 ]]; then message="$message ERROR: could not mount $mountpath" mailandexit 1 /media/$VOL_TO_RESTORE "$SUBJECT_RESTORE" "$message" fi # if volume not empty, do nothing if [[ $(ls /media/$VOL_TO_RESTORE | wc -l) -gt 2 ]] then message="$message WARN: target not empty, nothing done $NL" mailandexit 0 /media/$VOL_TO_RESTORE "$SUBJECT_RESTORE" "$message" fi # restore message="$message $(tar -zxvf $file_to_restore -C /media/$VOL_TO_RESTORE/)$NL$NL" if [[ ! $? -eq 0 ]]; then message="$message ERROR: could not restore $file_to_restore" mailandexit 1 /media/$VOL_TO_RESTORE "$SUBJECT_RESTORE" "$message" fi # umount umount /media/$VOL_TO_RESTORE if [[ $? -eq 0 ]]; then rmdir /media/$VOL_TO_RESTORE fi message="$message restored $file_to_restore into $mountpath $NL" mailadmin "$SUBJECT_RESTORE" "$message" } ### SCRIPT LOGIC ################################ case "$1" in sync) Sync ;; report) Report ;; backup) backup_zfspv ;; restore) ZFS_POOL="$2" VOL_TO_RESTORE="$3" restore_zfspv ;; *) Help ;; esac |
In additions, most important files are also synchronized on Onedrive which is monitored via a custom log item plus a trigger in Zabbix for the file “/var/log/onedrive”
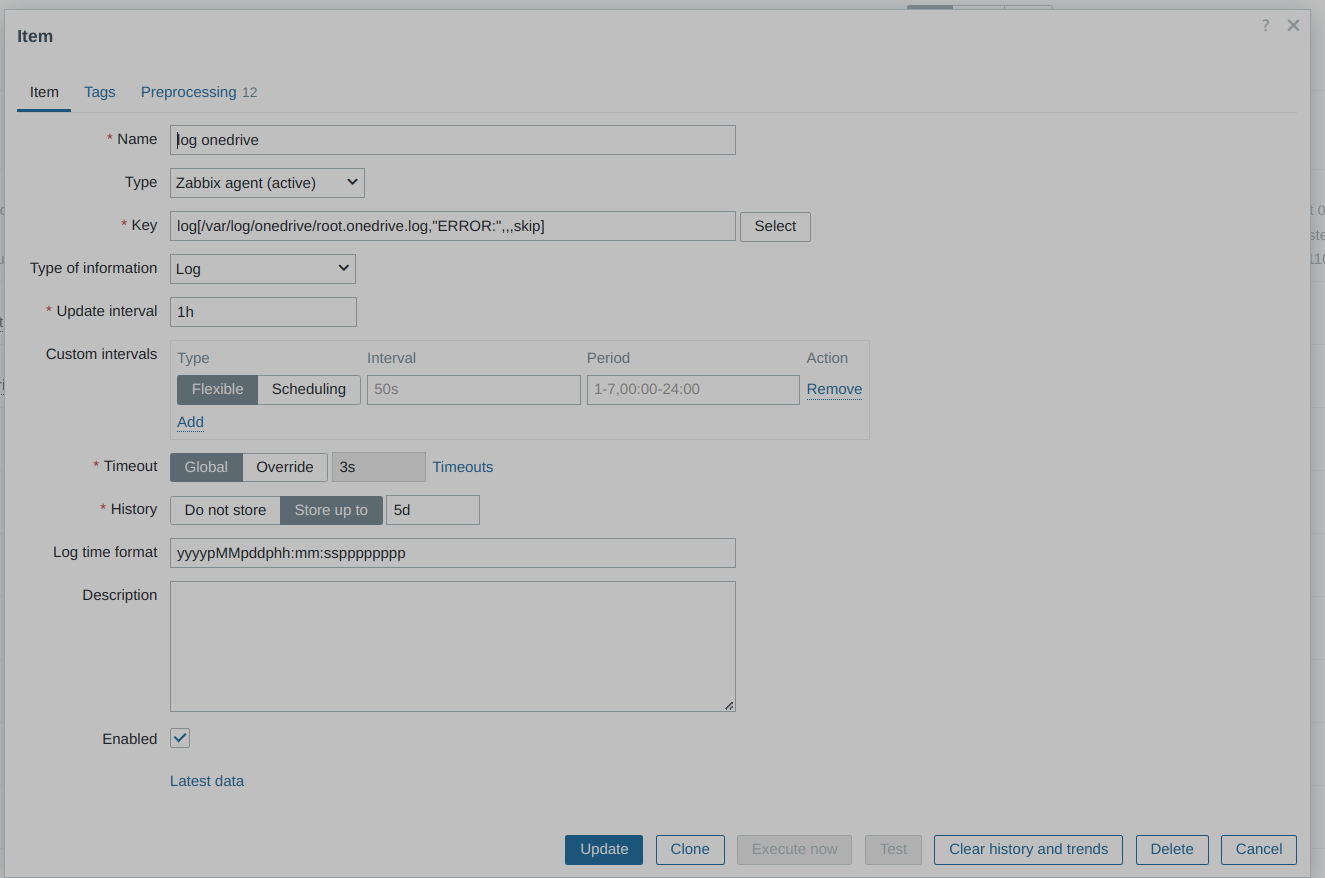
The NAS service itself is provided by a dedicated LXC on node-1. This LXC uses the “online” hard disk to provides SMB shares on a VLAN dedicated to users. Users confguration has been covered in the previous chapter “Users management”.
The state that configure the LXC is pretty simple:
|
1 2 3 4 5 6 7 8 9 10 11 12 13 14 15 16 17 18 19 20 21 22 23 24 25 26 27 28 29 30 31 32 33 34 35 36 37 |
# source : https://wiki.archlinux.fr/Samba + https://wiki.debian.org/Avahi # install samba filesrv_packages: pkg.installed: - pkgs: - samba - avahi-daemon - wsdd # custom configuration file /etc/samba/smb.conf: file.managed: - source: salt://services/files/smb.conf - user: root - group: root - mode: 644 # ensure service is active and running smbd: service.running: - enable: True - watch: - file: /etc/samba/smb.conf nmbd: service.running: - enable: True - watch: - file: /etc/samba/smb.conf wsdd: service.running: - enable: True avahi-daemon: service.running: - enable: True |
Reverse proxy and WAF
As explained later, I have a Kubernetes cluster on which some exposed services are running. These services are behind an Nginx server that serves as a reverse proxy, SSL offloading, and a web application firewall thanks to NAXSI.
Nginx is fully deployed on a dedicated LXC running on node-2 via a couple of states.
Below is an example of pillar values to set up Nginx. Crypto keys are encrypted with GPG:
|
1 2 3 4 5 6 7 8 9 10 11 12 13 14 15 16 17 18 19 20 21 22 23 24 25 26 27 28 29 30 31 32 33 34 35 36 37 38 39 40 41 42 43 44 45 46 47 48 49 50 51 52 53 54 55 56 57 58 59 60 61 |
#!jinja|yaml|gpg ############################################################## # reverse proxy configuration with in-memory cache # secrets are encrypted with GPG # # rproxy_conf : # - ssl_certificate and ssl_certificate_key are GPG encrypted data for let's encrypt. Wildcard certificate is assumed (same for all sites) # # rproxy_sites: # - type: used for specific settings and naxsi rules file name naxsi_<type>.rules # ############################################################## rproxy_conf: naxsi_package: https://github.com/wargio/naxsi/releases/download/1.6/debian-bookworm-libnginx-mod-http-naxsi_1.6_amd64.deb worker_connections: 512 # maximum number of simultaneous connections that can be opened by a worker process resolver: aaa.bbb.ccc.ddd # ip address of dns server to use to resolve backend fqdn cache_max_age: 14d # delete file older than x days cache_max_size: 400m # maximum size the cache can take () dh4096: | -----BEGIN PGP MESSAGE----- [...] -----END PGP MESSAGE----- ssl_certificate: | -----BEGIN PGP MESSAGE----- [...] -----END PGP MESSAGE----- ssl_certificate_key: | -----BEGIN PGP MESSAGE----- [...] -----END PGP MESSAGE----- rproxy_certbot: rsa-key-size: 4096 cert-name: all-sites email: registered@email.com domains: www.mydomain.com,www.myother-domain.org deploy-hook: systemctl restart nginx rproxy_sites: mydomain.com: type: wordpress cache_static_files: enabled cache_dynamic_files: enabled backends: - k3s-master-1.local.lan:8001 - k3s-master-2.local.lan:8001 myother-domain.org: type: wordpress cache_static_files: enabled cache_dynamic_files: enabled backends: - k3s-master-1.local.lan:8002 - k3s-master-2.local.lan:8002 |
And here it the state file:
|
1 2 3 4 5 6 7 8 9 10 11 12 13 14 15 16 17 18 19 20 21 22 23 24 25 26 27 28 29 30 31 32 33 34 35 36 37 38 39 40 41 42 43 44 45 46 47 48 49 50 51 52 53 54 55 56 57 58 59 60 61 62 63 64 65 66 67 68 69 70 71 72 73 74 75 76 77 78 79 80 81 82 83 84 85 86 87 88 89 90 91 92 93 94 95 96 97 98 99 100 101 102 103 104 105 106 107 108 109 110 |
############################################################## # Deploy everything that is required to run nginx as a reverseproxy + waf + cache: # - needed packages # - external deb package for naxsi extention # - custom config for nginx service in order to create /run/nginx directory for tmpfs caching # - install naxsi rules files and cache configurations # - make custom nginx config file regarding pillar values # - set let's encrypt required certiitates file based on pillar GPG encrypted values # - create site configuration file for each site declared in pillar # - set a cronjob that runs certbot everyday to try to renew the wildcards certificate ############################################################## # install packages rproxy_packages: pkg.installed: - pkgs: - nginx - certbot - python3-certbot-nginx # install naxsi extention, assume debian host rproxy_sources_packages: cmd.run: - name: wget {{ pillar['rproxy_conf']['naxsi_package'] }} -O /root/naxsi.deb && dpkg -i /root/naxsi.deb && rm /root/naxsi.deb - unless: test -f /usr/lib/nginx/modules/ngx_http_naxsi_module.so # tune systemd nginx service config rproxy_systemd_config: file.managed: - name: /etc/systemd/system/nginx.service.d/custom-service.conf - source: salt://services/files/rproxy/custom-service.conf - makedirs: True # install available naxsi rules rproxy_naxsi_rules: file.recurse: - name: /etc/nginx/naxsi-rules - source: salt://services/files/rproxy/naxsi-rules # install available reverse proxy cache configurations rproxy_cache_conf: file.recurse: - name: /etc/nginx/reverse-conf - source: salt://services/files/rproxy/reverse-conf # deploy nginx configuration rproxy_conf: file.managed: - name: /etc/nginx/nginx.conf - source: salt://services/files/rproxy/nginx.conf - template: jinja - context: worker_connections: {{ pillar['rproxy_conf']['worker_connections'] }} resolver: {{ pillar['rproxy_conf']['resolver'] }} cache_max_age: {{ pillar['rproxy_conf']['cache_max_age'] }} cache_max_size: {{ pillar['rproxy_conf']['cache_max_size'] }} # let's encrypte cert files rproxy_dh4096: file.managed: - name: /etc/nginx/dh4096.pem - contents: |- {{ pillar['rproxy_conf']['dh4096'] | indent(8) }} rproxy_fullchain: file.managed: - name: /etc/letsencrypt/live/all-sites/fullchain.pem - makedirs: True - contents: |- {{ pillar['rproxy_conf']['ssl_certificate'] | indent(8) }} rproxy_privkey: file.managed: - name: /etc/letsencrypt/live/all-sites/privkey.pem - makedirs: True - contents: |- {{ pillar['rproxy_conf']['ssl_certificate_key'] | indent(8) }} # generate config files for each declared site {% for site in pillar['rproxy_sites'] %} rproxy_site_{{ site }}: file.managed: - name: /etc/nginx/sites-enabled/{{ site }}.conf - source: salt://services/files/rproxy/sites-enabled.conf - makedirs: True - template: jinja - context: site: {{ site }} {% endfor %} # ensure nginx is running rproxy_service: service.running: - name: nginx - enable: True - restart: True - watch: - file: /etc/nginx/nginx.conf - file: /etc/nginx/sites-enabled/* # auto renew let's encrypt certificate rproxy_certbot: schedule.present: - function: cmd.run - job_args: - 'certbot --nginx --agree-tos --hsts --staple-ocsp --rsa-key-size {{ pillar['rproxy_certbot']['rsa-key-size'] }} --cert-name {{ pillar['rproxy_certbot']['cert-name'] }} --email {{ pillar['rproxy_certbot']['email'] }} --domains {{ pillar['rproxy_certbot']['domains'] }}' - maxrunning: 1 - cron: '0 5 * * *' |
I’m not going to share all my nginx configuration files, but as you can see I use a generic “site-enabled.conf” which is a jinja template.
k3s cluster
Create the cluster
If you’ve managed to read the previous chapters and reached this line, you probably already know how my K3S cluster is deployed and configured: via states and pillar values.
Node-1 and node-2 are primarily used to host services that require high performance or persistence. Node-3 can handle smaller workloads but, more importantly, serves as a third Etcd instance. While it’s not mandatory with K3s, it provides additional security.
Below is a compilation of all the pillar values needed to configure the cluster. Of course, they must be distributed across several files to assign values to specific hosts (e.g., first master, simple node, etc.).
Pillar values :
|
1 2 3 4 5 6 7 8 9 10 11 12 13 14 15 16 17 18 19 20 21 22 23 24 25 26 27 28 29 30 31 32 33 |
############################################################## # k3s common settings for all nodes ofthe cluster # url: base url where to get k3s binaries from # test: file to check to choose weither k3s install should be done # tocken: gpg encrypted needed token to join the cluster # echo -n 'value to encrypt' | gpg --homedir /etc/salt/gpgkeys --trust-model always -ear unique_ear_key ############################################################## k3s-common: url: https://get.k3s.io test: test -x /usr/local/bin/k3s token: | -----BEGIN PGP MESSAGE----- [...] -----END PGP MESSAGE----- ############################################################## # k3s first master of the cluster. # A server (not lxc) must exists on local.lan # # Any other node of the cluster will first have to connect to this one # Install: command to run in order to deploy k3s on this master node ############################################################## k3s-master: install: sh -s - server --cluster-init --write-kubeconfig-mode=644 --tls-san k3s-master-1.local.lan ############################################################## # k3s master definition for all nodes. # # master: fqdn of the first k3s master ############################################################## k3s-node: master: k3s-master-1.local.lan |
The following states take care of installing either a primary master or a node, depending on available pillar values:
|
1 2 3 4 5 6 7 8 9 10 11 12 13 14 15 16 17 18 19 20 21 22 23 24 25 26 27 28 29 30 31 32 33 34 35 36 37 38 39 40 41 42 43 44 45 46 47 48 49 50 51 52 53 54 55 56 57 58 59 60 61 62 63 64 65 66 |
############################################################## # Deploy k3s cluster regarding k3s-* pillars. # - The role of the node is defined by its name (k3s-agent-*, k3s-master-*, k3s-server-*) # - The 1st master will be used to add all other nodes # - A custom udev rule is added to all nodes that can handle persistent volumes: # Any scsi disk with a product name that starts with "pv_" is # mounted as /media/pv_<name> on all PV enabled hosts # ############################################################## {% if grains['host'].startswith('k3s-agent') %} {% set role='agent' %} {% elif pillar.get('k3s-master', none) is not none %} {% set role='' %} {% else %} {% set role='server' %} {% endif %} k3s_dependencies: pkg.installed: - pkgs: - ca-certificates {% if pillar.get('k3s-master', none) is not none %} k3s_install_{{ grains['host'] }}: cmd.run: - name: wget -q -O - {{ pillar['k3s-common']['url'] }} | {{ pillar['k3s-master']['install'] }} {% for label in pillar['k3s-labels'] %}{{ ' --node-label ' + label + '=' ~ pillar['k3s-labels'][label] }} {% endfor %} --token {{ pillar['k3s-common']['token'] }} - unless: {{ pillar['k3s-common']['test'] }} - require: - pkg: k3s_dependencies {% endif %} {% if pillar.get('k3s-node', none) is not none %} k3s_install_{{ grains['host'] }}: cmd.run: - name: wget -q -O - {{ pillar['k3s-common']['url'] }} | K3S_URL="https://{{ pillar['k3s-node']['master'] }}:6443" K3S_TOKEN="{{ pillar['k3s-common']['token'] }}" sh -s - {{ role }} {% for label in pillar['k3s-labels'] %}{{ ' --node-label ' + label + '=' ~ pillar['k3s-labels'][label] }} {% endfor %} - unless: {{ pillar['k3s-common']['test'] }} - require: - pkg: k3s_dependencies {% endif %} {% if pillar['k3s-labels']['pv'] == 'enabled' %} k3s_install_udev: file.managed: - names: - /etc/udev/rules.d/80-pv-disks.rules: - source: salt://services/files/80-pv-disks.rules - mode: 640 cmd.run: - name: udevadm control --reload-rules && udevadm trigger - onchanges: - file: /etc/udev/rules.d/80-pv-disks.rules {% endif %} k3s_running: service.running: {% if role == 'agent' -%} - name: k3s-agent {% else -%} - name: k3s {% endif -%} - enable: True - require: - cmd: k3s_install_{{ grains['host'] }} |
As you can see, a special udev rule file (80-pv-disks.rules) is installed on all K3S nodes with the pillar value “k3s-label:pv”. More on than on the next chapter.
Manage persistence
I’ve already touched on the subject of persistent volumes in the “Backup and Restore” chapter. The concept is to use ZFS volumes that are mirrored between node-1 and node-2.
These ZFS volumes are mounted as SCSI devices on K3s hosts. They are then automatically mounted and unmounted via udev rules (80-pv-disks.rules). The purpose of “automount” is to prevent the same volume from being mounted simultaneously on two different nodes, thereby avoiding filesystem corruption. The auto-unmount timeout is set to a relatively short value (5 seconds).
Now, you might ask: where/how should these SCSI volumes be mounted so that K3s pods can recognize their names? The trick is to use the SCSI property “product,” which you may have already seen in the script set_zfspv.sh.
For example, I have a ZFS volume named pv_mariadb on the hypervisor side. This volume is presented as a SCSI device on all nodes with a command like:
qm set 1200 --scsi0 /dev/zvol/zfs-storage/pv_mariadb-part1,ssd=1,product="pv_mariadb"
Then, on all hosts with the pillar value k3s-label:pv , there is a set of udev rules that automatically mount all SCSI devices and create mount points according to the SCSI property “product” (exposed as “ID_MODEL” by udev). For example, /media/pv_mariadb. This way, I can define a pod that references a local storage path, and no matter where the pod is deployed, the data will be accessible.
Below are the udev rules :
|
1 2 3 4 5 6 7 8 9 10 11 |
# create mount dir ACTION=="add", KERNEL=="sd[a-z]?", ENV{ID_MODEL}=="pv_*", RUN+="/bin/mkdir -p /media/%E{ID_MODEL}" KERNEL=="sd[a-z]?", ENV{ID_MODEL}=="pv_*", RUN+="/bin/mkdir -p /media/%E{ID_MODEL}" # set automount: all kube pv with reside in /media/pv_xxx ACTION=="add", KERNEL=="sd[a-z]?", ENV{ID_MODEL}=="pv_*", RUN+="/usr/bin/systemd-mount --no-block --automount=yes --timeout-idle-sec=5s --collect $devnode /media/%E{ID_MODEL}" KERNEL=="sd[a-z]?", ENV{ID_MODEL}=="pv_*", RUN+="/usr/bin/systemd-mount --no-block --automount=yes --timeout-idle-sec=5s --collect $devnode /media/%E{ID_MODEL}" # if device is removed, umount it... ACTION=="remove", KERNEL=="sd[a-z]?", ENV{ID_MODEL}=="pv_*", RUN+="/usr/bin/systemd-mount -u /media/%E{ID_MODEL}" # ... then remove mount dir ACTION=="remove", KERNEL=="sd[a-z]?", ENV{ID_MODEL}=="pv_*", RUN+="/bin/rmdir /media/%E{ID_MODEL}" |
And here is a example of a persistent volume definition for K3S (additional nodeAffinity may be required):
|
1 2 3 4 5 6 7 8 9 10 11 12 13 14 15 16 17 18 |
apiVersion: v1 kind: PersistentVolume metadata: name: mariadb-data-pv namespace: prod spec: capacity: storage: 3500M volumeMode: Filesystem accessModes: - ReadWriteOnce persistentVolumeReclaimPolicy: Retain storageClassName: local-storage claimRef: name: mariadb-data-pv-claim namespace: prod local: path: /media/pv_mariadb |
By combining this mechanism with the backup and desired-state approach I explained earlier, I can delete any SCSI volume (e.g., qm set 1200 --delete scsi0 ) or even destroy the ZFS volume (e.g., zfs destroy zfs-storage/pv_mariadb ). Everything will be automatically reconstructed and restored, either by manually running salt '*' state.apply or by waiting a bit, as the same command is automatically executed on a regular basis.
Application deployment
Deploying applications in Kubernetes “as code” is done with YAML files that include various definitions (volumes, services, containers, deployments, etc.). To maintain a GitOps approach, all applications deployed in my K3s cluster are based on pillar values and states.
The concept is that all Kubernetes definition YAML files are managed by SaltStack, which is also responsible for running kubectl apply. By “definition files,” I mean not only application deployments but also namespaces, secrets, and custom images. As mentioned earlier, any push of a new or modified file to the Git repository triggers a “highstate apply.” Thus, any newly added YAML file is automatically applied to the K3s cluster.
However, removing a pod is not (yet?) handled automatically. I haven’t implemented that for now, but it shouldn’t be complicated (pillar value + dedicated state that could trigger a kubectl delete).
Here is an exemple of pillar values I can use:
|
1 2 3 4 5 6 7 8 9 10 11 12 13 14 15 16 17 18 19 20 21 22 23 24 25 26 27 28 29 30 31 32 33 34 35 36 37 38 39 40 41 42 43 |
#!yaml|gpg ############################################################## # List of applications that are deployed on kubernetes cluster # The name must correspond to a kube yaml definitions file on # salt/kubeapps/files. # # yaml files are managed on all k3s server nodes in /root # # e.g: "mariadb" will trigger kubectl apply -f /root/mariadb.yaml # # kubesecrets part is used to create secrets in k3s cluster # secrets are base64 encoded then encrypted with gpgp # echo -n 'value to encrypt' | base64 | gpg --homedir /etc/salt/gpgkeys --trust-model always -ear unique_ear_key ############################################################## kubeapps: - mariadb - mariadbbackup kubesecrets: prod: mariadbpwd: | -----BEGIN PGP MESSAGE----- [...] -----END PGP MESSAGE----- ############################################################## # k3s docker images to install on all nodes # # expected format of docker image name: <name>-<version> # # install: list of image to install # remove: list of image to delete (the '-' is replaced by ':' when trying to remove) # prefix is used to remove images, adding this value to the image name:version ############################################################## k3s-images: prefix: docker.io/library/ install: wordpress-v2024.11.17: https://github.com/jit06/docker-images/releases/download/wordpress/wordpress-v2024.11.17.tar.gz remove: - wordpress-v2024.11.16 - wordpress-latest |
And below the states that manage namespaces, custom images installation, secrets and applications deployments:
|
1 2 3 4 5 6 7 8 9 10 11 12 13 14 15 16 17 18 19 20 21 22 23 24 25 26 27 28 29 30 31 32 33 34 35 36 37 38 39 40 41 42 43 44 45 46 47 48 49 50 51 52 53 54 55 56 57 58 59 60 |
############################################################## # installation and removall of docker images to local repository # image to install is expected to be a gziped tar archive ############################################################## # install {% for image in pillar['k3s-images']['install'] %} {{ image }}_install: cmd.run: - name: wget -q -O - {{ pillar['k3s-images']['install'][image] }} | gzip -d - | ctr image import - - unless: test -n "$(ctr images ls | grep {{ image.replace('-',':') }})" {% endfor %} # remove {% for image in pillar['k3s-images']['remove'] %} {{ image }}_remove: cmd.run: - name: ctr images del {{ pillar['k3s-images']['prefix'] }}{{ image.replace('-',':') }} - unless: test -z "$(ctr images ls | grep {{ image.replace('-',':') }})" {% endfor %} ############################################################## # Handle installation and deployment of apps in k3s cluster # This state should only be applied on a k3s master. # # The list of apps to deploy are checked in 'kubeapps' pillar # for each apps: # - the yaml definition from files/<appname>.yaml is copied to /root # - the yaml file is applied via kubectl unless app is already installed ############################################################## # create / refresh namespaces kubeapps_namespaces: file.managed: - name: /root/namespaces.yaml - source: salt://kubeapps/files/namespaces.yaml cmd.run: - name: kubectl apply -f /root/namespaces.yaml # create / refresh secrets than remove the file kubeapps_secrets: file.managed: - name: /root/secrets.yaml - source: salt://kubeapps/files/secrets.yaml - template: jinja cmd.run: - name: kubectl apply -f /root/secrets.yaml # deploy kubapps if not running {% for app in pillar['kubeapps'] %} {{ app }}_{{ grains['host'] }}: file.managed: - name: /root/{{ app }}.yaml - source: salt://kubeapps/files/{{ app }}.yaml - template: jinja - mode: 600 apply_{{ app }}_{{ grains['host'] }}: cmd.run: - name: kubectl apply -f /root/{{ app }}.yaml - unless: test -n "$(kubectl get pods | grep {{ app }})" {% endfor %} |
Finally, here is an example of my MariaDB definition to be deployed on the cluster, which also embed phpMyAdmin (yes, they shoud be on separates pods…):
|
1 2 3 4 5 6 7 8 9 10 11 12 13 14 15 16 17 18 19 20 21 22 23 24 25 26 27 28 29 30 31 32 33 34 35 36 37 38 39 40 41 42 43 44 45 46 47 48 49 50 51 52 53 54 55 56 57 58 59 60 61 62 63 64 65 66 67 68 69 70 71 72 73 74 75 76 77 78 79 80 81 82 83 84 85 86 87 88 89 90 91 92 93 94 95 96 97 98 99 100 101 102 103 104 105 106 107 108 109 110 111 112 113 114 115 116 117 118 119 120 121 122 123 124 125 126 127 128 129 130 131 132 133 134 135 136 137 138 139 140 141 142 143 144 145 146 147 148 149 150 151 152 153 154 155 156 157 158 159 160 161 162 163 164 165 166 167 168 169 170 171 172 173 174 175 176 177 178 179 180 181 182 183 184 185 186 187 188 189 190 191 192 193 194 195 196 197 198 199 200 201 202 203 |
####################################### # Services ####################################### --- apiVersion: v1 kind: Service metadata: name: mariadb-internal-service namespace: prod spec: selector: app: mariadb ports: - protocol: TCP port: 3306 targetPort: 3306 --- apiVersion: v1 kind: Service metadata: name: phpmyadmin-service namespace: prod spec: selector: app: mariadb type: LoadBalancer ports: - protocol: TCP port: 80 # exposed port for targetPort: 8080 # targeting port on the container # nodePort: 30100 # external IP port from 30000 till 32767 range ####################################### # routes ####################################### --- apiVersion: networking.k8s.io/v1 kind: Ingress metadata: name: phpmyadmin namespace: prod spec: rules: - host: phpmyadmin.local.lan http: paths: - path: / pathType: Prefix backend: service: name: phpmyadmin-service port: number: 80 ####################################### # Maps ####################################### --- apiVersion: v1 kind: ConfigMap metadata: name: mariadb-configmap namespace: prod data: mariadb.cnf: | [mariadb] key_buffer_size=4M max_allowed_packet=16M table_open_cache=64 sort_buffer_size=512K net_buffer_length=8K read_buffer_size=256K read_rnd_buffer_size=512K myisam_sort_buffer_size=8M innodb_buffer_pool_size=64M query_cache_limit=1M query_cache_size=16M tmp_table_size=64M max_heap_table_size=64M max_connections=50 log-warnings slow-query-log general-log disable-log-bin ####################################### # volumes ####################################### --- apiVersion: v1 kind: PersistentVolumeClaim metadata: name: mariadb-data-pv-claim namespace: prod labels: app: mariadb spec: accessModes: - ReadWriteOnce resources: requests: storage: 3500M storageClassName: local-storage volumeName: mariadb-data-pv --- apiVersion: v1 kind: PersistentVolume metadata: name: mariadb-data-pv namespace: prod spec: capacity: storage: 3500M volumeMode: Filesystem accessModes: - ReadWriteOnce persistentVolumeReclaimPolicy: Retain storageClassName: local-storage claimRef: name: mariadb-data-pv-claim namespace: prod local: path: /media/pv_mariadb nodeAffinity: required: nodeSelectorTerms: - matchExpressions: - key: kubernetes.io/hostname operator: In values: - k3s-master-1 - k3s-master-2 ####################################### # containers ####################################### --- apiVersion: apps/v1 kind: Deployment metadata: name: mariadb-deployment namespace: prod spec: # specification for deployment resource replicas: 1 # how many replicas of pods we want to create selector: matchLabels: app: mariadb template: metadata: namespace: prod labels: app: mariadb # service will look for this label spec: containers: - name: mariadb-internal-service image: mariadb ports: - containerPort: 3306 env: - name: MARIADB_ROOT_PASSWORD valueFrom: secretKeyRef: name: kubesecrets key: mariadbpwd volumeMounts: - name: mariadb-config mountPath: /etc/mysql/conf.d/ # directory will be cleaned at the beginning - name: mariadb-data-pv mountPath: /var/lib/mysql - name: phpmyadmin image: bitnami/phpmyadmin:latest ports: - containerPort: 8080 env: - name: DATABASE_HOST value: mariadb-internal-service volumes: - name: mariadb-config configMap: name: mariadb-configmap defaultMode: 0644 items: - key: mariadb.cnf path: plugin-configuration.cnf - name: mariadb-data-pv persistentVolumeClaim: claimName: mariadb-data-pv-claim affinity: nodeAffinity: requiredDuringSchedulingIgnoredDuringExecution: nodeSelectorTerms: - matchExpressions: - key: pv operator: In values: - enabled requiredDuringSchedulingIgnoredDuringExecution: nodeSelectorTerms: - matchExpressions: - key: speed operator: In values: - fast |
A Last Word on Secrets Management. You may have seen how I manage secrets:
- Secrets are encoded in base64, as required by K3s.
- Base64-encoded secrets are then encrypted with GPG and stored in pillar values (which reside in my private Git repository).
- Secrets are injected into K3s via a temporary YAML file located in /root. This file is always removed after usage, as it contains decrypted secrets.
Kubernetes applications
If you’ve read this far, you probably understand the concept of my homelab. However, I’ll provide some application deployment examples in this chapter to better illustrate real-life use cases.
Mariadb + phpMyAdmin
This deployment was discussed in the previous chapter. However, I use a specific deployment to back up MariaDB. Even though all persistent volumes are replicated and backed up automatically, I find it safer to keep basic, text-based SQL exports of all databases.
To do this, I use a Kubernetes cronjob to execute the mariadb-dump command and store SQL files on a dedicated persistent volume.
|
1 2 3 4 5 6 7 8 9 10 11 12 13 14 15 16 17 18 19 20 21 22 23 24 25 26 27 28 29 30 31 32 33 34 35 36 37 38 39 40 41 42 43 44 45 46 47 48 49 50 51 52 53 54 55 56 57 58 59 60 61 62 63 64 65 66 67 68 69 70 71 72 73 74 75 76 77 78 79 80 81 82 |
####################################### # volumes ####################################### --- apiVersion: v1 kind: PersistentVolumeClaim metadata: name: mariadb-backup-pv-claim namespace: prod spec: accessModes: - ReadWriteOnce resources: requests: storage: 900M storageClassName: local-storage volumeName: mariadb-backup-pv --- apiVersion: v1 kind: PersistentVolume metadata: name: mariadb-backup-pv namespace: prod spec: capacity: storage: 900M volumeMode: Filesystem accessModes: - ReadWriteOnce persistentVolumeReclaimPolicy: Retain storageClassName: local-storage claimRef: name: mariadb-backup-pv-claim namespace: prod local: path: /media/pv_mariadbbackup nodeAffinity: required: nodeSelectorTerms: - matchExpressions: - key: kubernetes.io/hostname operator: In values: - k3s-master-1 - k3s-master-2 ####################################### # cron job ####################################### --- apiVersion: batch/v1 kind: CronJob metadata: name: mariadb-backup-cronjob namespace: prod spec: schedule: "0 4 * * *" jobTemplate: spec: template: spec: containers: - name: mariadb-backup image: mariadb command: - "/bin/sh" - "-c" - 'mariadb -h mariadb-internal-service -u root -p$(cat /secrets/mariadbpwd) -N -e "show databases" | while read dbname; do mariadb-dump -h mariadb-internal-service -u root -p$(cat /secrets/mariadbpwd) --add-drop-database --single-transaction "$dbname" > "/backup/$dbname-$(date -I)".sql; done; find /backup -type f -mtime +1 -exec rm {} \;' volumeMounts: - name: mariadb-backup-pv mountPath: /backup - name: secrets mountPath: /secrets readOnly: true restartPolicy: OnFailure volumes: - name: mariadb-backup-pv persistentVolumeClaim: claimName: mariadb-backup-pv-claim - name: secrets secret: secretName: kubesecrets |
WordPress
For my WordPress sites, I need php extensions not provided by the official image. The Dockerfile and image I use are available in a public GitHub repository:
- https://github.com/jit06/docker-images/tree/master/wordpress
- https://github.com/jit06/docker-images/releases
Below is an example of a WordPress YAML definition I use:
|
1 2 3 4 5 6 7 8 9 10 11 12 13 14 15 16 17 18 19 20 21 22 23 24 25 26 27 28 29 30 31 32 33 34 35 36 37 38 39 40 41 42 43 44 45 46 47 48 49 50 51 52 53 54 55 56 57 58 59 60 61 62 63 64 65 66 67 68 69 70 71 72 73 74 75 76 77 78 79 80 81 82 83 84 85 86 87 88 89 90 91 92 93 94 95 96 97 98 99 100 101 102 103 104 105 106 107 108 109 110 111 112 113 114 115 116 117 118 119 120 121 122 123 124 125 126 127 128 129 130 131 132 133 134 135 136 137 138 139 140 141 142 143 144 145 146 147 148 149 150 151 152 |
####################################### # Services ####################################### --- apiVersion: v1 kind: Service metadata: name: my_site namespace: prod spec: selector: app: my_site type: LoadBalancer ports: - protocol: TCP port: 8001 # exposed port for targetPort: 80 # targeting port on the container nodePort: 30200 # external IP port from 30000 till 32767 range ####################################### # volumes ####################################### --- apiVersion: v1 kind: PersistentVolumeClaim metadata: name: my_site-data-pv-claim namespace: prod labels: app: my_site spec: accessModes: - ReadWriteOnce resources: requests: storage: 6500M storageClassName: local-storage volumeName: my_site-data-pv --- apiVersion: v1 kind: PersistentVolume metadata: name: my_site-data-pv namespace: prod spec: capacity: storage: 6500M volumeMode: Filesystem accessModes: - ReadWriteOnce persistentVolumeReclaimPolicy: Retain storageClassName: local-storage claimRef: name: my_site-data-pv-claim namespace: prod local: path: /media/pv_my_site nodeAffinity: required: nodeSelectorTerms: - matchExpressions: - key: kubernetes.io/hostname operator: In values: - k3s-master-1 - k3s-master-2 ####################################### # containers ####################################### --- apiVersion: apps/v1 kind: Deployment metadata: name: my_site namespace: prod labels: app: my_site spec: replicas: 1 # how many replicas of pods we want to create selector: matchLabels: app: my_site template: metadata: namespace: prod labels: app: my_site # service will look for this label spec: containers: - name: my_site image: wordpress:v2024.11.17 ports: - containerPort: 80 env: - name: WORDPRESS_DB_HOST value: mariadb-internal-service - name: WORDPRESS_DB_NAME value: www.my_site.org - name: WORDPRESS_DB_PASS valueFrom: secretKeyRef: name: kubesecrets key: my_sitepwd - name: WORDPRESS_DB_USER value: my_site - name: NGINX_SERVER_NAME value: my_site - name: SITEMAP_DOMAIN value: www.my_site.org - name: WORDPRESS_DEBUG value: 'false' - name: WORDPRESS_AUTH_KEY value: xxx - name: WORDPRESS_SECURE_AUTH_KEY value: xxx - name: WORDPRESS_LOGGED_IN_KEY value: xxx - name: WORDPRESS_NONCE_KEY value: xxx - name: WORDPRESS_AUTH_SALT value: xxx - name: WORDPRESS_SECURE_AUTH_SALT value: xxx - name: WORDPRESS_LOGGED_IN_SALT value: xxx - name: WORDPRESS_NONCE_SALT value: xxx volumeMounts: - name: my_site-data-pv mountPath: /srv/http/wordpress/wp-content volumes: - name: my_site-data-pv persistentVolumeClaim: claimName: my_site-data-pv-claim affinity: nodeAffinity: requiredDuringSchedulingIgnoredDuringExecution: nodeSelectorTerms: - matchExpressions: - key: pv operator: In values: - enabled requiredDuringSchedulingIgnoredDuringExecution: nodeSelectorTerms: - matchExpressions: - key: speed operator: In values: - fast |
Issues encountered so far
As of now, after a few months of operation, I’ve encountered some issues, and all of them are hardware- or low-level related (e.g., driver issues). The table below lists these issues and the actions I took to resolve them:
| Issue | Action | ||
|---|---|---|---|
| USB nic (r8153) stopped working due to “Hardware Unit Hang” (reported by dmesg ) | Disabled TCP fragmentation offload. For now I added a line on
rc.local file on all node (
ethtool -K enx00e04c6800a0 sg off )
I may set this on /etc/network/interfaces in the future |
||
| One USB NIC get reset by the kernel from time to time on node-1, which makes the vmbr1 to stop working even if it is up | This triggers an alert from Zabbix. For now, I manually reset the interface and add it back into bond0:
I may add some udev rules to handle this automatically, but since only one USB NIC has this problem, it might be best to “keep an eye” on the alerts. The NIC might be defective and could stop working soon. |
||
| JMB582 controller (SATA) reported some failure (eg. ” failed command: READ FPDMA QUEUED”) | This error is pretty common and usually caused by a bad SATA cable. I replaced it, and I haven’t seen the error occur again. |
Pingback: GitOps-Driven OpenHAB on K3s: Declarative Home Automation Setup