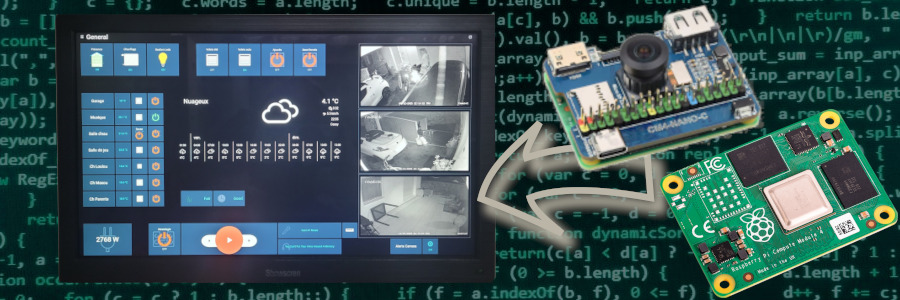
Raspberry pi powered wall mounted tablet
For several years, I relied on a wall-mounted Android tablet running Fully Kiosk Browser as a control panel for my home automation system (OpenHAB). When my last tablet finally died, I decided to try a different approach: a Raspberry Pi paired with a touchscreen. I had looked into this option a few years ago, but back then the software side required far too many tweaks to match the smooth experience of an Android tablet (especially for touchscreen interactions and on-screen keyboard support).
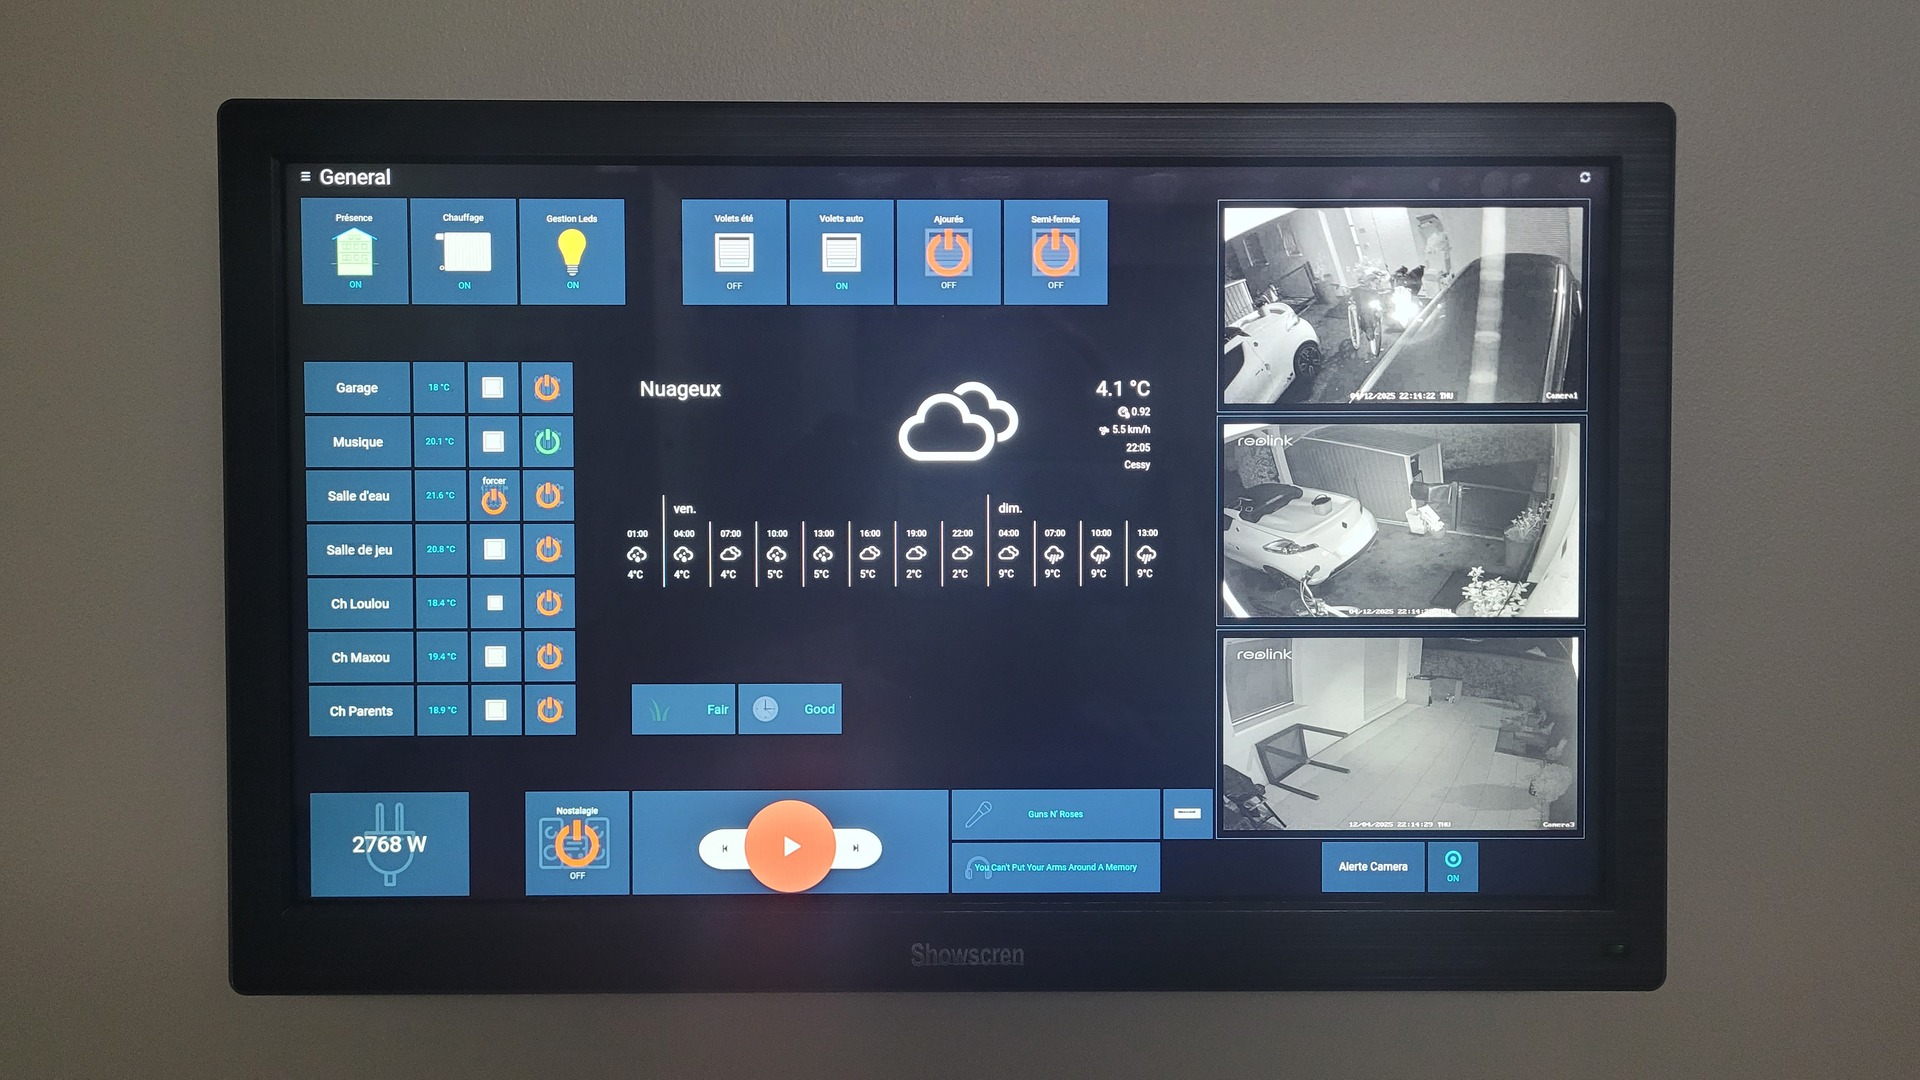
Fortunately, things have evolved. It’s now surprisingly easy to build a web-based kiosk tablet using a Raspberry Pi and a reasonably large display. One of my main goals was to create a device that needs little to no maintenance while staying permanently available.
This is the story of my new Raspberry-Pi-powered wall-mounted tablet…
Used Materials
Here is the list of components I used to build the wall-mounted tablet:
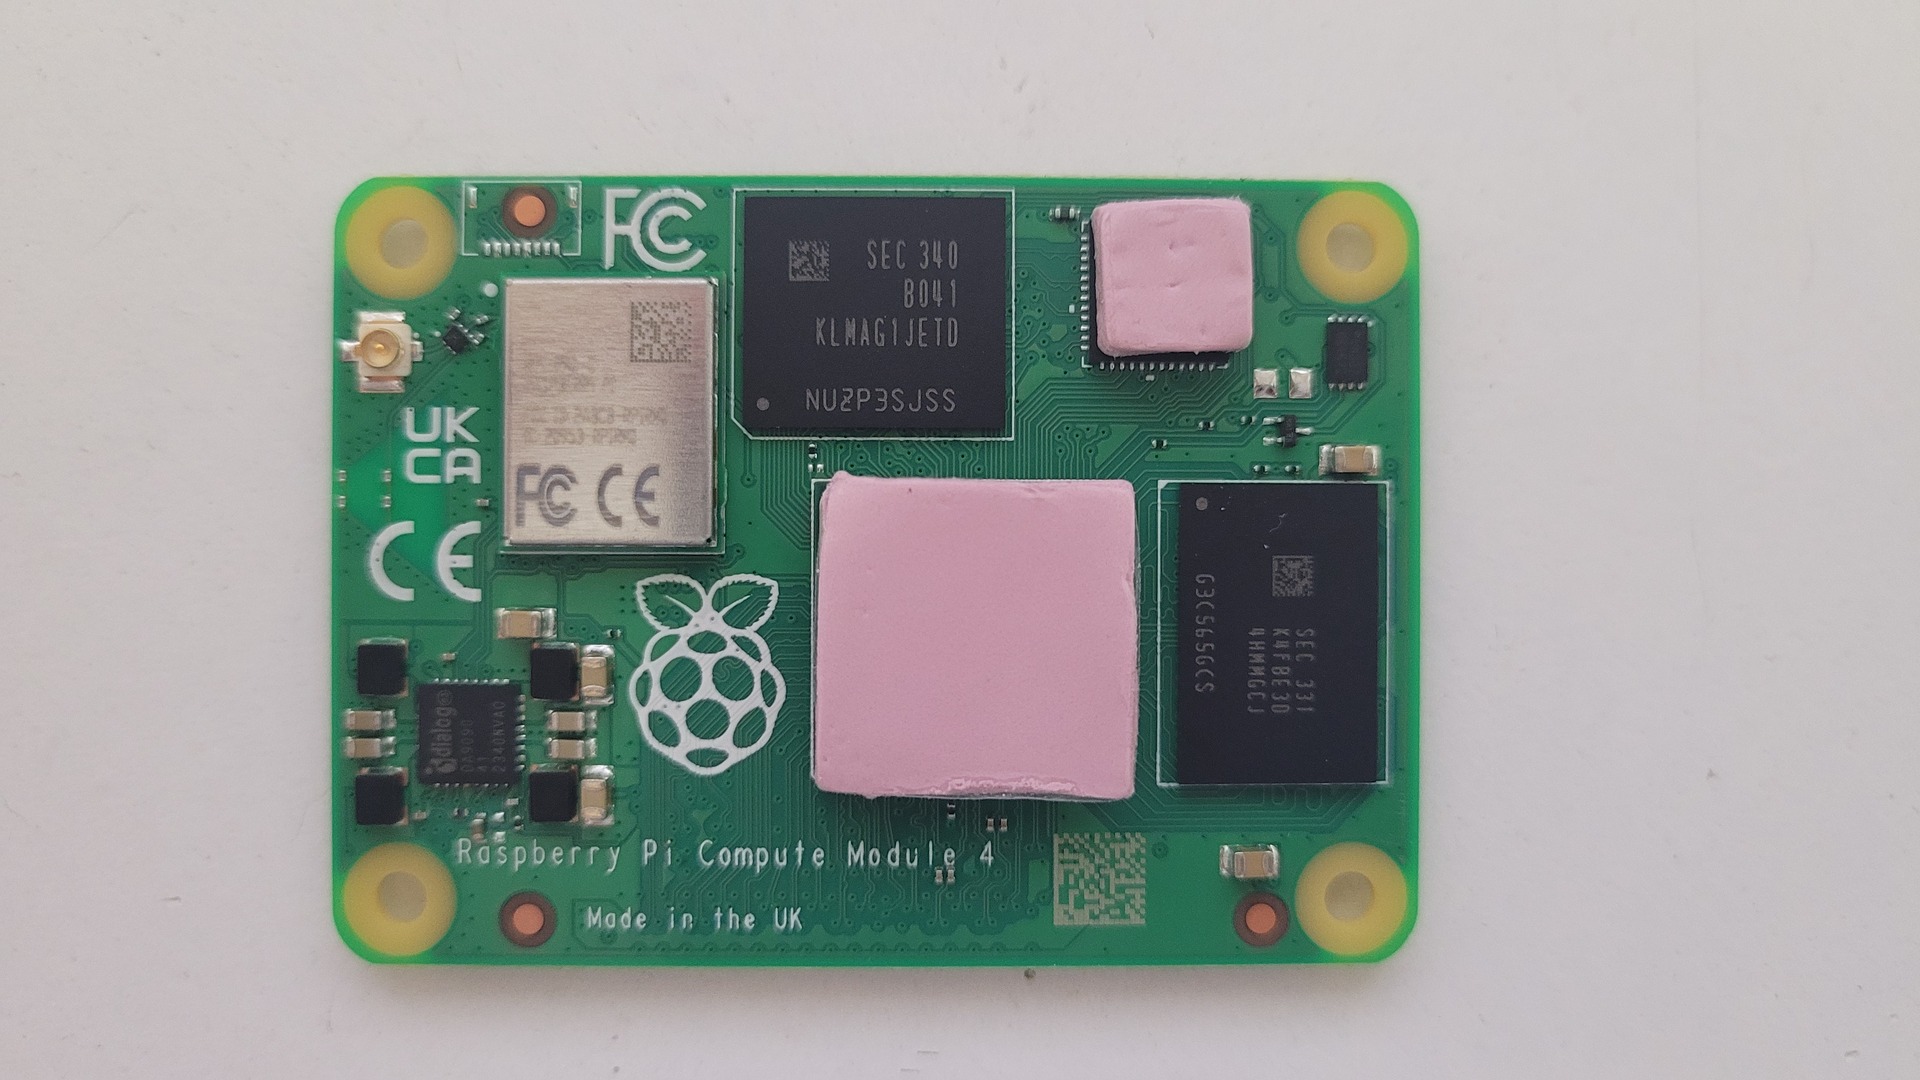
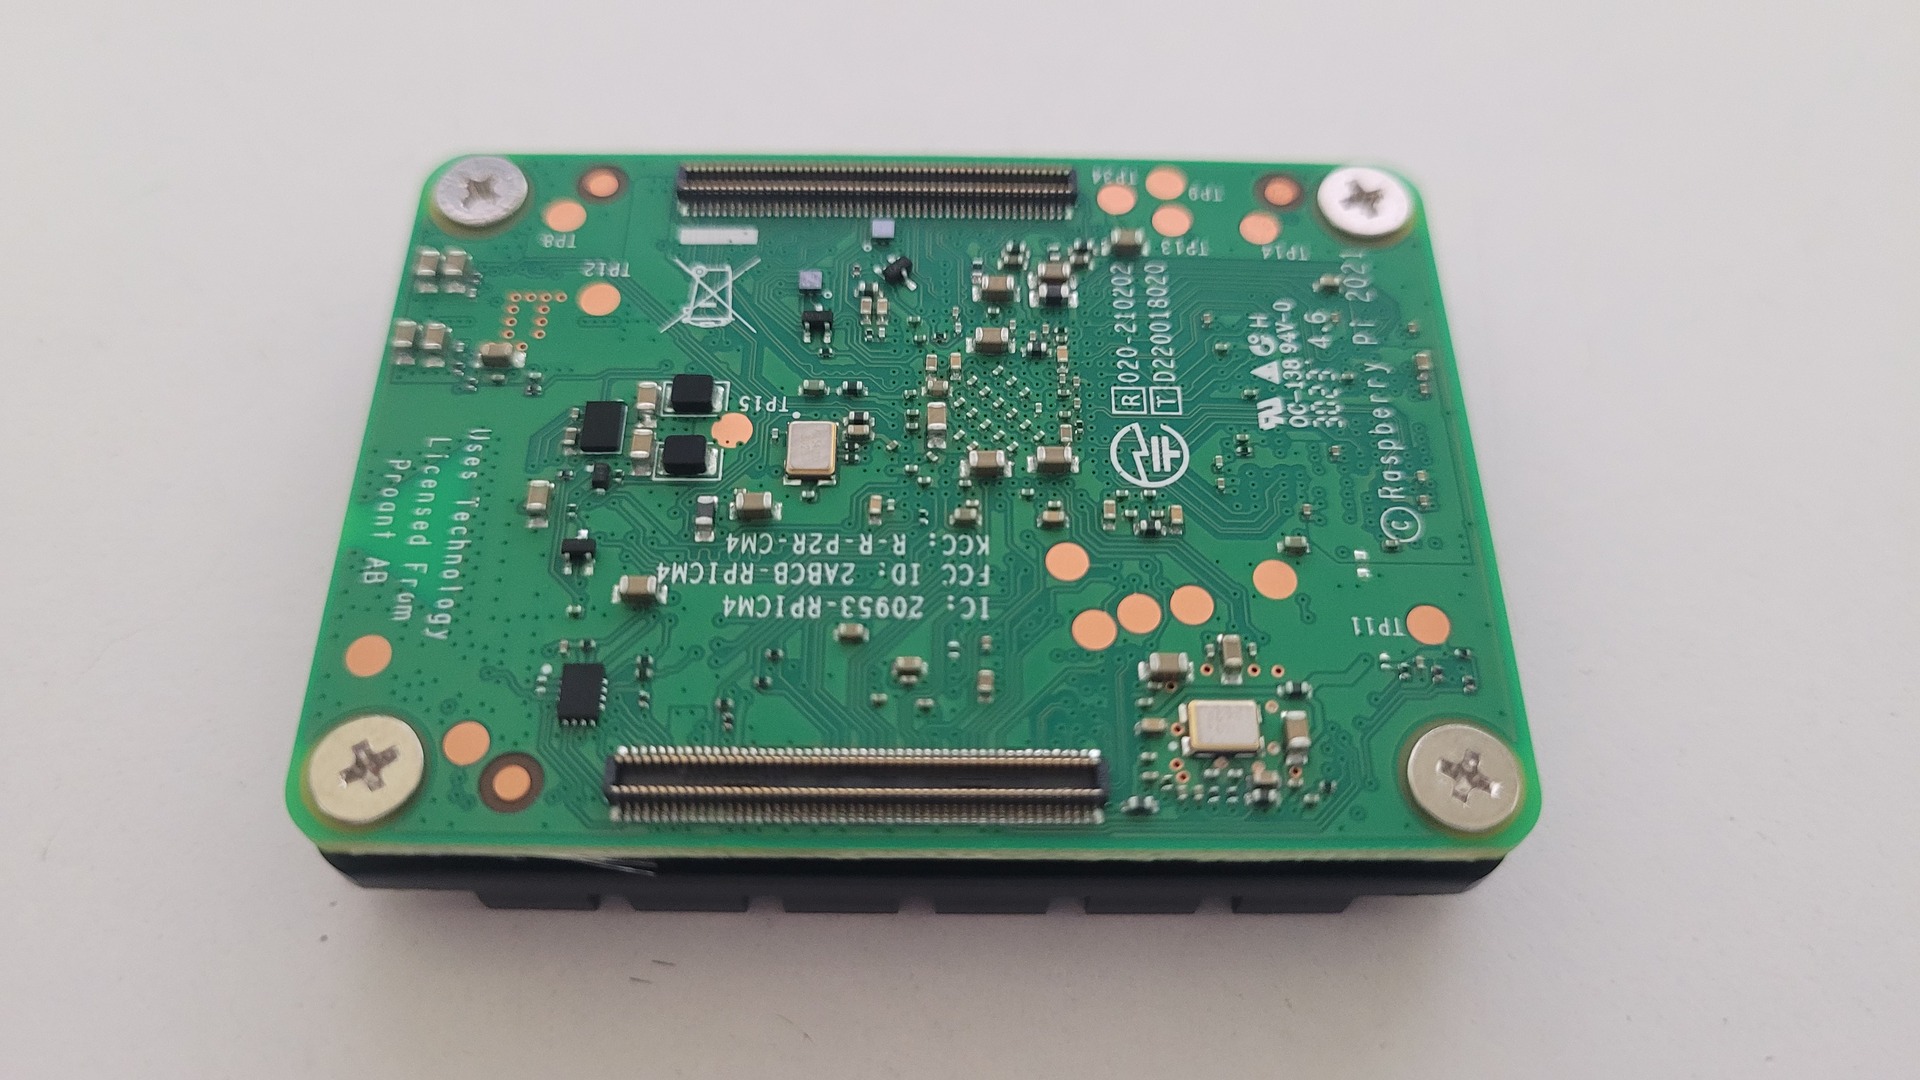
- Raspberry Pi CM4 (4 GB RAM, Wi-Fi, 16 GB eMMC)
- 15.6″ Full HD HDMI IPS touchscreen (brand “Showscren”)
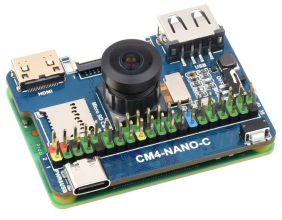
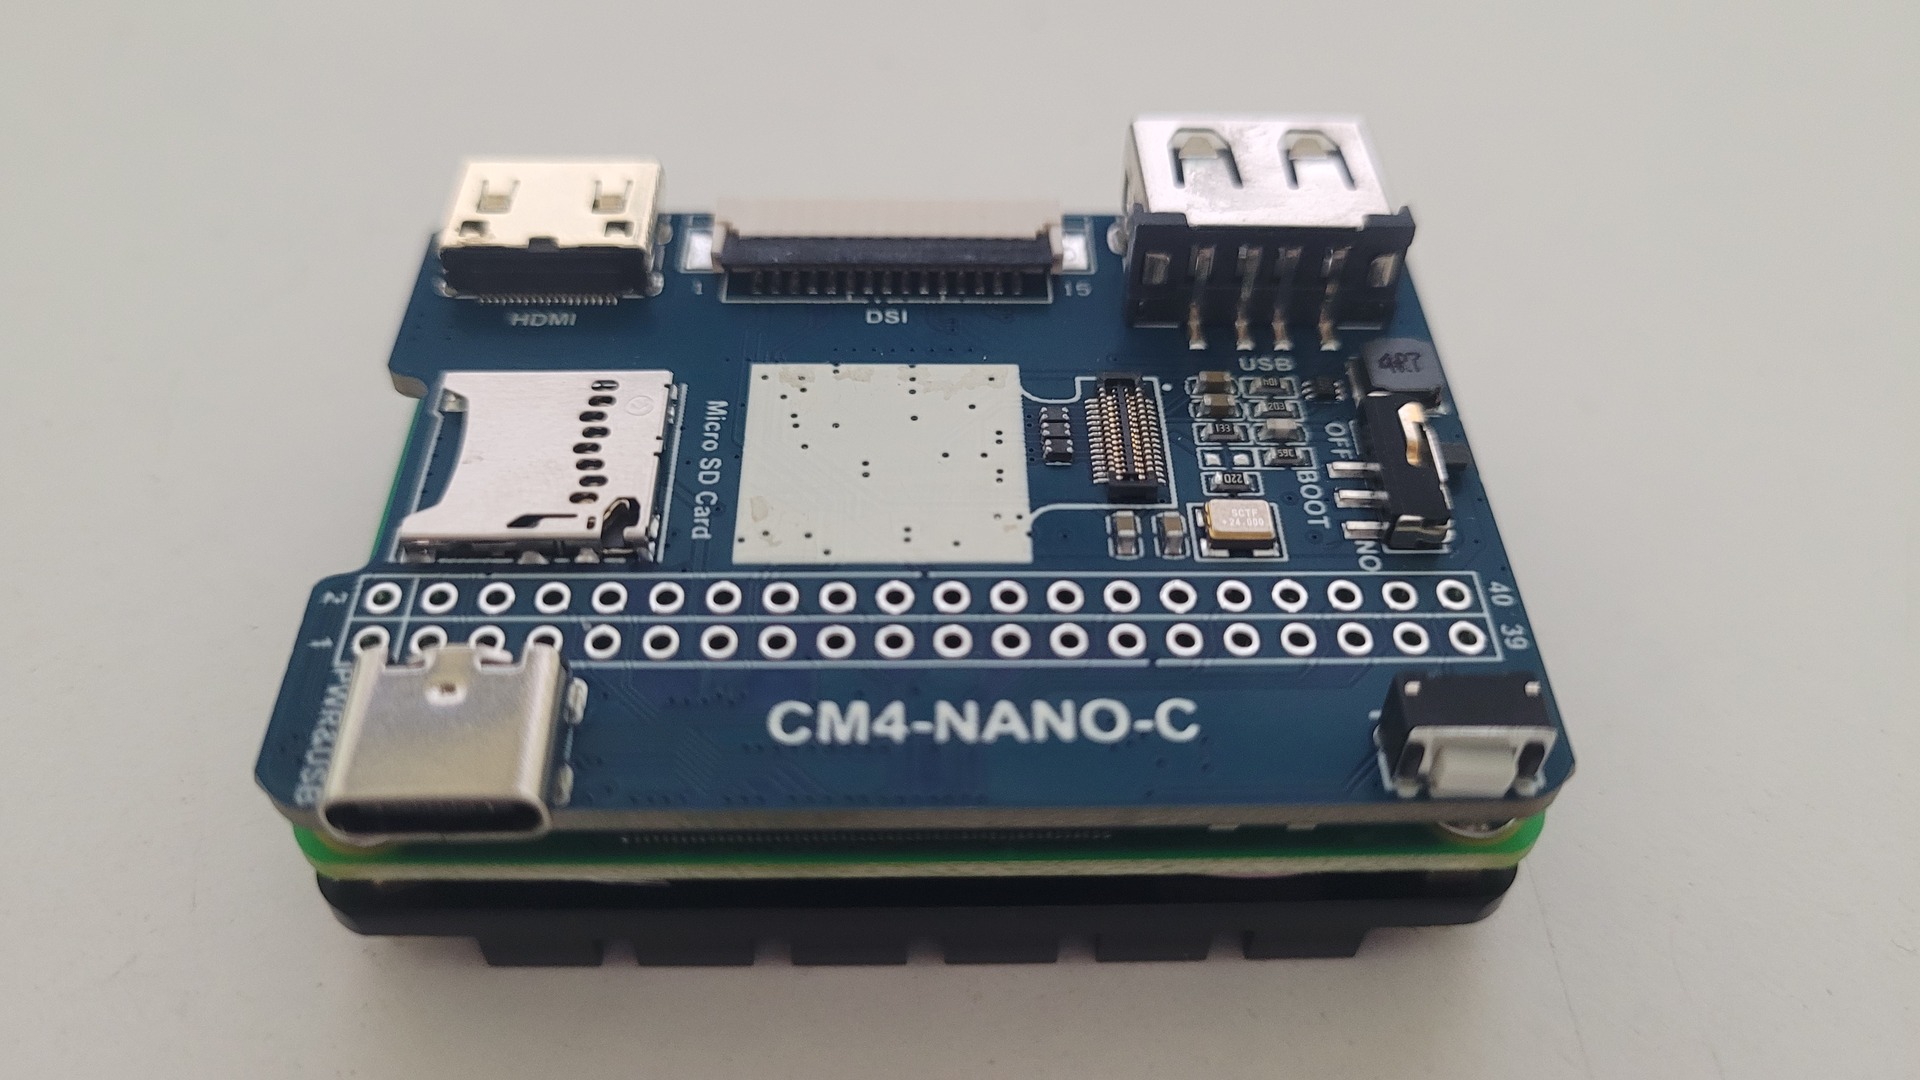
- Waveshare Nano Board C (CM4 carrier board)
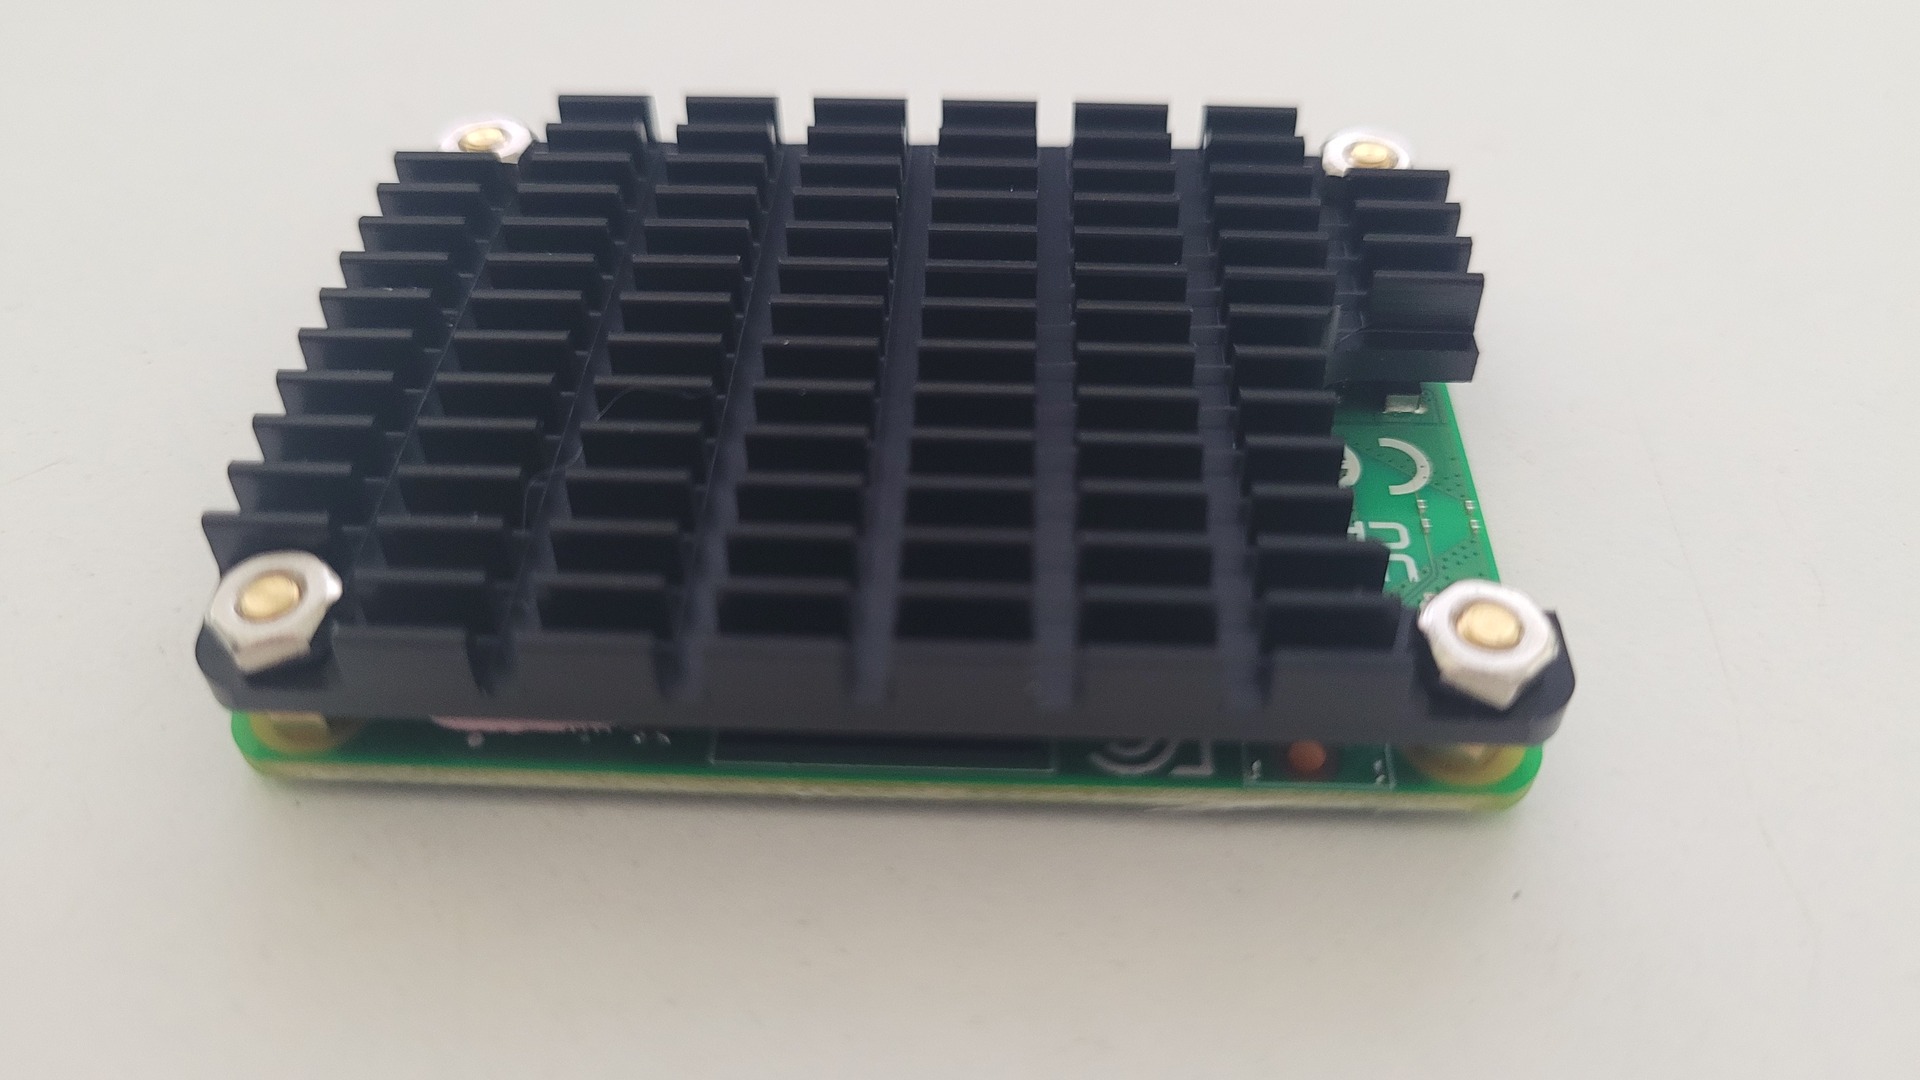
- Waveshare aluminium heatsink for Raspberry Pi CM4
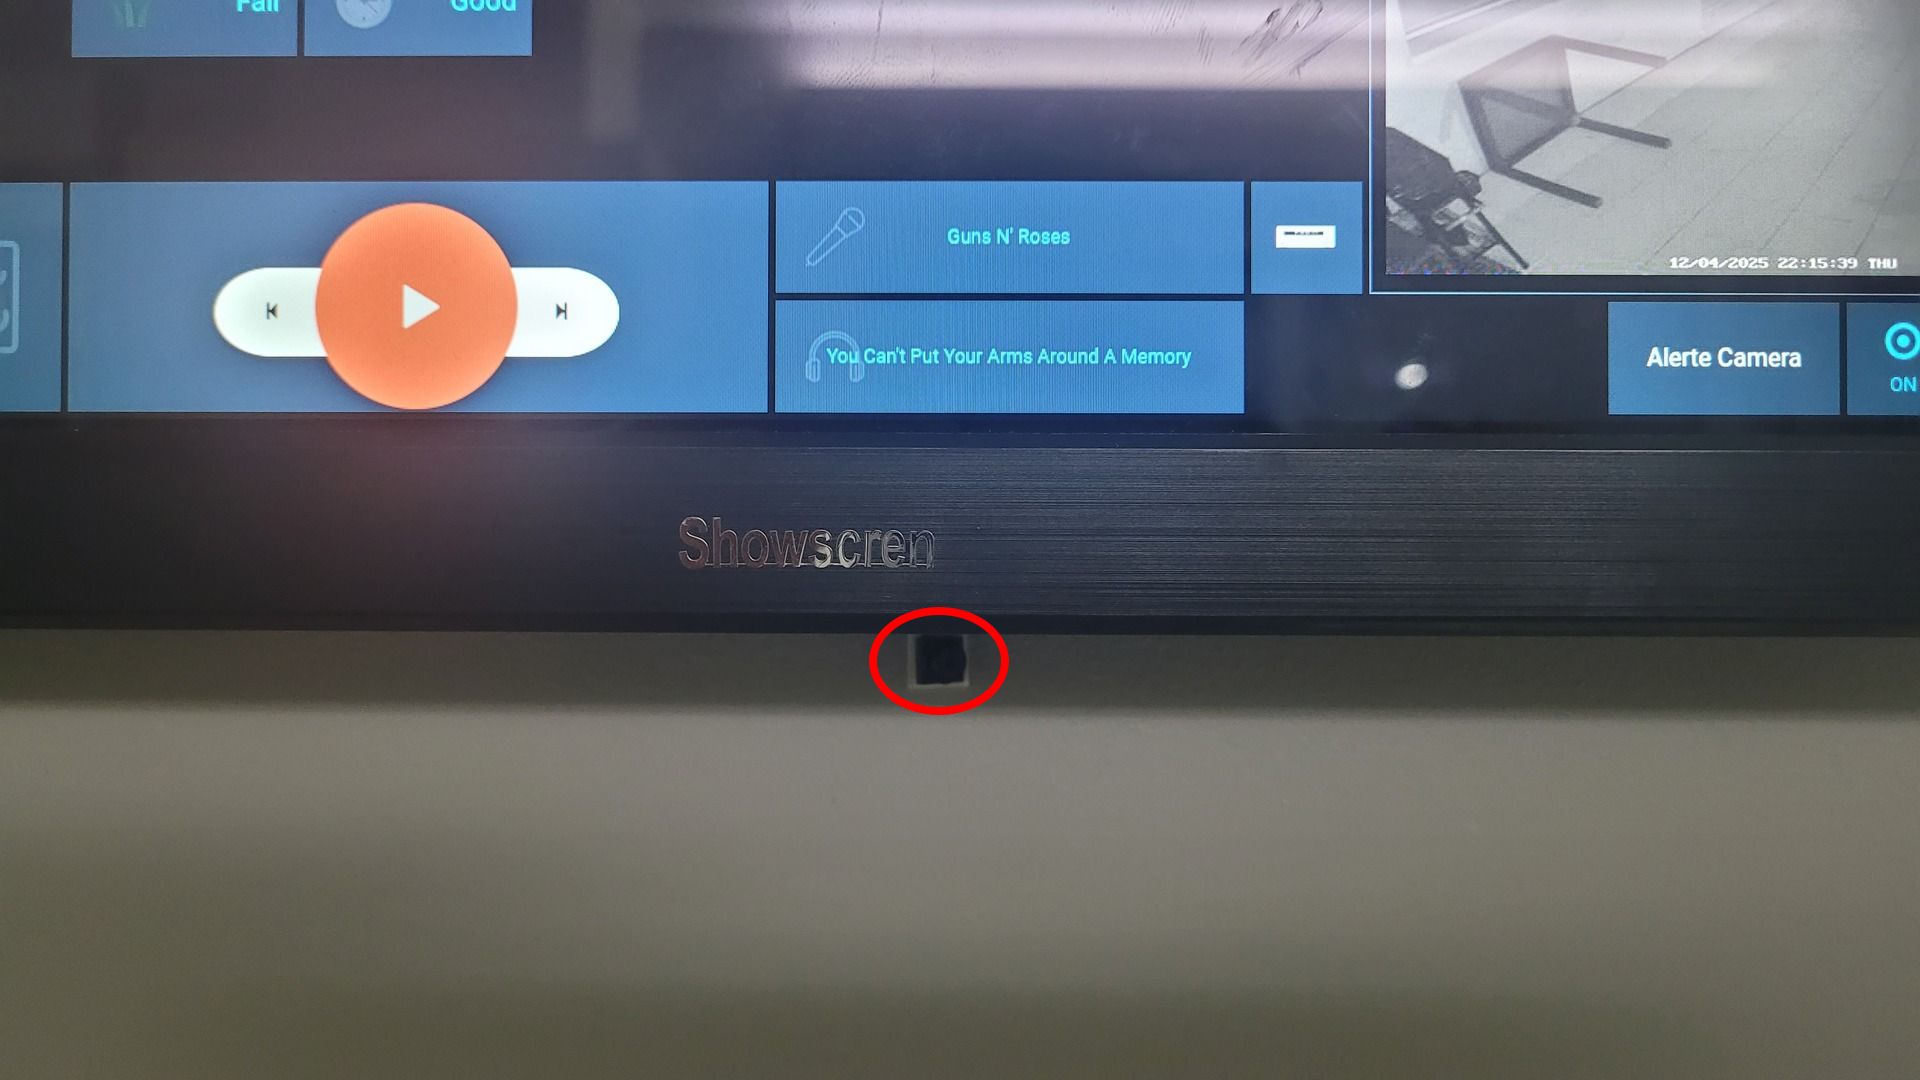
- Uadme camera module (IMX219 sensor)
- 30 cm ultra-thin HDMI cable (Thsucords)
- 25 cm USB-A 90° to USB-C cable
- 13 cm flat “FPC-style” USB-A to USB-C 90° cable
Hardware Assembling
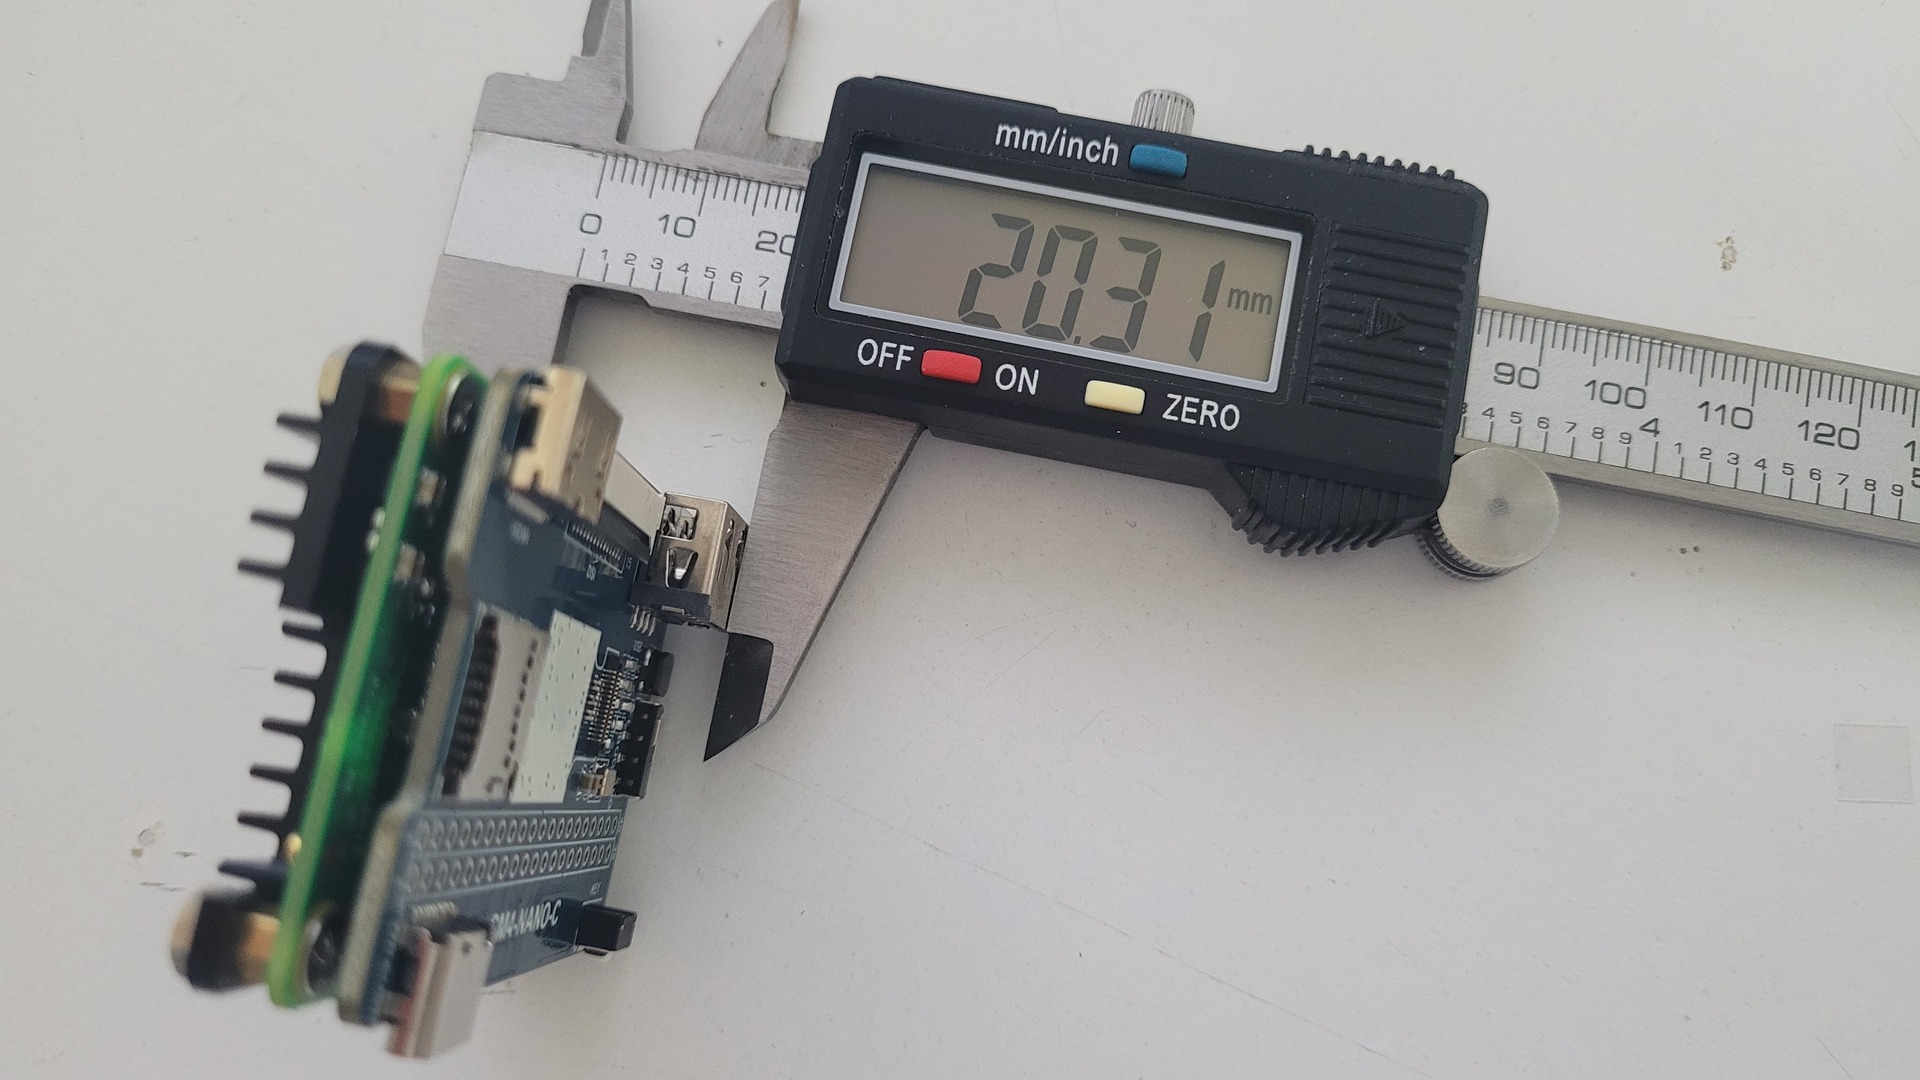
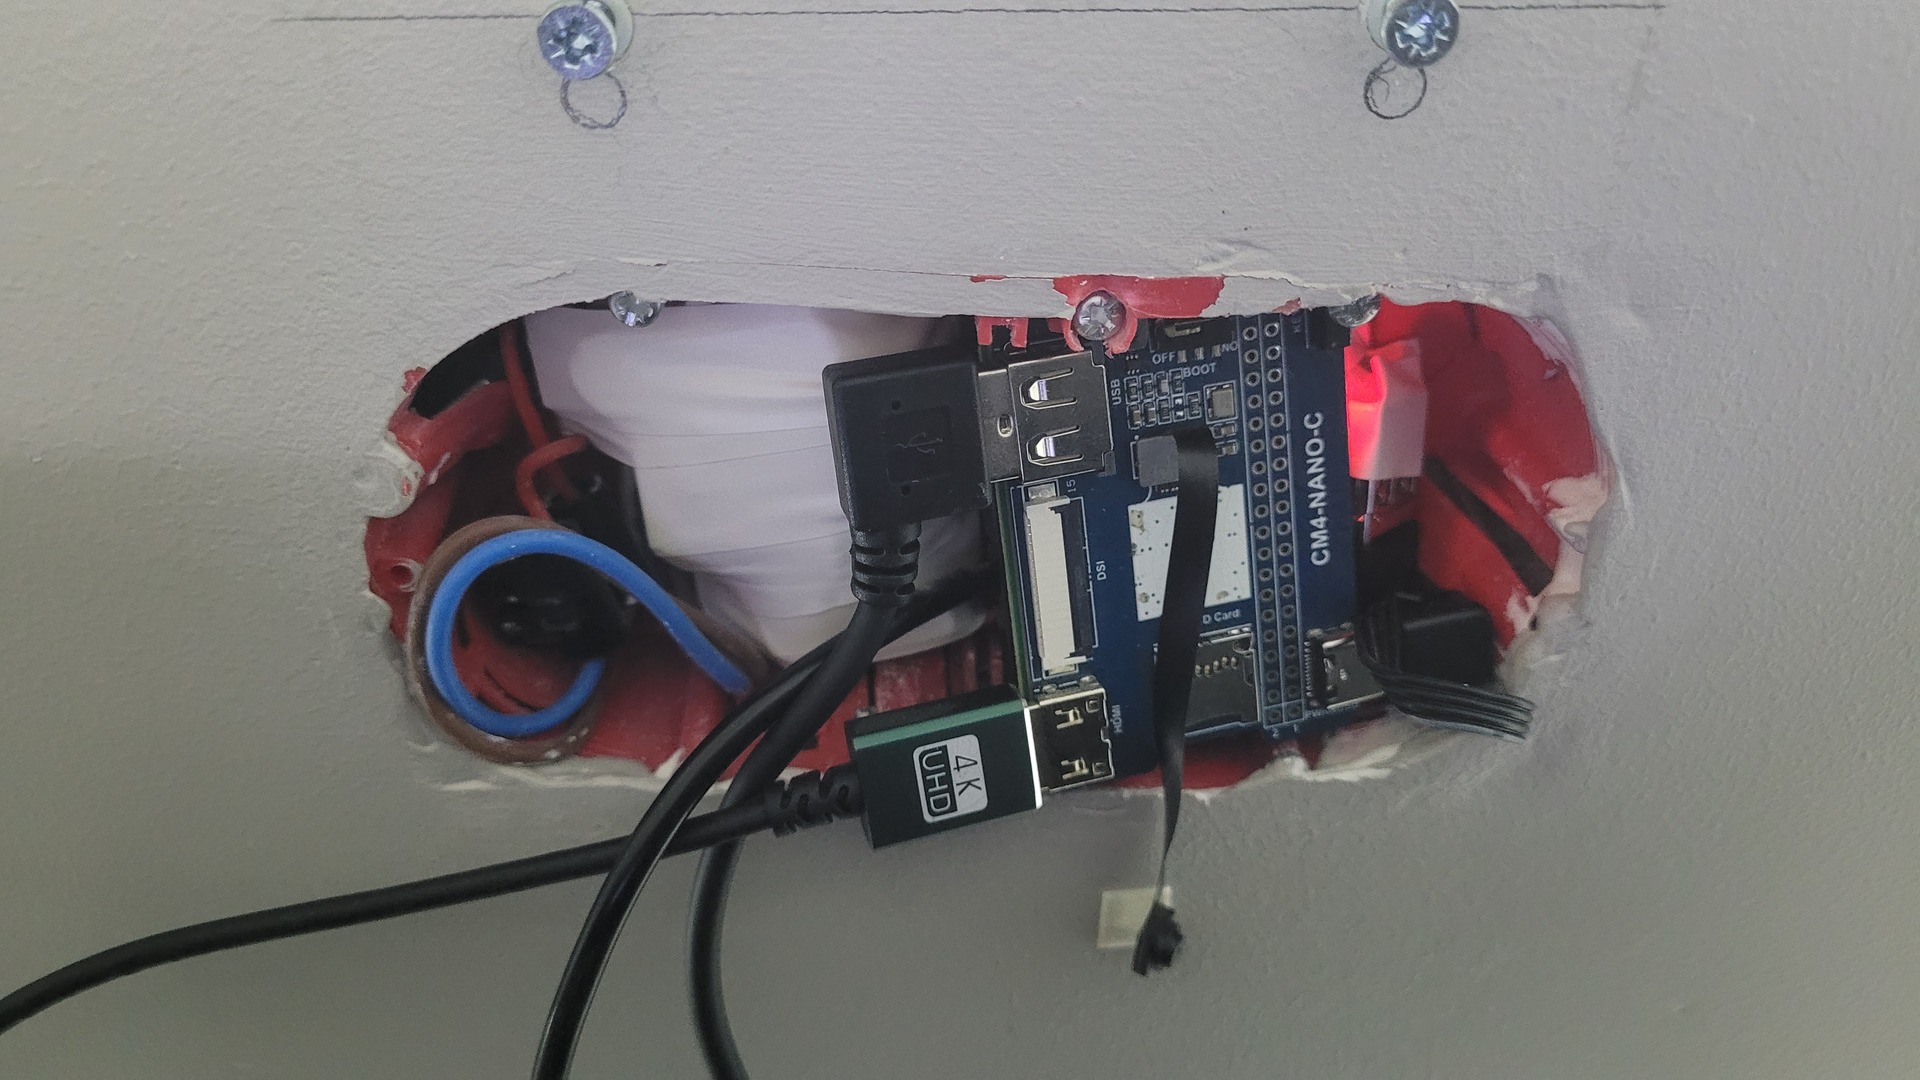
The choice of the CM4 combined with the Nano Board C was intentional: I needed a compact setup that could fit inside a standard cavity wall box alongside a 5 V power supply and a heatsink.
First, the heatsink needs to be screwed onto the CM4:

Then the Nano Board C is connected to the CM4. The assembled unit has a total depth of just 20.3 mm:
Below you can see how the tablet is powered and mounted on the wall. The last photo highlights the position of the camera module:
Mounting eMMC to Flash an OS
I chose a CM4 with eMMC instead of a microSD card because it is faster and provides sufficient storage for this tablet. However, flashing the eMMC requires a small utility called rpiboot , which essentially exposes the eMMC as a standard block device on your PC (e.g., /dev/sdc ).
The Waveshare Nano C board features a small boot button that must be set to “ON.” Then, connect the CM4 to your PC via a USB-C cable. Running rpiboot produces the following output:
|
1 2 3 4 5 6 7 8 9 10 11 |
RPIBOOT: build-date Jan 31 2022 version 0~20220315+git6fa2ec0+nowin-0ubuntu1 Waiting for BCM2835/6/7/2711... Loading embedded: bootcode4.bin Sending bootcode.bin Successful read 4 bytes Waiting for BCM2835/6/7/2711... Loading embedded: bootcode4.bin Second stage boot server Loading embedded: start4.elf File read: start4.elf Second stage boot server done |
At this point, the Pi’s LEDs turn on, and the eMMC is accessible as a standard mass storage device, ready for flashing.
Install and configure
Base install
I initially experimented with LineageOS by following the installation guide, hoping to replicate the setup of my previous Android-based tablet running Fully Kiosk Browser. Unfortunately, a few limitations quickly made it unsuitable for this project:
- The build lacks full camera and Bluetooth support, which makes videoconferencing apps unusable.
- The browser became unstable and regularly crashed or froze after only a few hours displaying my HabPanel dashboard.
Given these constraints, I switched to Raspberry Pi OS with Desktop (the standard edition — not “full” and not “lite”), which offers better stability and broader hardware compatibility for a kiosk-style setup:
sudo dd if=2025-10-01-raspios-trixie-arm64.img of=/dev/sdc bs=2048 status=progress
Configuring
Once the system was installed, I completed the initial setup by configuring Wi-Fi, setting Firefox as the default browser, and opening the Control Center for the first adjustments:
- Disabled the background image and set a plain black wallpaper
- Switched the system theme to Dark
Following the Waveshare CM4-Nano-C documentation, I applied the recommended settings in config.txt :
|
1 2 |
dtoverlay=imx219,i2c_vc,cam0 set camera_auto_detect=0 |
I verified camera support using rpicam-hello , as described in the official documentation.
Using raspi-config , I enabled a few essential services:
- SSH
- VNC
- The on-screen keyboad in automatic mode
Desktop adjustments:
- Removed the trash icon from the desktop
- Enabled multitouch gestures from the Control Center
Firefox configuration:
- Disabled spell checking
- Disabled recommended extensions and integrated features
- Disabled data collection
- In about:config , set dom.w3c_touch_events.enabled to 1 to improve touchscreen handling
Finally, I paired my Bluetooth Plantronics Calisto 620 using the SBC-XQ audio codec. Now, whenever I power it on, it automatically connects to the Pi and becomes the default system microphone.
Automated upgrade
Keeping the OS up to date with automatic reboots is part of the “bare minimum” for a true no-toil device. Since Raspberry Pi OS is based on Debian, I relied on the standard unattended-upgrades service.
First, install the package:
apt-get install unattended-upgrades -y
Then copy the default configuration and edit your local version:
|
1 |
sudo cp /etc/apt/apt.conf.d/50unattended-upgrades /etc/apt/apt.conf.d/52unattended-upgrades-local |
In the edited file, I enabled the following:
- Allow updates and proposed-updates in the Origins-Pattern section
- Unattended-Upgrade::Remove-Unused-Kernel-Packages
- Unattended-Upgrade::Remove-New-Unused-Dependencies
- Unattended-Upgrade::Remove-Unused-Dependencies
- Unattended-Upgrade::Automatic-Reboot
- Unattended-Upgrade::Automatic-Reboot-WithUsers
- Set Unattended-Upgrade::Automatic-Reboot-Time to 04:00
My logic was: download updates at 2:00, apply upgrades at 3:00, and reboot at 4:00 if required. Everything happens overnight, with no disruption during the day.
To tune the timers, I edited the systemd units apt-daily.timer
|
1 2 3 |
[Timer] OnCalendar=02:00 RandomizedDelaySec=0 |
Then apt-daily-upgrade.timer :
|
1 2 3 |
[Timer] OnCalendar=03:00 RandomizedDelaySec=0 |
Photo frame while idle
On my previous Android setup, Fully Kiosk Browser provided a built-in photo slideshow when the tablet was idle. It’s a neat way to make a wall-mounted display useful even when nothing is actively shown. Raspberry Pi OS / Debian doesn’t offer such a feature out of the box, but implementing it turned out to be straightforward.
I also added a small improvement: automatic random photo selection at a configurable frequency. Photos are copied from a CIFS share hosted on my NAS to the Raspberry Pi, and a script handles the randomization logic before copying them locally.
The CIFS share is mounted via fstab using a line similar to:
|
1 |
//mynas.local/photos /mnt/photos cifs ro,username=user,password=pwd,iocharset=utf8 |
- The source path (remote CIFS folder)
- The local destination folder
- The maximum number of photos to copy
- How many recent photos to include
- How many months define a recent photo
- How many months define an old photo
This may look a bit over-engineered, but I like my photo frame to display a balanced mix of fresh memories and older ones. The script also handles folders to ignore.
Since the tablet is mounted horizontally, I added a simple check to only keep landscape-oriented photos.
To avoid putting unnecessary load on my NAS, the script generates a cached list of all eligible photos based on the selected parameters. This cache is reused until a new file is detected on the NAS, at which point it is rebuilt.
|
1 2 3 4 5 6 7 8 9 10 11 12 13 14 15 16 17 18 19 20 21 22 23 24 25 26 27 28 29 30 31 32 33 34 35 36 37 38 39 40 41 42 43 44 45 46 47 48 49 50 51 52 53 54 55 56 57 58 59 60 61 62 63 64 65 66 67 68 69 70 71 72 73 74 75 76 77 78 79 80 81 82 83 84 85 86 87 88 89 90 91 92 93 94 95 96 97 98 99 100 101 102 103 104 105 106 107 108 109 110 111 112 113 114 115 116 117 118 119 120 121 122 123 124 125 126 |
#!/bin/bash ########################################################################## # Usage ########################################################################## if [ $# -lt 2 ]; then echo "Usage: $0 <source> <destination> [total] [newer] [month_newer] [month_old]" exit 1 fi ########################################################################## # Globals ########################################################################## # set values from mandatory params SRC="$1" DEST="$2" # set default values depending on params TOTAL=${3:-50} RECENT_COUNT=${4:-30} RECENT_MONTHS=${5:-6} OLD_MONTHS=${6:-12} # where cached index and last scan date are stored INDEX_DIR="$HOME" INDEX_FILE="$INDEX_DIR/_index.txt" LASTSCAN="$INDEX_DIR/_last_scan.txt" ########################################################################## # Functions ########################################################################## # Index builder rebuild_index() { echo "Building jpg images index..." echo "" > "$INDEX_FILE" find "$SRC" \ -type d \( \ -path "$SRC/temp" -o \ -path "$SRC/test" -o \ -path "$SRC/archive" \ \) -prune -o \ -type f \( -iname "*.jpg" -o -iname "*.jpeg" -o -iname "*.png" \) -print | while read -r file; do ts=$(stat -c %Y "$file" 2>/dev/null) echo "$ts|$file" >> "$INDEX_FILE" done date +%s > "$LASTSCAN" echo "Index has been rebuilt ("$(wc -l < $INDEX_FILE)" indexed images)." } # copy images with Landscape orientation only copy_with_orientation_check() { local list="$1" local needed="$2" local count=0 while read -r file; do [ -z "$file" ] && continue orientation=$(exiftool -s -s -s -Orientation "$file" 2>/dev/null) if [[ "$orientation" == *"Horizontal"* ]]; then cp "$file" "$DEST/" count=$((count + 1)) fi [ $count -ge $needed ] && break done <<< "$list" } ########################################################################## # Main logic ########################################################################## # Check wether index need to be rebuilt (new file detected or no index file) needs_rebuild=0 if [ ! -f "$INDEX_FILE" ] || [ ! -f "$LASTSCAN" ]; then needs_rebuild=1 else last_scan_ts=$(cat "$LASTSCAN") last_scan_date=$(date -d @"$last_scan_ts" +"%Y-%m-%d %H:%M:%S") # search at least one file newer than the latest scan date new_files=$(find "$SRC" -type f -newermt "$last_scan_date" -print -quit 2>/dev/null) if [ -n "$new_files" ]; then needs_rebuild=1 fi fi if [ $needs_rebuild -eq 1 ]; then echo "Index has to be (re)built" rebuild_index else echo "Index not updated - no new images detected" fi # Photos selection now=$(date +%s) recent_cutoff=$((now - RECENT_MONTHS*30*24*3600)) old_cutoff=$((now - OLD_MONTHS*30*24*3600)) mapfile -t recent_list < <(awk -F'|' -v rc="$recent_cutoff" '$1 >= rc {print $2}' "$INDEX_FILE") mapfile -t old_list < <(awk -F'|' -v oc="$old_cutoff" '$1 <= oc {print $2}' "$INDEX_FILE") # creating random images list recent_candidates=$(printf "%s\n" "${recent_list[@]}" | shuf -n "$RECENT_COUNT" 2>/dev/null) old_needed=$((TOTAL - RECENT_COUNT)) old_candidates=$(printf "%s\n" "${old_list[@]}" | shuf -n "$old_needed" 2>/dev/null) # clean-up the destination before copy new images rm -f "$DEST"/* #echo "copie newer images..." copy_with_orientation_check "$recent_candidates" "$RECENT_COUNT" #echo "copy old images..." copy_with_orientation_check "$old_candidates" "$old_needed" echo "Done. Number of copied photos : $(ls "$DEST" | wc -l)" |
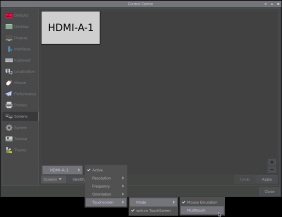
The script is triggered via cron ( crontab -e ), along with scheduled display power on/off during night hours to save energy. I also restart Firefox every day at 05:30, as HabPanel tends to freeze after several hours.
|
1 2 3 4 5 |
30 5 * * * killall firefox; XDG_RUNTIME_DIR=/run/user/1000 WAYLAND_DISPLAY="wayland-0" firefox --kiosk "http://openhab.local.lan/habpanel/index.html#/view/test" & 00 5 * * 6 /usr/local/bin/sync_photos.sh /mnt/photos /home/tablet/Pictures 70 45 6 12 00 1 * * * WAYLAND_DISPLAY="wayland-0" wlr-randr --output HDMI-A-1 --off 30 6 * * 1,5 WAYLAND_DISPLAY="wayland-0" wlr-randr --output HDMI-A-1 --on 30 9 * * 6,7 WAYLAND_DISPLAY="wayland-0" wlr-randr --output HDMI-A-1 --on |
To display photos, I installed imv ( apt get install -y imv ).Together with swayidle, the slideshow starts automatically after 30 seconds of inactivity. Example:
|
1 |
swayidle timeout 30 'imv-wayland -f -s full -t 10 /home/tablet/Pictures/*' resume 'killall imv-wayland' |
Autostart everything at boot
To make the tablet fully autonomous, both Firefox (in kiosk mode) and the idle photo slideshow must start automatically at boot. This is handled through standard XDG autostart entries.
I created two .desktop files in /etc/xdg/autostart/ :
firefox-kiosk.desktop:
|
1 2 3 4 5 6 |
[Desktop Entry] Name=Firefox kiosk Comment=launch Firefox in kiosk mode with habpanel Exec=firefox --kiosk "http://openhab.local.lan/habpanel/index.html#/view/test" Terminal=false Type=Application |
idle-slideshow.desktop
|
1 2 3 4 5 6 |
[Desktop Entry] Name=Idle-slideshow Comment=Display photos from user Pictures directory when idle Exec=swayidle timeout 30 'imv-wayland -f -s full -t 10 $HOME/Pictures/*' resume 'killall imv-wayland' Terminal=false Type=Application |